3
GB
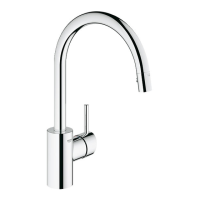
Application
Can be used in conjunction with:
•
Pressurised storage heaters
•
Thermally controlled instantaneous heaters
•
Hydraulically controlled instantaneous heaters
Operation with low-pressure displacement water
heaters is
not
possible.
Specifications
•
Flow pressure
- min. 0.5 bar
- recommended 1 - 5 bar
•
Operating pressure max. 10 bar
•
Test pressure 16 bar
If static pressure is greater than 5 bar, fit pressure
reducer.
Avoid major pressure differences between hot and
cold water supply.
•
Flow rate at 3 bar flow pressure:
- shower spray approx. 11 l/min
- aerator approx. 13.5 l/min
- dishwasher connection approx. 16 l/min
•
Temperature
Hot water inlet (maximum): 80
°
C
Recommended (energy saving): 60
°
C
•
Water connection hot - left
cold - right
•
Max. clamping length 60mm
Note:
All
Grohe
single-hole mixers with pull-out spouts are
equiped with non-return valves.
Installation
Flush pipes thoroughly.
Prepare sink
Refer to the dimensional drawing on fold-out page I.
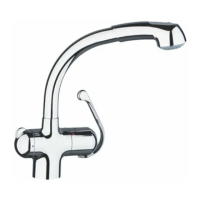
Install sink mixer,
see fold-out page II, Fig. [1].
To do this, proceed as follows:
1.Fit O-ring (A).
2.Insert mixer into sink.
This will require leading through the pressure hoses
one at a time (first the pressure hose with 3/4"
union).
3.Fit support plate (B), if necessary, with washer (C)
and connect nut (D) with tube (E).
To do this, insert fitting key (G) into tube (E) and turn
fitting key clockwise to fasten mixer.
(Tube may also have to be turned with an 22mm
open-ended spanner.)
Note:
If there is no need to fit support plate (B), clamping
length may be increased by 15mm.
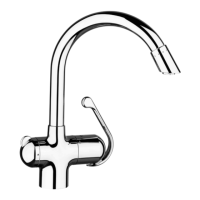
The following lever positions can also be obtained,
see Fig. [2].
Connect sink mixer,
see Figs. [1] and [3].
- Hot-water connection
(marked red) = left
- Cold-water connection
(marked blue) = right
- Dishwasher connection = 3/4" pressure hose
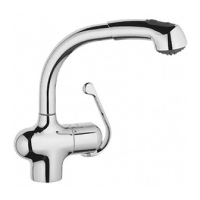
Connect spray hose (H),
see Figs. [4] to [7].
To do this, proceed as follows:
1.Fit spray hose (H) through spout (J), see Fig. [4].
2.Fit spray hose (H) from above through mixer body
and fit spout (J) so that it snaps into place, see
Fig. [5].
3.Connect handspray (K) to spray hose (H) without
using any additional seals, see Fig. [6].
4.With handspray in position, fit spring (L) onto spray
hose (H) from below.
5.Screw snap coupling (M) with O-ring (M1) onto
spray hose (H).
6.Push the sleeve (M2) of the snap coupling (M)
downwards and fit the snap coupling to the coupling
nipple (N).
To ensure that the handspray (K) is correctly seated
when inserted, lug (J1) on the outlet must engage in
recess on the handspray (K1), see Fig. [7].
Open service valves.
Check unions for leaks.
I954561.b : I95456GB.FM Page 3 Friday, April 24, 1998 1:17 PM