ENGLISH
14
Setting up the device
The speaker for the device is located at the bottom of
the device.
To optimise the sound, mount the device holder on the
bottom of the device.
UP MODE
DOWN TIMER
VOL.
MEMO
SET
ON OFF
1 2
543
6 7
8 9 10
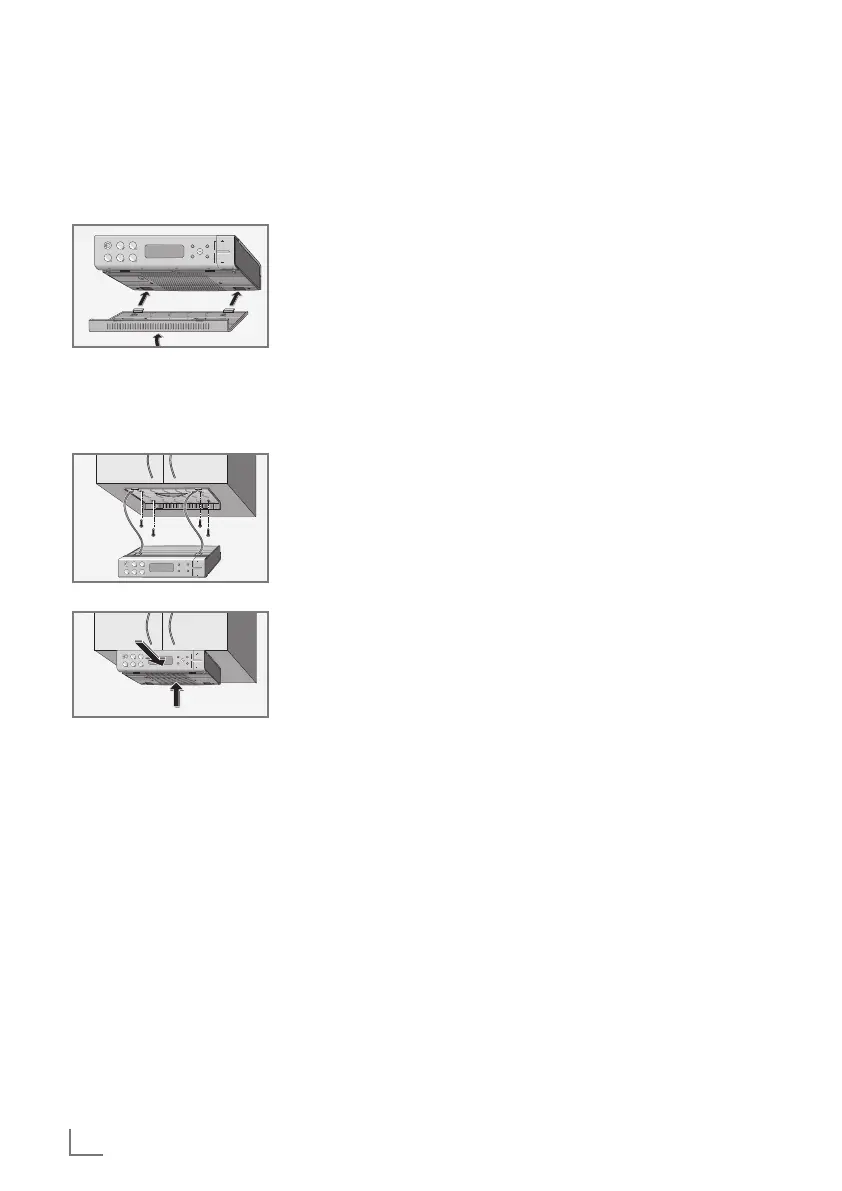
1 Click the device
holder in place in
the recesses on the
bottom of the
device.
Mounting the device under the counter
The fixing screws can be found in the side compart-
ment of the packing.
ONOFF
1 2
543
6 7
8 9 10
UP MODE
DOWN TIMER
VOL.
1 Mark the locations
for four mounting
screws.
2 Screw the device
holder on with four
screws.
UP MODE
DOWN TIMER
VOL.
MEMO
SET
ONOFF
1 2
543
6 7
8 9 10
3 Insert the device in
the holder.
Note:
7
To remove the device, press the snap-catch at
the back and remove by pulling forward.
Setting radio stations
There are 10 channel positions available for radio sta-
tions.
1 Switch on the device with »ON/OFF«.
2 Begin station search by pressing and holding down
»UP« or »DOWN«.
– The search stops, as soon as a radio station with a
sufficiently strong signal is found.
– If RDS information is transmitted by the station cur-
rently set, »f« appears in the display and after a
short time the station name appears in place of
the frequency.
INSTALLATION AND SETTINGS ________________
Note:
7
You can also set the frequency step-by-step
(50 kHz) by briefly pressing »UP« or »DOWN«.
Only 100 kHz steps are shown in the display.
3 Save radio station by pressing »MEMORY«
(»P -« flashes in the display ), select the desired chan-
nel position within 8 seconds with »1 … 10« and
confirm with »MEMO SET«.
– »1 … 10« press once for channel positions
1 … 5, twice for channel positions 6 … 10.
– Display: the channel position is shown briefly, and
then the frequency.
4 To set further radio stations, repeat this procedure
starting at pt. 2.
Note:
7
If no channel position is selected within 8 sec-
onds, the device interrupts the setting procedure.
Start again at pt. 3.
Setting the time automatically
1 Select a channel position with an RDS station to au-
tomatically set the time.
– The display »¥« flashes, the current time is set by
the RDS time signal. This process may last a few min-
utes.
– If an RDS time signal was received, the indicator
»¥« is illuminated.
Note:
7
If the time is not automatically set, select another
channel position with an RDS station by pressing
»1 … 10«, »¥« flashes in the display.
7
If your device cannot automatically set the time,
you can enter the time manually.
Setting the time manually
1 Switch off device with »ON/OFF«.
– In the display, »12:00« flashes.
2 Press »MEMO SET« and hold down.
3 Set the time with »UP« or »DOWN«.
– When »UP« or »DOWN« are held down, the
time can be set more quickly.
4 Release »MEMO SET«.



 To Next Page