EN 16
Oven care and cleaning
Replacing the oven lamp
H2O CAVITY CLEAN
This function performs a cleaning cycle by in-
jecting steam into the cavity for 15 minutes.
At the end of the cycle, any crusting that may
have formed due to high-temperature cooking
inside the oven cavity, will be softened and be
-
come much easier to remove.
H20 CIRCUIT CLEAN
This function performs a cleaning cycle of the
circuit, to keep it clean and ecient over time.
WATER DISCHARGE
At the end of each steam cooking and after all
the cleaning processes, it is recommended to
discharge residual water.
By pressing the On/O button, before going to
stand by mode, follow the instructions on the
screen to proceed with the water discharge.
1. Remove the tank until signed area
2. Wait for discharge
3. Empty the tank
IMPORTANT: The oven lamp must have pre
-
cise characteristics:
• Structure suitable for high temperatures
(up to 300 °C);
• Power supply: see the V/Hz value on the se
-
rial number plate;
• Power 25 W;
• Type G9 connector.
ATTENTION: Make sure the appliance is o
before replacing the lamp to avoid the possibil
-
ity of electric shock.
• To avoid damage, spread a tea towel for
pots and pans inside the oven;
• Remove the screws holding the steel frame;
• Remove the old lamp by sliding it out of its
seat and taking care not to break it;
• Insert the new bulb taking care not to touch
it with your hands (we recommend using a
disposable latex glove);
• Replace the stainless steel frame taking
care not to pinch the silicone gasket seal;
• Screw in the stainless steel screws you pre
-
viously removed;
• Connect the appliance to the power line.
For the installer
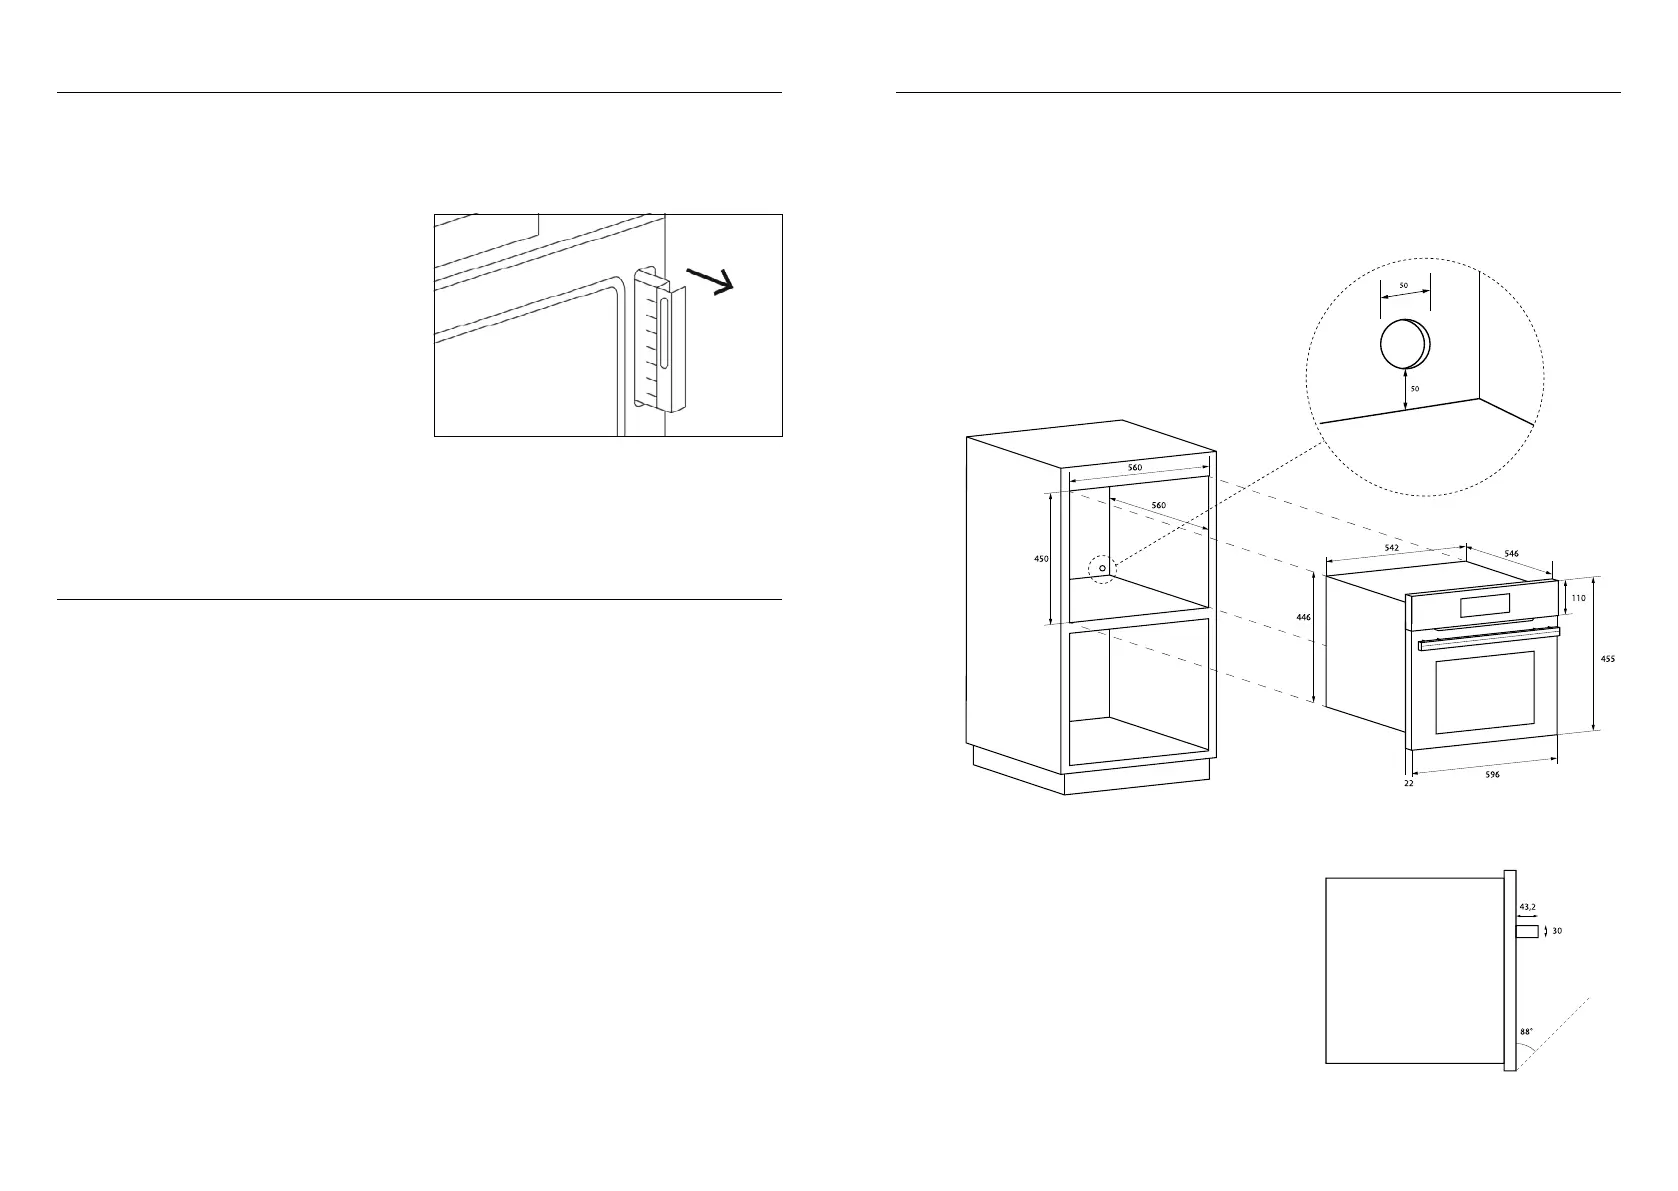
INSTALL THE OVEN IN THE COUNTER
• The oven must be installed under a cook
top, in a column, or combined with the rel
-
ative food-warmer drawer.
• The dimensions of the space must be those
shown in gure.
• The cabinet material must be able to with
-
stand the heat.
• The oven must be centred within the walls
of the cabinet and xed with the screws and
bushings that are provided.
EN 17
Oven care and cleaning
Replacing the oven lamp
H2O CAVITY CLEAN
This function performs a cleaning cycle by in-
jecting steam into the cavity for 15 minutes.
At the end of the cycle, any crusting that may
have formed due to high-temperature cooking
inside the oven cavity, will be softened and be
-
come much easier to remove.
H20 CIRCUIT CLEAN
This function performs a cleaning cycle of the
circuit, to keep it clean and ecient over time.
WATER DISCHARGE
At the end of each steam cooking and after all
the cleaning processes, it is recommended to
discharge residual water.
By pressing the On/O button, before going to
stand by mode, follow the instructions on the
screen to proceed with the water discharge.
1. Remove the tank until signed area
2. Wait for discharge
3. Empty the tank
IMPORTANT: The oven lamp must have pre
-
cise characteristics:
• Structure suitable for high temperatures
(up to 300 °C);
• Power supply: see the V/Hz value on the se
-
rial number plate;
• Power 25 W;
• Type G9 connector.
ATTENTION: Make sure the appliance is o
before replacing the lamp to avoid the possibil
-
ity of electric shock.
• To avoid damage, spread a tea towel for
pots and pans inside the oven;
• Remove the screws holding the steel frame;
• Remove the old lamp by sliding it out of its
seat and taking care not to break it;
• Insert the new bulb taking care not to touch
it with your hands (we recommend using a
disposable latex glove);
• Replace the stainless steel frame taking
care not to pinch the silicone gasket seal;
• Screw in the stainless steel screws you pre
-
viously removed;
• Connect the appliance to the power line.
For the installer
INSTALL THE OVEN IN THE COUNTER
• The oven must be installed under a cook
top, in a column, or combined with the rel
-
ative food-warmer drawer.
• The dimensions of the space must be those
shown in gure.
• The cabinet material must be able to with
-
stand the heat.
• The oven must be centred within the walls
of the cabinet and xed with the screws and
bushings that are provided.
 Loading...