This document is an operation manual for a split-type room air conditioner, covering models HSM09HS03/R2(DB), HSM12HS03/R2(DB), and 2HUM18H03/R2(DB).
Function Description
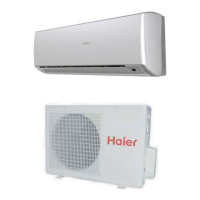
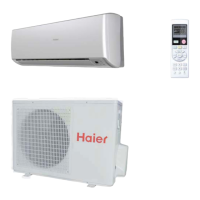
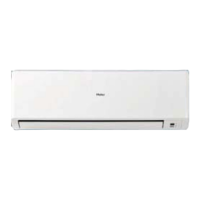
The device is a split-type room air conditioner designed for cooling, heating, dry, and fan-only operations, with additional features like health anion function, sleep mode, and timer functions. It consists of an indoor unit and an outdoor unit. The indoor unit features a display board with indicator lights for "OPERATE," "COOL," "DRY," "HEAT," "TIMER," and "HEALTH" modes, an anion generator, vertical and horizontal flaps for airflow direction adjustment, and an air filter. The outdoor unit includes an outlet, inlet, connecting piping and electrical wiring, and a drain hose.
Important Technical Specifications
The air conditioner operates within specific ambient temperature ranges:
- Cooling:
- Indoor: Maximum D.B/W.B 32°C/23°C, Minimum D.B/W.B 18°C/14°C
- Outdoor: Maximum D.B/W.B 43°C/26°C, Minimum D.B 18°C
- Heating:
- Indoor: Maximum D.B 27°C, Minimum D.B 15°C
- Outdoor: Maximum D.B/W.B 24°C/18°C, Minimum D.B/W.B -15°C
The refrigerating circuit is leak-proof. The fuse for the indoor unit's PC board is T.3.15A/250V, and for the outdoor unit, it's T.25A/250V. The power plug and connecting cable must meet local attestations.
Usage Features
The air conditioner is controlled via a remote controller with various buttons and displays:
- ON/OFF Button: Starts and stops the unit.
- MODE Button: Cycles through operation modes: AUTO, COOL, DRY, HEAT, FAN.
- TEMP Button (▲/▼): Adjusts the desired temperature. Each press increases/decreases by 1°C; holding the button changes rapidly.
- FAN Button: Selects fan speed: LOW, MED, HI, AUTO. In AUTO mode, the fan speed adjusts based on room temperature.
- HEALTH Button: Activates/deactivates the health anion function. When active, the anion generator releases anions to balance air quality, kill bacteria, and speed up dust sediment. This function is available under any mode when the indoor fan motor is running.
- SWING UP/DOWN Button: Adjusts the vertical air sending direction.
- SWING LEFT/RIGHT Button: Adjusts the horizontal air sending direction.
- SLEEP Button: Activates sleep mode. In COOL/DRY mode, the temperature increases by 1°C after 1 hour, then another 1°C after another hour, running for 6 hours. In HEAT mode, the temperature decreases by 2°C after 1 hour, then another 2°C after another hour, then increases by 1°C after 3 hours, running for 3 hours. In AUTO mode, it adapts to the selected operation mode. Sleep mode is not available in FAN mode. Wind speed may be adjusted to low during sleep mode.
- TIMER Button: Sets TIMER ON, TIMER OFF, or TIMER ON-OFF. The time can be adjusted within 24 hours using the HOUR button.
- CLOCK Button: Sets the current time.
- POWER/SOFT Button:
- POWER Operation: For rapid heating or cooling. In HEAT or COOL mode, fan speed automatically runs in HI for 15 minutes, then returns to original settings.
- SOFT Operation: For quiet operation. Fan speed automatically sets to LOW.
- FRESH Button: Activates the fresh air function (if available on the model).
- LIGHT Button: Controls the indoor LCD display board's lighting.
- LOCK Button: Locks all other buttons and the LCD display. Pressing again unlocks.
- RESET Button: Resets the remote controller if it appears abnormal.
- CODE Button: Selects CODE A or B (specific use not explained).
Airflow Direction Adjustment:
The vertical flap and horizontal louvers can be adjusted to various positions. The remote controller displays the current air sending direction. The unit memorizes the previous swing position upon restart.
Emergency Operation:
If the remote controller is defective or lost, an emergency switch on the indoor unit can be used. Pressing it once starts operation with a "Pi" sound. The system automatically selects COOL (above 21°C) or HEAT (below 21°C) mode, both at 24°C, with AUTO fan speed. Dry mode is not available.
Test Operation:
The emergency switch can also be used for test operation when the room temperature is below 16°C. Press and hold for more than 5 seconds until two "Pi" sounds are heard. Cooling operation starts with "Hi" fan speed and ends automatically after 30 minutes.
Maintenance Features
General Maintenance:
- Remote Controller: Wipe with a dry cloth. Do not use water, glass cleaner, or chemical cloth.
- Indoor Body: Wipe with a soft, dry cloth. For serious stains, use a neutral detergent diluted with water, wring out the cloth, and wipe thoroughly.
- Cleaning Restrictions: Do not use gasoline, benzine, thinner, or cleanser as they may damage the coating. Avoid hot water over 40°C (104°F) to prevent discoloring or deformation.
Air Filter Cleaning:
- Open the inlet grille by pulling it upward.
- Remove the filter by pushing up its center tab and pulling it downward.
- Clean the filter using a vacuum cleaner or by washing with water. Dry completely in the shade.
- Attach the filter correctly, ensuring the "FRONT" indication faces forward and it's fixed behind the stopper.
- Close the inlet grille.
It is recommended to clean the air filter once every two weeks.
Air Purifying Filter Replacement:
- Open the inlet grille.
- Detach the standard air filter.
- Attach the old air purifying filter appliances into the right and left filter frames.
- Attach the standard air filter (necessary installation). The green side of the bacteria-killing medium air purifying filter should face outside, and the white side towards the machine.
- Close the inlet grille.
The bacteria-killing medium air purifying filter does not need frequent changing but should be vacuumed regularly to remove dust, as washing is strictly prohibited.
Seasonal Maintenance (After Season):
- Operate in cooling mode for 2-3 hours at the designated temperature or 30°C with high fan speed to prevent mold and bad smells.
- Unplug the power supply cord.
- Clean the body.
- Remove batteries from the wireless remote controller.
Seasonal Maintenance (Before High Season):
- Clean the standard air filter, ensuring both right and left filters are attached.
- Ensure the earthing cable is connected properly to avoid electric shock.
- Do not block the air inlet or outlet of the unit.
- Plug in the unit, ensuring dust is brushed away from the plug and it's fully inserted into the outlet. If using an exclusive circuit breaker, switch it on. Avoid handling with wet hands.