3
Warning –Batteries
•Remove the batteries from products that arenot being used
for an extended period (unless these arebeing kept ready for
an emergency).
•Donot short-circuit batteries.
•Donot charge batteries.
•Donot throw batteries in a re.
•Keep batteries out of the reach of children.
•Never open, damage or swallow batteries or allow
them to enter the environment. They can contain toxic,
environmentally harmful heavy metals.
•Avoid storing, charging or using the device in extreme
temperatures and extremely low atmospheric pressure(for
example, at high altitudes).
4.
Getting Started
Warning
•Connect the product only to asocket that has been approved
for the device. The socket must be installed close to the
product and must be easily accessible.
•Disconnect the product from the network using the power
button –ifthis is not available, unplug the power cordfrom
the socket.
•When using amulti-socket power strip, make surethat the
sum power draw of all the connected devices does not exceed
its maximum throughput rating.
•Ifyou will not be using the product for along period of time,
disconnect it from mains power.
4.1. Inserting the batteries /connecting the power supply
•Connect the power supply unit to the power supply unit
connection socket (20) on the back of the radio-controlled
alarm clock.
•Connect the power cable of the radio-controlled alarm clock to a
properly installed socket.
•The radio-controlled alarm clock switches on automatically.
•Alternatively,open the battery compartment (21), insert two
AAA batteries with the correct polarity and close the battery
compartment cover.
Note
•Ifthe batteries areinserted correctly and you connect the
power supply unit to the alarm clock, the radio-controlled
alarm clock will automatically switch to the external power
supply.
•Sustained projection is only possible on mains power
4.2. Replacing the batteries
•Open the battery compartment (21) on the back of the product.
•Remove and dispose of any used batteries. Insert two new
batteries (AAA). Ensurethat the polarity of the battery
corresponds to the symbols in the battery compartment.
•Close the battery compartment (21).
5. Operation
Note
Hold down the UP button (14) or the DOWN button (15) to
select values faster.
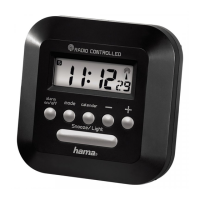
5.1. Setting date/time automatically using the DCF signal
•Once you have inserted the batteries or connected the power
supply unit, the display is switched on, an acoustic signal sounds
and the alarm clock automatically starts searching for aDCF
radio signal. During the search, the radio symbol (3) ashes. This
process can take around 7minutes.
•When the radio signal is received, the date and time are
automatically set.
Display
Searching for the DCF
signal
Display ashing
Active
Display steady (not ashing)
Successful –signal is
being received
Not displayed Inactive
Weak signal reception
If the station still does not receive asignal, press and hold the
WAVE button (16) for approx. 3seconds to start the manual search
for the DCF signal. The radio icon (3) starts to ash.