6
Warning -rechargeable battery
• Only use suitable charging devices orUSB ports to charge the
product.
• Do not use defective chargers or USBportsand do notattempt
torepair them.
• Do not overcharge the product or allow the battery to
completely discharge.
• Avoid storing, charging and using in extreme temperatures
and at extremely low atmospheric pressures (suchasathigh
altitudes).
• When stored over along period of time, batteries should be
charged regularly (at least every three months).
Warning -magnets
• This product generates magnetic elds. Individuals with
cardiac pacemakers should consult adoctor beforeusing this
product as it may affect the pacemaker's proper function.
• Do not storebank or similar cards with magnetic strips near
the charging case or earphones. Thedataonthe cards could
be damaged or completely deleted.
Warning -high volume
• High sound pressure!
• Thereisarisk of hearing damage.
• To prevent any loss of hearing, avoidlistening at loud volumes
for prolonged periods.
• Always keep the volume at areasonable level. Loud volumes
can damage hearing –evenover short periods.
• Using this product limits your perception of ambient
noise. Forthis reason, do not operate any
vehicles or machines while using this product.
6. Installation and commissioning
6.1 Transmitter installation
Warning
• Only operate the product from an approved socketthat is
connected to the public power supply.The socket must be
installed close to the productand must be easily accessible.
• Disconnect the productfromthe power supply using the On/
Off switch –ifthis is not available, unplug the power cord
from the socket.
• If using amulti-socket power strip, make surethat the total
power consumption of allconnected devices does notexceed
the socket strip's maximum throughput rating.
• If you willnot be using the product for aprolonged period,
disconnect it from mains power.
• Connect the 2.4 GHz station to asuitable power source using
the power supply unit supplied.
• Now connect the audio output of your TV to the jack socket of
the station using the audio cable supplied. Alternatively,you
can connect the station to the opticaloutput of the TV using an
optical cable (not included in the extent of delivery).
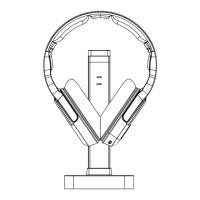
6.2Receiver installation
• Charge the headphones fully beforeusing themfor the rst time.
LED lights up red.
• Switch the headphones on (7). LED ashes cyan.
• Theheadphones automatically recognise the 2.4 GHzsignal and
the LED lights up blue.
• Alternatively,the headphones can be operated via BT.If
theheadphones do not receive asignal from the2.4 GHz
transmitter, they automatically switch to BT reception.Select
"hama TV-headphones Station"inyour playback source. After
successful pairing, the LED lights up green.
Note: Powersupply unit
• The suppliedpower supply unit is not suitable for the
headphones. To charge them, place the headphones on
thecharging station. Alternatively,the headphones can be
charged via asuitable USB-C cable (not included in theextent
of delivery).
6.3 Switching on/off
ON: Press the On/Off button (7) for approx. 2seconds, the
announcement“Power On” sounds.
OFF: To switch off,press the On/Off button (7) for approx. 3
seconds, the announcement “Power OFF” sounds.
Note –Automatic switch-off of the headphones
Theheadphones areequipped withanautomatic switch-off
mechanism. If there is no connection to your device within 3
minutes, they switch off automatically.
7.Charging
Fullycharge the headphones once beforeusing them for the rst
time.
7.1 Switch offthe headphones and connectthem
• Ensurethat the headphones areswitched off beforecharging
them.
• Hang the headphones on the chargingstation.
• Alternatively,connect aUSB chargingcable (not included in the
extent of delivery) to thecharging socket (2). Connect the free
plug on the USB-C charging cable to asuitable USB charger.To
do this, consult the operatinginstructions for theUSB charger
you areusing.
7.2 Charging process for the headphones
The LED (9)lights up solid redduring the chargingprocess.
Once the chargingprocess is complete, the LED (9) goes out.
It can take up to 2.5 hours for the battery to be fully charged.
 Loading...