Do you have a question about the HAMPTON BAY HB ACACIA BUTCHER BLOCK 1007 508 205 and is the answer not in the manual?
| Brand | HAMPTON BAY |
|---|---|
| Model | HB ACACIA BUTCHER BLOCK 1007 508 205 |
| Category | Indoor Furnishing |
| Language | English |
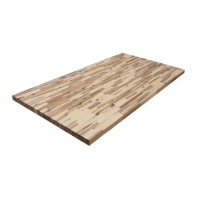
Ensure the countertop is installed and finished before use. Follow manual instructions to keep warranty valid.
Allow wood to move (expand/contract) using flexible adhesives, sealants, and proper gaps.
Lists necessary tools for installation, including safety goggles, gloves, tape measure, level, sandpaper, drill, screws, caulk gun, sander, and saws.
Provide expansion gaps between countertop and wall for wood movement. Use backsplash for protection.
Ensure distance from cutouts to ends is >4 in. Support overhangs >8 in. Maintain 1.5 in. from heat sources.
Avoid installing over heaters. Use insulation under countertop for appliances to protect from heat/moisture.
Mount to cabinet frame or drill oversized holes. Use washers and screws, withdrawing screw a quarter turn.
Suggests butt joints for stability and miter joints for 45-degree transitions.
Details miter bolts, biscuit/mortise and tenon joints, pocket bore fixtures, and temporary clamp blocks for joining.
Use a fine-tooth blade with tape on the cut line to minimize chipping. Clamp a straight edge as a guide.
Mark with tape, drill pilot holes. Cut two edges first, then brace the cutout section.
Use oil or oil-wax for finishing. Re-oil every 3-6 months. Other methods like polyurethane are allowed.
Remove spills promptly, use mats for hot dishes, clean with soft cloth. Includes dent removal process by sanding and steaming.
Details requirements for food safe chopping and contact, and suitability of different wood grains.