EasyManua.ls Logo

HAMPTON BAY L08557 - User Manual

HAMPTON BAY L08557
5 pages
Print Icon
To Next Page IconTo Next Page
Loading...
Item #1006 695 203
Model #L08557
Use and Care Guide
PACKAGE CONTENTS
Assembly and Installation
1
Attaching and installing the light
2
Connecting the wires
WARNING: The wire connector (C) contacts have sharp edges for piercing the
main low-voltage cable. To avoid injury, do not touch the metal contacts.
CAUTION: The wire from the low-voltage power unit shall be 12-18 AWG type
underground low energy circuit cable or SPT2W.
IMPORTANT:
building structure such as a house or deck.
The landscape wire and connector can also be hidden under stone or buried
under grass at a maximum depth of 6 in. (15.24 cm).
WARNING: Risk of Electric Shock. Install all luminaires 10 ft. (3.05 m) or more
from a pool, spa or fountain.
Only for use with low voltage power units with a maximum output rating of 12V,
300W per secondary.
FOR LANDSCAPE LIGHTING SYSTEMS ONLY. OUTDOOR USE ONLY. THE DEVICE IS
ACCEPTED AS A COMPONENT OF A LANDSCAPE LIGHTING SYSTEM WHERE THE
SUITABILITY OF THE COMBINATION SHALL BE DETERMINED BY CSA OR LOCAL
INSPECTION AUTHORITIES HAVING JURISDICTIO
N.
ETL LISTED UNDER MODEL # L08557.
Please read and save these instructions.
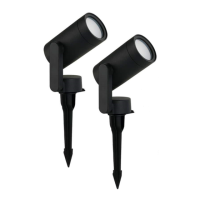
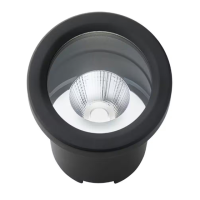
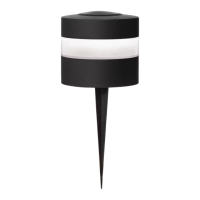
Part Description Quantity
A
Light
3
B 3
C 3
Connector
Spike
Attach spike (B) and light (A) together by turning them
Carefully remove the fixture from its protective packaging.
WARNING: Never push the fixture into the ground by the light (A) or use a
hammer to insert the spike (B) into the ground.
anti clockwise.
CAUTION: Safe for outdoor operation.
WARNING
or bulb protector.
WARNING: Install in accordance with all local codes and ordinances.
INSTRUCTIONS PERTAINING TO A RISK OF FIRE, OR INJURY TO PERSONS
IMPORTANT SAFETY INSTRUCTIONS.
A
B
C
Press the top half of the connector into the bottom half until it clicks
into place and is secure. This will pierce the low voltage wire and
connect the light to the transformer.
Align the low-voltage wire and fit it into the connector bottom
half as shown below.
Test the connection by plugging in the transformer to see if the light
turns on. If it does, unplug the transformer and continue the install-
ation. If it does not, unplug the transformer and check the connec-
tion between the transformer and low-voltage wire, reinstall the
connector, and ensure power is available to the outlet you are using.
Once the connection is secure, repeat the process for the remaining
lights.
Once all lights are connected, it is recommended to wrap each con-
nector with electrical tape for additional p
rotection.
After all xtures are installed, turn on the transformer by plugging it
into an outlet.
Note: If you want to install this with your existing low-voltage lighting
system, skip step 4 and instead plug the lights into your existing
1
- 1 -
8AWG to 12AWG SPT-2W wiring.
Caution Be careful ! The wire stabs are very sharp !
RGBW LED SPOT LIGHT
A
B
C

Questions and Answers

Summary

Assembly and Installation

Attaching and Installing the Light

Attaches the spike (B) to the light (A) by turning them anti-clockwise.

Connecting the Wires

Pierces the low-voltage wire with the connector to establish a secure connection.

Control via Bluetooth and Wi-Fi

Download and Set Up Hubspace App

Download the Hubspace app, enable Bluetooth/Wi-Fi, and register or log in to your account.

Select and Pair LED Spot Light

Add the light via QR code or manual entry, name it, assign a room, and connect to power.

Care and Cleaning

Troubleshooting

Addresses common issues like fixture not lighting, breaker trips, flickering, or Bluetooth connection failures.

Product Warranty Information

Cable Selection Guide

Overview

This document provides a comprehensive guide for the installation, operation, and maintenance of the RGBW LED Spot Light, Model #L08557. Designed for outdoor use in landscape lighting systems, this device offers versatile illumination and smart control capabilities.

Function Description

The RGBW LED Spot Light is a low-voltage outdoor lighting fixture designed to enhance landscapes with customizable illumination. It features RGBW (Red, Green, Blue, White) LEDs, allowing users to select from a wide spectrum of colors and various shades of white light. This versatility makes it suitable for accentuating architectural features, highlighting garden elements, or creating dynamic lighting scenes. The spot light is intended for use with low-voltage power units, specifically those with a maximum output rating of 12V and 300W per secondary. It is ETL listed under Model #L08557, ensuring it meets safety and performance standards for landscape lighting systems. The device is accepted as a component of a landscape lighting system, with the suitability of the combination determined by CSA or local inspection authorities.

A key feature of this spot light is its smart control capability, integrating with the Hubspace app via Bluetooth® wireless technology and Wi-Fi® network. This allows users to remotely control the light's functions, including color selection, brightness adjustment, and scheduling, directly from their mobile devices. The app-based control provides a convenient and flexible way to manage multiple lights and create personalized lighting environments.

Usage Features

The installation process for the RGBW LED Spot Light is designed to be straightforward, though it requires careful attention to safety instructions. The package includes the light fixture, a spike for ground installation, and wire connectors.

Attaching and Installing the Light:

  1. Unpacking: Carefully remove the fixture from its protective packaging.
  2. Assembly: Attach the spike (B) to the light (A) by turning them anti-clockwise until secure.
  3. Ground Installation: The spike is designed to be inserted into the ground. WARNING: Never push the fixture into the ground by the light (A) itself, and do not use a hammer to insert the spike (B) into the ground, as this can damage the fixture.

Connecting the Wires:

  1. Wire Compatibility: The low-voltage power unit wire should be 12-18AWG type underground low energy circuit cable or SPT2W.
  2. Connector Use: Align the low-voltage wire and fit it into the bottom half of the provided connector (C). Press the top half of the connector into the bottom half until it clicks into place and is secure. This action will pierce the low-voltage wire and connect the light to the transformer. WARNING: The wire connector (C) contacts have sharp edges for piercing the main low-voltage cable. To avoid injury, do not touch the metal contacts.
  3. Testing Connection: After connecting, plug in the transformer to an outlet to test if the light turns on. If it does not, unplug the transformer, check the connection between the transformer and low-voltage wire, reinstall the connector, and ensure power is available to the outlet.
  4. Securing Connections: Once the connection is secure, repeat the process for any remaining lights. It is recommended to wrap each connector with electrical tape for additional protection after all lights are connected.
  5. Powering On: Turn on the transformer by plugging it into an outlet.
  6. Existing Systems: If integrating with an existing low-voltage lighting system, users can skip the transformer connection step and plug the lights directly into their existing 18AWG to 12AWG SPT-2W wiring.

Important Safety Considerations for Wiring:

  • Outdoor Operation: The device is safe for outdoor operation.
  • Damaged Components: Do not operate the luminaire fitting with a missing or damaged lens or bulb protector.
  • Local Codes: Install in accordance with all local codes and ordinances.
  • Electrical Shock Risk: Install all luminaires 10 ft. (3.05 m) or more from a pool, spa, or fountain.
  • Wire Protection: Protect the wiring by routing it in close proximity to the light fitting or next to a building structure such as a house or deck. The landscape wire and connector can be hidden under stone or buried under grass at a maximum depth of 6 in. (15.24 cm). Do not submerge the fixture in water.

Controlling the Light with Bluetooth® Wireless Technology and Wi-Fi® Network:

  1. Download Hubspace App: Download the Hubspace app from the device's App Store or Google Play Store.
  2. Enable Connectivity: Turn on Bluetooth® and Wi-Fi® functions on the smart device to ensure a stable Wi-Fi® signal.
  3. Open Hubspace App: Open the app and register or log in.
  4. Pairing the Light:
    • In the Hubspace app, tap the plus sign "+" in the upper right corner.
    • Scan the product's QR code or enter the code manually.
    • Name the LED spot light (e.g., "Spotlight") and assign it to a room.
    • Connect the device to power and follow the on-screen instructions.
    • Discovery Mode (for lighting and fan products only): If the QR code is inaccessible, switch the device off and on 5 times. The light will pulse to indicate it's in discovery mode. Then, use the app's "+" sign to discover devices. This method can add multiple devices at once.

Troubleshooting Common Issues:

The manual provides a detailed troubleshooting guide for various issues, including:

  • Light not turning on: Check power supply, circuit breaker, wire connections, and switch.
  • Fuse blows/circuit breaker trips: Inspect wire connections for crosses or grounding out.
  • Light flickers/buzzes: Verify dimmer circuit compatibility and adjust dimming range.
  • Bluetooth spotlight not pairing: Ensure Bluetooth is enabled on the smart device, check device range (within 33 ft. or 10 m), confirm "Discoverable" mode, and manually connect if needed. Also, ensure the downlight is powered on and check for interference from Wi-Fi routers or computers.
  • Hubspace device not connecting to Wi-Fi: Check power source, internet connection, 2.4GHz Wi-Fi network range, and ensure the phone is within Bluetooth range if using LTE.
  • QR code issues: If the QR code is lost or damaged, look for it on other stickers or in the device documentation, or enter the numbers manually.
  • Device transfer/reset: Instructions are provided for removing a device from an account and transferring it.
  • Offline device: Check Wi-Fi signal strength and consider moving the router or using mesh Wi-Fi/extenders.
  • App not connecting after QR scan: Turn Bluetooth off and on, then rescan the QR code.
  • Adding multiple products: Each product has a unique QR code, so the same code cannot be used for multiple products.

Cable Selection:

The manual includes detailed tables for cable selection based on total fixture wattage and cable length for both 12-VOLT and 15-VOLT taps. These guidelines help ensure proper voltage delivery and performance. For example, for a 12-VOLT tap with 0-50 feet of cable and 0-60 watts, 16 AWG cable is recommended. For longer runs or higher wattages, thicker cables (lower AWG numbers) are required. The document notes that most LED landscape lighting fixtures can operate with full illumination from 9V down to as little as 6V, allowing for extended length runs beyond the specifications shown. Additional landscape lighting cable can be purchased at a local Home Depot store.

Maintenance Features

Maintaining the RGBW LED Spot Light is simple and primarily involves routine cleaning and addressing any connectivity issues.

Care and Cleaning:

  1. Power Disconnection: Before attempting to clean the fixture, always disconnect the power to the fixture. This is a crucial safety step to prevent electrical shock.
  2. Cleaning Method: Clean the fixture with a soft, dry cloth.
  3. Avoid Harsh Cleaners: Do not use cleaners with chemicals, solvents, or harsh abrasives, as these can damage the fixture's finish or internal components.

Troubleshooting for Connectivity and Performance:

The comprehensive troubleshooting section serves as a maintenance guide for resolving operational issues. By following the suggested solutions for problems like flickering lights, pairing difficulties, or Wi-Fi connectivity issues, users can often restore the device's functionality without professional assistance. This includes checking power sources, verifying connections, adjusting settings in the Hubspace app, and ensuring proper network conditions.

Warranty Information:

The manufacturer provides a five (5) year warranty from the date of purchase, covering defects in materials and workmanship. This warranty applies to the original consumer and products used in normal use and service. If a product is found to be defective, the manufacturer's obligation is limited to repair or replacement at their discretion, provided the product has not been damaged through misuse, abuse, accident, modifications, alterations, neglect, or mishandling.

What is Not Covered by Warranty:

The warranty does not cover products that have been improperly installed, set up, or used not in accordance with the instructions. It also excludes failures resulting from accidents, misuse, abuse, negligence, alteration, faulty installation, or other failures unrelated to material or workmanship. The finish on any portion of the product, such as surface and/or weathering, is not covered as it is considered normal wear and tear. The manufacturer disclaims any implied warranties of fitness for a particular purpose and is not liable for consequential or incidental loss or damage, including labor/expense costs for replacement or repair.

For customer service, users can contact the Customer Service Team at 1-877-592-5233 or visit HOMEDEPOT.COM/HUBSPACE.

HAMPTON BAY L08557 Specifications

General IconGeneral
BrandHampton Bay
ModelL08557
Color/FinishBlack
MaterialMetal
CategoryOutdoor Light
FinishBlack
Light SourceLED
Voltage120V
Color Temperature3000K
DimmableNo
Weather ResistanceWeather Resistant
Mounting TypeWall Mount
Lumens800 lm

Related product manuals