EasyManua.ls Logo

Harbor Freight Tools 40939 User Manual

Harbor Freight Tools 40939
12 pages
To Next Page IconTo Next Page
Page #1 background imageLoading...
Page #1 background image
Visit our website at: http://www.harborfreight.com
Email our technical support at: productsupport@harborfreight.com
Visit our website at: http://www.harborfreight.com
Email our technical support at: productsupport@harborfreight.com
Owners Manual & Safety Instructions
Save This Manual Keep this manual for the safety warnings and precautions, assembly,
operating, inspection, maintenance and cleaning procedures. Write the product’s serial number in the
back of the manual near the assembly diagram (or month and year of purchase if product has no number).
Keep this manual and the receipt in a safe and dry place for future reference. 18e
When unpacking, make sure that the product is intact
and undamaged. If any parts are missing or broken,
please call 1-888-866-5797 as soon as possible.
Copyright
©
2007 by Harbor Freight Tools
®
. All rights reserved.
No portion of this manual or any artwork contained herein may be reproduced in
any shape or form without the express written consent of Harbor Freight Tools.
Diagrams within this manual may not be drawn proportionally. Due to continuing
improvements, actual product may differ slightly from the product described herein.
Tools required for assembly an d se rv ic e may n ot b e in cl uded.
Read this material before using this product.
Failure to do so can result in serious injury.
SAVE THIS MANUAL.
Question and Answer IconNeed help?

Do you have a question about the Harbor Freight Tools 40939 and is the answer not in the manual?

Harbor Freight Tools 40939 Specifications

General IconGeneral
CategoryPower Tool
Arbor Size5/8 in.
No Load Speed11, 000 RPM
Voltage120V
Wheel Diameter4-1/2 in.
Amperage4.3 Amps
Spindle Thread5/8 in.-11 UNC

Summary

Owner's Manual and Safety Instructions

Save This Manual

Keep manual and receipt for future reference. Record serial number inside.

Product Safety Warning

Read this material before using to avoid serious injury.

Specifications and Safety Overview

Machine Specifications

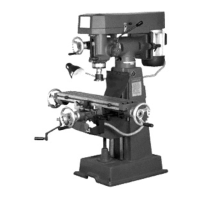
Details electrical, mechanical, and performance specs of the mill.

General Safety Precautions

Operator must supply common sense; read all instructions before operation.

Detailed Safety Guidelines

Work Area and Equipment Safety

Maintain clean area, proper lighting, secure equipment, and avoid hazards.

Personal Safety and Operation

Dress properly, use PPE, stay alert, remove tools, avoid overreaching.

Specific Hazards and Warnings

Operational Hazards

Do not operate under influence; check for damaged parts; use correct parts.

Special Mill Safety Warnings

Electrical safety, ejected material, and entanglement precautions for vertical mill use.

Preparation and Installation

Unpacking and Inspection

Check for intact product and report missing/broken parts immediately.

Installation Site Requirements

Locate on a solid, level floor in a well-lit, ventilated area with 220V service.

Pre-Lubrication Procedures

Clean machine with solvent and lubricate slide ways and gears before starting.

Machine Leveling Importance

Crucial to level work table lengthwise and crosswise for machining accuracy.

Electrical Wiring and Safety

Power Supply and Plug Requirements

Designed for 220V/60Hz single-phase power; plug is not supplied.

Wiring Diagram and Key

Illustrates electrical connections with a key for components like switches, motor, and fuse.

Professional Installation Advisory

Contact a qualified electrician for plug installation and safety inspection.

Machine Adjustments and Disassembly

Table Feed Travel and Gib Adjustments

Adjust feed travel, table gib, saddle, and knee gibs for precision.

Clamping and Disassembly Procedures

Clamp machine parts for rigidity; instructions for removing table and saddle.

Operational Controls and Head Adjustments

Motor and Belt Speed Adjustment

Adjust motor plate and belts for desired variable speeds.

Quill Lock and Vertical Feed Operation

Lock quill for stability; use micrometer depth stop for accurate depth control.

Quill Clutch and Feed Selection

Use hand wheel for fine feeds and handle for fast feeds via clutch adjustment.

Vertical Head Tilting and Swiveling

Tilt head 90° and swivel 120° using adapter locking bolts and set bolts.

Parts List and Repair Disclaimer

Repair and Replacement Disclaimer

Manufacturer recommends certified technicians for repairs; buyer assumes risk.

Comprehensive Parts List

Detailed list of parts with reference numbers and descriptions for the milling machine.

Parts List Continuation and Notes

Continued Parts Inventory

Further detailed listing of replacement parts for the milling machine.

Serial Number Recording

Space provided to record serial number or purchase date for warranty/reference.

Assembly Diagrams

Head Assembly Diagram

Exploded view showing components of the milling machine's head assembly.

Base Assembly Diagram

Exploded view illustrating the parts and layout of the machine's base assembly.

Limited 90 Day Warranty Information

Warranty Terms and Coverage

Covers defects for 90 days; excludes misuse, accidents, and lack of maintenance.

Warranty Claim Procedure

Return product with shipping prepaid, proof of purchase, and complaint for repair/replacement.

Related product manuals