EasyManua.ls Logo

Harbor Freight Tools Haulmaster 58203 - User Manual

Harbor Freight Tools Haulmaster 58203
8 pages
Print Icon
To Next Page IconTo Next Page
Loading...
Visit our website at: http://www.harborfreight.com
Email our technical support at: productsupport@harborfreight.com
Owners Manual & Safety Instructions
Save This Manual Keep this manual for the safety warnings and precautions, assembly,
operating, inspection, maintenance and cleaning procedures. Write the product’s serial number in the
back of the manual near the assembly diagram (or month and year of purchase if product has no number).
Keep this manual and the receipt in a safe and dry place for future reference. 20l
When unpacking, make sure that the product is intact
and undamaged. If any parts are missing or broken,
please call 1-888-866-5797 as soon as possible.
Copyright
©
2020 by Harbor Freight Tools
®
. All rights reserved.
No portion of this manual or any artwork contained herein may be reproduced in
any shape or form without the express written consent of Harbor Freight Tools.
Diagrams within this manual may not be drawn proportionally. Due to continuing
improvements, actual product may differ slightly from the product described herein.
Tools required for assembly an d se rv ic e may n ot b e in cl uded.
Read this material before using this product.
Failure to do so can result in serious injury.
SAVE THIS MANUAL.
Question and Answer IconNeed help?

Do you have a question about the Harbor Freight Tools Haulmaster 58203 and is the answer not in the manual?

Overview

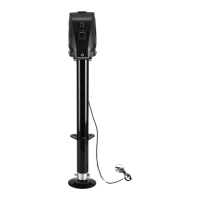
This document describes the HAULMASTER 12V Electric A-Frame Trailer Jack, model 58203. It serves as an owner's manual, providing safety instructions, assembly, operation, inspection, maintenance, and cleaning procedures.

Function Description

The HAULMASTER 12V Electric A-Frame Trailer Jack is designed to assist in mounting and dismounting trailers from a towing vehicle. It features both electric and manual operation modes, allowing users to raise and lower the trailer's A-frame hitch to the appropriate height for coupling or uncoupling. The electric mode utilizes a 12V power source, typically the trailer's battery, and is controlled via a directional switch. For situations where electric power is unavailable or preferred, a manual crank can be inserted into the drive shaft to operate the jack. The jack also includes an LED light for improved visibility during nighttime operation and a built-in circuit breaker for safety, which automatically trips and resets if amperage becomes too high.

Important Technical Specifications

  • Weight Capacity: 3,500 lbs.
  • Travel Length: 22-1/2"
  • Lift Range: 9" – 31-1/2"
  • Application: For use with A-frame trailers.
  • Hardware: Three 3/8"-16UNC-1"-2A bolts and washers (Grade 5).
  • Mounting Torque: 15-20 ft. lb. for mounting hardware.

The jack's components include a Protective Cap, Cover, Light Switch, Directional Switch, Motor, Gear Assembly, Drive Shaft, Short Positive/Negative Wire, LED Light, Wiring Board, ACME Screw, Outer Tube, Crank, Mounting Plate, Black Wire, Inner Tube, White Wire, Lock Pin, Foot Pad, Up/Down Switch Cover, LED Wire, Hardware Kit, and Light Switch Cover.

Usage Features

Installation: The trailer jack is specifically designed for A-frame hitches. Installation involves blocking the trailer wheels, supporting the A-frame with jack stands, and disconnecting the trailer battery ground cable. If replacing an existing jack, it must first be removed. For proper grounding, paint should be removed from around one bolt hole on the jack and the matching bolt hole on the trailer tongue. A flat washer may be needed for good contact. The outer tube of the jack is inserted into the A-frame opening, ensuring the motor housing faces forward and the mounting plate holes align with the trailer's bolt holes. The mounting plate is then secured to the A-frame using the specified nuts, bolts, and washers, tightened to 15-20 ft. lb. The footpad is then replaced and secured with the lock pin.

Wiring: Wiring should be performed by a qualified technician. The BLACK wire lead connects directly to the positive (+) terminal of the battery, and the WHITE ground wire connects to the negative (-) battery terminal. The battery ground cable is reconnected after wiring. The jack has a built-in circuit breaker that automatically trips and resets if amperage is too high.

Mounting the Trailer to the Towing Vehicle (Operation):

  1. Chock trailer wheels to prevent rolling.
  2. Electric Operation: Ensure proper wiring by testing the Directional Switch. Turn on LED lights if needed (they only work when powered). Check that the Switch Cover is secured. Push the Directional Switch up to raise the trailer to the towing vehicle's hitch level. Release the switch to stop. A warning advises releasing the switch if the motor slows or switches off, waiting 15 seconds for reset to prevent damage.
  3. Manual Operation: Disconnect power. Remove the Protective Cap to access the Drive Shaft. Insert the Crank and rotate it counterclockwise to raise the trailer.
  4. Back the towing vehicle to the trailer with a spotter's assistance.
  5. Mount the trailer onto the towing vehicle's hitch.
  6. Retract the jack (electric: push Directional Switch down; manual: turn Crank clockwise) to lower the trailer and transfer weight to the towing vehicle.
  7. Continue retracting the jack until it reaches the "STOP" label on the Inner Tube. The trailer jack must always be fully retracted when towing.
  8. Attach the safety chain.

Dismounting the Trailer from the Towing Vehicle (Operation):

  1. Chock trailer wheels.
  2. Electric Operation: Turn on LED lights if needed. Check Switch Cover. Push Directional Switch up to raise the trailer to the towing vehicle's hitch level. Release the switch to stop.
  3. Manual Operation: Disconnect power. Remove Protective Cap, insert Crank, and rotate counterclockwise to extend the jack and raise the trailer.
  4. Continue extending the jack to take the trailer's weight, making it easier to disengage the hitch.
  5. Disengage electrical connections, the hitch, safety chains, and other connections.
  6. Extend the jack further if needed to clear the hitch. Drive the vehicle away once clear. A caution advises using a spotter.
  7. When finished, disconnect power (electric) or remove the Crank and replace the Protective Cap (manual). Store the Crank safely.

Maintenance Features

Cleaning, Maintenance, and Lubrication:

  • BEFORE EACH USE: Inspect the general condition of the tool. Check for loose hardware, misalignment or binding of moving parts, cracked or broken parts, and any other condition affecting safe operation.
  • If welded, check welds for cracks.
  • If exposed to salt water, immediately wash off with fresh water and lubricate all moving parts with light oil.
  • AFTER USE: Wipe external surfaces with a clean cloth.
  • WARNING: To prevent serious injury, remove the jack from the trailer before performing any inspection, maintenance, or cleaning procedures. Do not use damaged equipment; if abnormal noise or vibration occurs, have it corrected by a qualified technician.
  • Procedures not specifically explained in the manual must be performed only by a qualified technician.

Warranty: The product comes with a Limited 90 Day Warranty from Harbor Freight Tools Co., covering defects in materials and workmanship. The warranty does not cover damage due to misuse, abuse, negligence, accidents, repairs or alterations outside facilities, criminal activity, improper installation, normal wear and tear, or lack of maintenance. To claim warranty, the product or part must be returned prepaid with proof of purchase and explanation of the complaint. If a defect is verified, Harbor Freight Tools will repair, replace, or refund the purchase price at their discretion. If no defect is found or if the defect is outside the warranty scope, the customer bears the cost of returning the product.

Harbor Freight Tools Haulmaster 58203 Specifications

General IconGeneral
BrandHarbor Freight Tools
ModelHaulmaster 58203
CategoryJacks
LanguageEnglish

Related product manuals