JBL JAM3000 HEADUNIT
3
EN
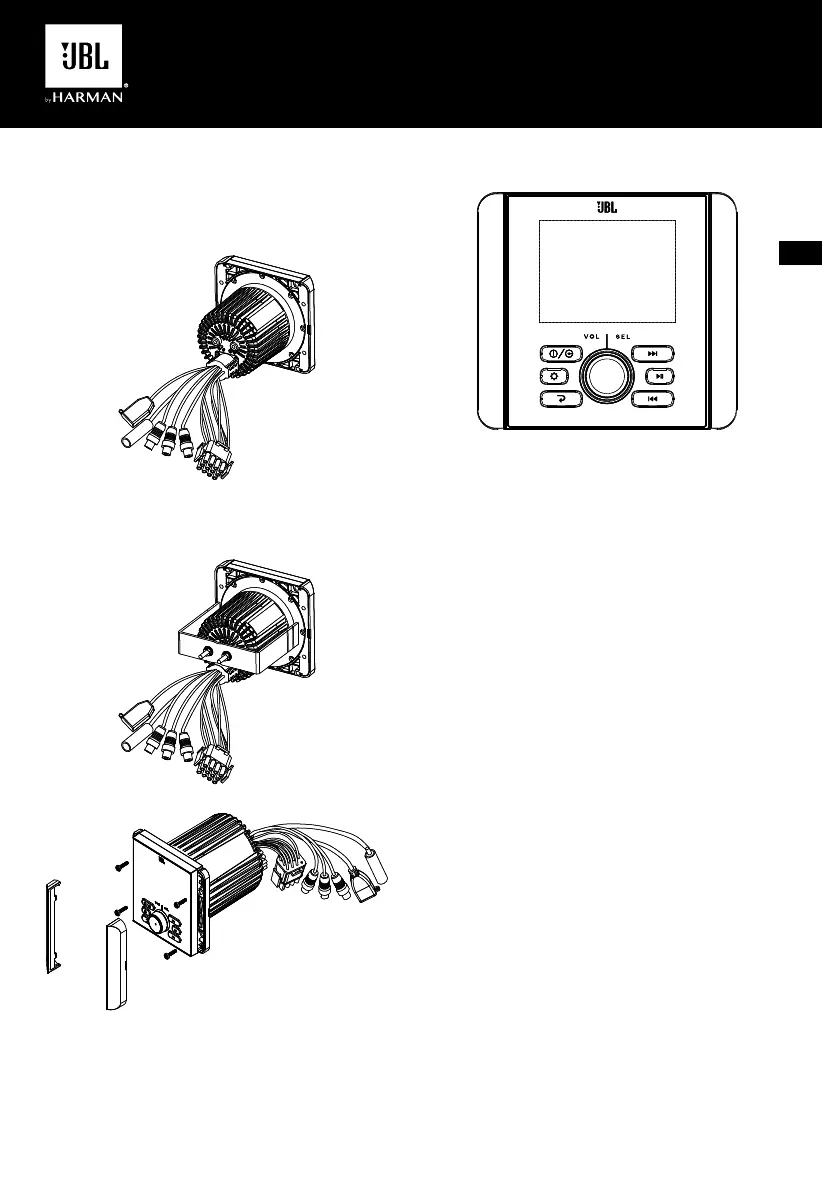
WIRING THE STEREO
IMPORTANT: Disconnect the vehicle’s negative (–) battery terminal
before beginning the installation.
1. Plug the vehicle harness into the connectors on the back of
the stereo.
MOUNTING THE STEREO
You can choose either one mounting method shows below:
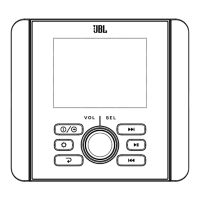
GENERAL BUTTON OPERATION
1
2
3
4
5
6
7
1. Power/SRC: Press for the first time to turn the unit on. Press
and hold for more than 3 seconds to turn the unit off. With unit
powered on, short repeat press to switch mode in following
sequence: FM1 FM2 AM BT USB FM1……
2. Setup: In Radio mode, short press to scan listening to the
preset stations. Long press it to auto store 6 stations in each
band in sequence by signal strength. After Auto Store is
completed, it will auto scan every preset for 6s in sequence.
In USB mode, press it repeatedly to select between Repeat
one, Repeat Folder, Random Folder, Random all, Intro Scan.
Long press it to enter Track Number search mode. Turn SEL
knob and press to set value of track number, then press and
hold SEL for 2s to confirm the selection.
3. Return: In selection station, press it to back to source playing
screen.
4. Volume/enter: Turn the knob to raise or lower the volume, or
to highlight desired control menu options.
Press the SEL knob to enter 1st setting menu, then press
it repeatedly to display features in following sequence:
VOLUME BASS TREBLE BALANCE FADER
EQ LOUD SUBWOOFER VOLUME……
Press and hold SEL knob for over 2s to enter 2nd setting
menu, then press it repeatedly to display features in following
sequence: I-VOLUME BRIGHTNESS AREA BEEP
ABOUT RESET I-VOLUME……
On each setting, the level can be controlled by turning SEL
knob. When the last adjustment is made, the display will
automatically return to the original mode after 5 seconds,
or you can press Return button to return the original mode
quickly.
5. NEXT: In Radio mode, press it to work as Manual Seek,
repeat press to tune the frequency in steps. Press and hold it
to activate Auto Seek.
In BT Music or USB mode, press it to select the next track.
In USB mode, press and hold it to fast forward.
6. PLAY/PAUSE: In Radio mode, press it to MUTE sound output.
In BT Music or USB mode, press it to Pause playback; press
it again to resume playback.
In USB mode, long press PLAY/PAUSE button to enter USB
files folder list.
7. PREVIOUS: In Radio mode, press it to work as Manual Seek,
repeat press to tune the frequency in steps. Press and hold it
to activate Auto Seek.
In BT Music or USB mode, press it to select the previous
track.
In USB mode, press and hold it to fast rewind.
JBL JAM3000 HEADUNIT
3
EN
WIRING THE STEREO
IMPORTANT: Disconnect the vehicle’s negative (–) battery terminal
before beginning the installation.
1. Plug the vehicle harness into the connectors on the back of
the stereo.
MOUNTING THE STEREO
You can choose either one mounting method shows below:
GENERAL BUTTON OPERATION
1
2
3
4
5
6
7
1. Power/SRC: Press for the first time to turn the unit on. Press
and hold for more than 3 seconds to turn the unit off. With unit
powered on, short repeat press to switch mode in following
sequence: FM1 FM2 AM BT USB FM1……
2. Setup: In Radio mode, short press to scan listening to the
preset stations. Long press it to auto store 6 stations in each
band in sequence by signal strength. After Auto Store is
completed, it will auto scan every preset for 6s in sequence.
In USB mode, press it repeatedly to select between Repeat
one, Repeat Folder, Random Folder, Random all, Intro Scan.
Long press it to enter Track Number search mode. Turn SEL
knob and press to set value of track number, then press and
hold SEL for 2s to confirm the selection.
3. Return: In selection station, press it to back to source playing
screen.
4. Volume/enter: Turn the knob to raise or lower the volume, or
to highlight desired control menu options.
Press the SEL knob to enter 1st setting menu, then press
it repeatedly to display features in following sequence:
VOLUME BASS TREBLE BALANCE FADER
EQ LOUD SUBWOOFER VOLUME……
Press and hold SEL knob for over 2s to enter 2nd setting
menu, then press it repeatedly to display features in following
sequence: I-VOLUME BRIGHTNESS AREA BEEP
ABOUT RESET I-VOLUME……
On each setting, the level can be controlled by turning SEL
knob. When the last adjustment is made, the display will
automatically return to the original mode after 5 seconds,
or you can press Return button to return the original mode
quickly.
5. NEXT: In Radio mode, press it to work as Manual Seek,
repeat press to tune the frequency in steps. Press and hold it
to activate Auto Seek.
In BT Music or USB mode, press it to select the next track.
In USB mode, press and hold it to fast forward.
6. PLAY/PAUSE: In Radio mode, press it to MUTE sound output.
In BT Music or USB mode, press it to Pause playback; press
it again to resume playback.
In USB mode, long press PLAY/PAUSE button to enter USB
files folder list.
7. PREVIOUS: In Radio mode, press it to work as Manual Seek,
repeat press to tune the frequency in steps. Press and hold it
to activate Auto Seek.
In BT Music or USB mode, press it to select the previous
track.
In USB mode, press and hold it to fast rewind.
.
HARMAN
WIRING THE STEREO
MOUNTING THE STEREO
JBL JAM3000 HEADUNIT
GENERAL BUON OPERATION
PY/PAUSE:
PRIOUS:
EN
I
 Loading...