6 - English
Removethebatterypackfromthesaw.
Removethebladewrench(5mmhexkey)fromthestorage
area.
Depressthespindlelockbuttonandremovetheblade
screwandouterbladewasher.
NOTE: Turnthebladescrewclockwisetoremove.
NOTICE:
Topreventdamagetothespindleorspindlelock,always
allowmotortocometoacompletestopbeforeengaging
spindlelock.
NOTE: Donotrunthecircularsawwithspindlelockengaged.
Wipeadropofoilontotheinnerbladewasherandouter
bladewasherwheretheycontacttheblade.
WARNING:
Ifinnerbladewasherhasbeenremoved,replaceitbefore
placingbladeonspindle.Failuretodosocouldcausean
accidentsincebladewillnottightenproperly.
Fitthesawbladeinsidethelowerbladeguardandonto
thespindle.
NOTE:Thesawteethpointupwardatthefrontofthesaw.
Replacetheouterbladewasher.
Depressthespindlelockbutton,thenreplacetheblade
screw.Tighten the blade screw securely by turning it
counterclockwise.
Returnthebladewrenchtothestoragearea.
NOTE:Neveruseabladethatistoothicktoallowtheouter
bladewashertoengagewiththeflatsonthespindle.
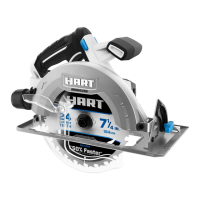
REMOVING THE BLADE
See Figure 2, page 12.
Removethebatterypackfromthesaw.
Removethebladewrenchfromthestoragearea.
Position the saw as shown, depress the spindle lock
buttonandremovethebladescrewbyturningitclockwise.
Removetheouterbladewasher.
Removetheblade.
UNPACKING
Thisproductrequiresassembly.
Carefullyremovetheproductandanyaccessoriesfrom
thebox.Allitemslistedinthe Includessectionmustbe
includedatthetimeofpurchase.
WARNING:
Items in this Assembly section are not assembled to
theproductbythemanufacturerandrequirecustomer
installation. Use of a product that may have been
improperlyassembledcouldresultinseriouspersonal
injury.
If any parts aredamaged or missing, please call
1-800-776-5191forassistance.
WARNING:
Ifanypartsaredamagedormissingdonotoperatethis
productuntilthepartsarereplaced.Useofthisproduct
withdamagedormissingpartscouldresultinserious
personalinjury.
WARNING:
Do not attempt to modify this product or create
accessoriesnotrecommendedforusewiththisproduct.
Anysuchalterationormodificationismisuseandcould
result in a hazardous condition leading to possible
seriouspersonalinjury.
WARNING:
Topreventaccidentalstartingthatcouldcauseserious
personalinjury,alwaysremovethebatterypackfromthe
productwhenassemblingparts.
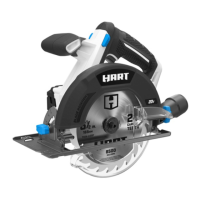
ATTACHING THE BLADE
See Figure 1, page 12.
WARNING:
A6-1/2in.bladeisthemaximumbladecapacityofthe
saw.Neveruseabladethatistoothicktoallowouter
bladewashertoengagewiththeflatsonthespindle.
Largerbladeswillcomeincontactwiththebladeguard,
while thicker blades will prevent blade screw from
securing blade on spindle. Either of these situations
couldresultinaseriousaccident.
ASSEMBLY