EasyManua.ls Logo

HAUL MASTER 96406 - User Manual

HAUL MASTER 96406
8 pages
Print Icon
To Next Page IconTo Next Page
Loading...
Page 1Item 96406 For technical questions, please call 1-888-866-5797
Owners Manual & Safety Instructions
Save This Manual Keep this manual for the safety warnings and precautions, assembly,
operating, inspection, maintenance and cleaning procedures. Write the product’s serial number in the
back of the manual near the assembly diagram (or month and year of purchase if product has no number).
Keep this manual and the receipt in a safe and dry place for future reference. 21h
When unpacking, make sure that the product is intact
and undamaged. If any parts are missing or broken,
please call 1-888-866-5797 as soon as possible.
Copyright
©
2007 by Harbor Freight Tools
®
. All rights reserved.
No portion of this manual or any artwork contained herein may be reproduced in
any shape or form without the express written consent of Harbor Freight Tools.
Diagrams within this manual may not be drawn proportionally. Due to continuing
improvements, actual product may differ slightly from the product described herein.
Tools requ ir ed f or a ss em bl y an d se rv ice ma y no t be i nc lu ded.
Read this material before using this product.
Failure to do so can result in serious injury.
SAVE THIS MANUAL.
Visit our website at: http://www.harborfreight.com
Email our technical support at: productsupport@harborfreight.com
96406
Question and Answer IconNeed help?

Do you have a question about the HAUL MASTER 96406 and is the answer not in the manual?

Overview

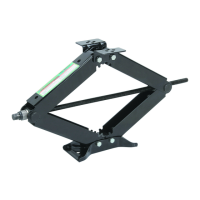
The HAULMASTER 2.5 TON TRAILER/RV SCISSOR STABILIZER (Item 96406) is a device designed to stabilize trailers, travel trailers, 5th wheels, and motor homes, preventing movement and ensuring a level position when parked. It is not intended for lifting purposes, such as changing tires. The stabilizer is constructed from 10 gauge sheet steel plate, providing robust support.

Function Description:

The primary function of this scissor stabilizer is to provide additional stability to recreational vehicles (RVs) and trailers, particularly when they are parked for extended periods. It helps to eliminate rocking and swaying, creating a more stable and comfortable environment inside the vehicle. The stabilizer operates by extending a scissor mechanism to make firm contact with the ground, applying pressure to prevent movement. It can be mounted to the vehicle's frame using either a bolt-on or weld-on method, or it can be used unmounted, though unmounted use is not recommended.

Important Technical Specifications:

  • Stabilizer Construction: 10 Gauge Sheet Steel Plate
  • Crank Handle Construction: Steel Rod with Rubber Grip and Attached Socket
  • Crank Handle Dimensions: 25-3/4" L x 15/32" Diameter (5" Long Rubber Handle and Grip)
  • Stabilizer Capacity: 5000 lb. maximum capacity, with the critical condition that the height must not be less than 13-3/4". The weight capacity drastically reduces below this height, and no load should be applied below 13-3/4".
  • Height Range: 4-5/8" Minimum Height to 23-1/2" Maximum Height
  • Overall Dimensions (Collapsed for Storage): 26-1/4" Total Length x 4-5/8" High x 6-3/4" Wide
  • Stabilizer Mounting: Bolt-On or Weld-On. Unmounted use is NOT recommended.
  • Weight (Stabilizer Only): 14.35 lb.

Usage Features:

  • Leveling: The stabilizer is used in conjunction with a carpenter's level or round bubble level to achieve a level position for the RV or trailer. For trailers, leveling blocks may be used in front of tires, and the trailer is slowly pulled forward onto the blocks.
  • Operation: The stabilizer is lowered using the included Handle Wrench (16). For best results, one stabilizer should be used on each side of the vehicle. After firm contact with the ground, the handle wrench should be turned twice to ensure the stabilizer will not loosen during use.
  • Mounting Options:
    • Bolt-On Installation: Requires marking 8 mounting holes on the RV or trailer frame using the Mounting Brackets (9) as a template. Pilot holes (1/8") are drilled, followed by larger holes (5/16"), and then the stabilizer is attached using eight 3/8" tapping screws and lock washers (not included).
    • Weld-On Installation: Involves holding the stabilizer against the frame and marking the locations of the 8 mounting holes. At least four 1" welds are then applied to the Stabilizer Mounting Brackets (9) to secure it to the frame.
  • Motor Home Stabilization: Can be used to provide additional stabilization for motor homes, even those with factory-installed hydraulic levelers.
  • Safety Precautions:
    • Always park the RV or trailer on level ground and block all wheels.
    • Never use for lifting or tire changes.
    • Keep hands away from the scissor mechanism.
    • Do not exceed the 5000 lb. capacity, especially noting the height restriction of 13-3/4".
    • Wear ANSI-approved safety goggles and heavy-duty work gloves.
    • Level only at manufacturer's recommended lifting points.
    • Keep children away from the stabilizer area.
    • Ensure the work area is uncluttered and well-lit.
    • Do not stand on the stabilizer or have people/pets inside the vehicle while leveling.
    • Place the stabilizer on a stable, clean, dry surface capable of sustaining the weight.
    • Consult the RV manufacturer for sub-frame strength information before use.
    • Before drilling for installation, check for any chassis components (electrical lines, gas lines, water tanks, etc.) inside the frame.

Maintenance Features:

  • Cleaning: Periodically clean the stabilizer of any dirt, grease, or debris.
  • Inspection: Before each use, inspect the general condition of the stabilizer. Check for broken, cracked, or bent parts, loose or missing components, and any condition that may affect proper operation. Damaged or deformed stabilizers should be discarded.
  • Lubrication: Periodically lubricate the Screw Rod (4) Threads with high-quality light-weight oil (not included).
  • Periodic Checks: When the RV or trailer will not be moved for several days, periodically check the stabilizer to ensure it has not worked loose.

The manual emphasizes that the warnings, cautions, and instructions cannot cover all possible conditions, and common sense and caution must be supplied by the operator. It also states that all repairs and parts replacements should be undertaken by certified and licensed technicians.

HAUL MASTER 96406 Specifications

General IconGeneral
BrandHAUL MASTER
Model96406
CategoryAutomobile Accessories
LanguageEnglish

Related product manuals