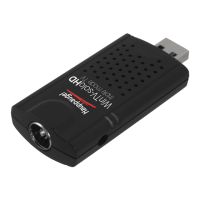
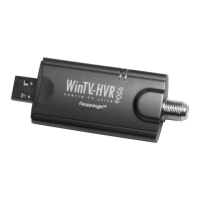
WinTV-USB
Quick Installation Guide
for Windows XP/ME/2000/98SE
Contents of the WinTV-USB package
Page 2 Page 3Page 1
Note: DO NOT Install the WINTV-USB until your PC has been turned on and Windows has
booted.
Hauppauge!
®
Page 4
The WinTV2000 TV application
To run the WinTV2000 application, double click the WinTV2000 icon.
Scanning for channels
When running WinTV for the first time, you will need to
scan for your TV channels. If you are using Cable TV, in
the Broadcast/Cable box select Cable (or Cable HRC).
Otherwise select Antenna.
Choose the Video Format for your geographic region,
then click on Start:
North America uses NTSC M
Europe uses PAL B/G
the U.K. uses PAL I
in South America, PAL M or PAL N is used
Setting up the channels
After you have scanned for channels, you can add channel names and fine tune for better
Step 4: WinTV Software installation
Snap
Snapshot
Button
Freeze
video
CFG
Configure
Snapshot
Pref
Preferences
menu
Menu
Setup Menu
Always-on-top
Full screen TV
Remove toolbars
"no toolbar" mode
Minimize
Record
open the record
controls
Channel surf
Video source select
Channel down
Channel up
Previous channel
Close
WinTV
Snapshot viewer
window
Double click on
each "thumbnail" to
see image full size.
Click and hold your
right mouse button
to see image
options.
Current TV channel
or video source
Click your right mouse
button here to see the
channel selector
Remove toolbars
Click your right mouse button in the TV
window to remove toolbars.
Click again to restore toolbars.
RC: Software remote control
reception. To do this, click the Menu button
on WinTV2000, then click Suite Manager. You
can also click and hold your right mouse
button, then click SuiteManager.
Click on the
desired channel
, then Edit.
Change the ChannelName to the name of
the station, change the description or fine
tune.
Then click OK.
Enabling live audio over USB
After you complete the WinTV-USB driver installation,
the default Audio setting is: Analog audio input to
the PC while watching live TV and Digital
audio over USB while recording.
If your PC or laptop does not have a Line-in jack, or if
you would like to simplify the installation of the WinTV-
usb, you can enable Digital audio while watching TV
and while recording. To do this, click on the Menu but-
ton and go to Audio Type and select Digital Rec+Live.
Close and reopen the WinTV application to have the changes take effect.
Selecting an External Video source (VCR, camcorder, etc.)
Click the green Video source select button to select TV, Composite and S-Video sources.
The video sources will use the TV standard chosen when you scanned for your TV channels
(NTSC or PAL).
Rescanning for channels
Click the Menu button and click on Suite Manager and then Auto scan. Make sure you select
cable or antenna in Broadcast / cable. Chose the correct Video format for your region and
then click Scan.
Displaying TV full screen
When you click the Full screen TV button, TV will appear full screen. When finished watching
TV full screen, click your right mouse button in the TV window.
If you see video with a black box around it, click the Pref button then click TV mode tab.
Check the box which says "Allow resolution change".
"Always-on-
Top" mode:
With Always on Top, the WinTV window can always be visible on your Windows desktop. To
turn on Always-on-Top, simply click the Always-on-top button. It will turn green. To turn off
Always on Top, click this button again.
A convenient way to use Always-on-Top is to make the TV window in the no-title mode small,
and to make the TV window in the title mode larger. Then you can switch very quick from a
small window to a larger one simply by clicking the right mouse button.
Menu button
Click the Menu button to open the TV Setup menu. Here are the main controls for TV chan-
nels, and duplicate controls for other functions:
Suite Manager: configure the TV tuner (scanning, naming, fine tuning, etc.), setting up
'favorite channel lists' and set an external A/V source to a TV channel.
Configuration: duplicate configuration menus for color, audio, MPEG settings, etc.
View: for setting the TV window size
Pref button
Click the Pref button to open the Preferences menu. You will have tabs for:
One Touch
Record
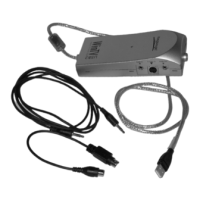
WinTV-USB or WinTV-USB-FM device
1 meter Audio cable - sound cable for
connecting between the WinTV-USB and
your sound card
S-Video to Composite video adapter
FM radio antenna (on models with FM
radio)
WinTV-USB Installation for Windows
CD-ROM with:
Drivers for Windows98SE,
WindowsMe, Windows2000 and
WindowsXP
WinTV2000 application
SoftPVR™
WinTV-Scheduler
DO NOT PLUG THE WINTV-USB into your PC until your PC has fully booted..
Turn on and boot into Windows. Then plug the WinTV-USB into one of the USB connectors
on the back of your PC. You can plug WinTV-USB into either USB 1.1 or USB 2.0 ports.
Note: it is not recommended to connect the WinTV-USB to a USB Hub or Keyboard.
Step 2: Boot your PC
Step 3: Install the WinTV-USB driver for Windows XP
3-1 After the WinTV-USB is installed, the
Found New Hardware Wizard will
appear.
When you see this dialog box, insert
the WinTV-USB Windows Installation
CD-ROM into your CD-ROM drive and
click NEXT.
Click NEXT, to Install the Software
Automatically (Recommended).
3-4 Click Finish to complete the
driver installation.
3-2 Windows will start to install the WinTV-
USB driver.
3-3 When the Hardware Installation dia-
log box appears click
Continue Anyway.
3-5 When the driver installation is complete,
this message should appear on the
Windows start bar.
Connect a TV aerial or cable TV to the WinTV-USB connector marked TV. If you have a
WinTV-USB with FM radio, attach the supplied FM antenna to the connector marked FM.
You can also connect an A/V source such as a VCR, camcorder or video camera to the
WinTV-USB. Connect the video from your A/V source to the S-Video In connector. If you
have a composite video source, use the S-Video to Composite adapter. Connect the
audio from your A/V source to the WinTV-USBs’ Line-In jack.
Audio from the WinTV-usb
There are two ways that audio gets into a PC or laptop from the WinTV-usb:
- either using the supplied 1 meter audio cable to bring analog audio from the
WinTV-usb into the Line-in jack on your PC or laptop, or
- by using the USB cable to bring digital audio from the WinTV-usb to your PC or
laptop.
The default audio setting is: Analog audio input to the PC while watching live TV
and Digital audio over USB while recording. This gives the best audio quality.
If your PC or laptop computer has a sound card with a Line-In
connector:
connect the Line-Out jack on the WinTV-USB
to your sound card’s Line-In jack. To do this,
plug one end of the supplied 1 meter audio
cable into the jack marked Line Out. Plug the
other end into your PC’s sound card LineIn
jack.
If your PC or laptop does not have a Line-In connector:
you can enable Digital audio over USB while watching live TV. To do this, see the section
“Enabling live audio over USB”.
Step 1: Connect the TV and Video/Audio cables
After the WinTV-USB driver has been loaded,
run the WinTV setup program.
Run SETUP.EXE from the WinTV-USB
Installation CD-ROM.
For example (if your CD-ROM is on driver E:), click
Start then Run then E:\Setup.exe
Click Install to start the WinTV installation.