Do you have a question about the Healthstream HS6.0B and is the answer not in the manual?
This document serves as a comprehensive user manual for the Healthstream HS6.0B exercise bike, providing detailed instructions for assembly, operation, and maintenance, along with safety guidelines and exercise recommendations.
Before operating the Healthstream HS6.0B, it is crucial to read and understand all safety instructions to prevent injury and damage to the appliance. The exercise bike should not be operated on deeply padded, plush, or shag carpets, as this can cause damage to both the carpet and the machine. Children should be kept away from the machine due to potential pinch points and other caution areas. Users must keep their hands away from all moving parts during operation. The machine should never be operated if it has a damaged cord or plug; in such cases, the user should contact the dealer. The power cord must be kept away from heated surfaces. No objects should ever be dropped or inserted into any openings. The exercise bike is designed for indoor use only and should not be used outdoors.
The pulse sensors on the machine are not medical devices; various factors, including user movement, can affect the accuracy of heart rate readings. These sensors are intended solely as exercise aids for determining general heart rate trends. Proper footwear is essential for using the machine; high heels, dress shoes, sandals, or bare feet are unsuitable. Quality athletic shoes are recommended to prevent leg fatigue.
The manual also includes instructions for assembly, emphasizing the correct fitting of guards and other safety devices. It warns about the potential injuries to young children if the exercise cycle is operated in their vicinity without properly fitted guards. Regular maintenance checks, including verifying the integrity of guards and safety devices, are also outlined. Instructions for the correct adjustment of the seat are provided to ensure user comfort and proper exercise posture. Users are advised to save these instructions and prioritize safety. Caution is also advised when opening the unit.
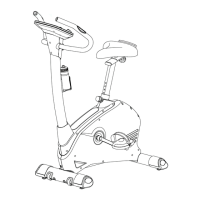
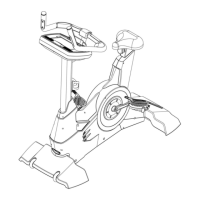
The Healthstream HS6.0B exercise bike features a robust design with several key components. The main frame supports the entire structure. At the front, it has a front stabilizer and a rear stabilizer at the back, both equipped with adjustable ends (B2, C4) to ensure the machine stands stably after assembly. The central tube connects the main frame to the handlebar and computer. The handlebar (E) provides a grip for the user and houses the computer. The computer (K) is the control center, displaying various workout metrics. The saddle (G) is adjustable for user comfort and is mounted on a saddle support tube (D). Pedals (F1, F2) are attached to the cranks (A26, A27) and include straps for secure foot placement. A knob (J3) is used for adjusting the handlebar position, and another knob (D5) is used for adjusting the saddle. The machine also includes a water bottle holder (L8) and a towel housing (P) for convenience during workouts.
The assembly process for the Healthstream HS6.0B is detailed with figures and step-by-step instructions.
To attach the front stabilizer (C) to the bracket at the front of the mainframe (A), insert two bolts (J2), two springs (J4), and two washers (J5) through the front stabilizer (C) and secure them tightly.
Similarly, attach the rear stabilizer (B) to the bracket at the front of the main frame (A) using two bolts (J2), two springs (J4), and two washers (J5). Tighten these bolts securely.
After completing the assembly of the front and rear stabilizers, if the machine is not stable, use the adjusted ends (B2, C4) on the stabilizers to level the machine.
First, remove the washer (L4) and nut (L5) from the handlebar (E). Insert the handlebar (E) into the handlebar housing and secure it with the washer (L4) and nut (L5).
Slide the sensor wires (L3 & E3) through the monitor front housing (H1) as shown in View A. Then, connect the monitor rear housing with the monitor front housing using screws (J1).
Attention: Ensure all sensor wires are positioned outside the computer housing. Finish the assembly by screwing the computer housing into place with screw (J1).
Loosen the knob (J3) by turning it to the left. This allows you to adjust the handlebar to your desired position.
Connect the sensor wires (E3 & L3) with the computer wires. Then, place the computer (K) onto the computer housing (H).
Loosen the saddle adjustment knob (D5) and move the saddle to a comfortable distance. Tighten the saddle adjustment knob to lock the saddle basement in place.
Install the right strap on the right pedal and the left strap on the left pedal.
The computer (K) on the Healthstream HS6.0B features a bar graph display for program profiles, showing 16 rows (load resistance levels) and 16 columns (time intervals). A quick key allows access to 12 program profiles.
During a workout, users can select what is shown in the Mode BAR Display. Flashing text indicates the currently displayed metric.
Initiates and stops the workout.
Includes options for MANUAL, PROGRAM, WATT, PERSONAL, and H.R.C. (Heart Rate Control).
The computer stores data for 5 users (U0-U4), including Gender, Age, Height (H.t.), and Weight (W.t.).
Confirms selections.
Resets all function values to default.
Adjusts function values by pressing these keys.
Automatically evaluates the user's fitness level.
The Healthstream HS6.0B tracks various metrics:
Adjust the resistance level using the dot matrix display and set function values as required. TIME/DISTANCE/CALORIES/PULSE values count down from a preset number to 0. Press ST/STOP to start the manual program at any time.
The machine offers 12 automatic adjusting programs (P1~P12) with control exercise program profiles. Resistance levels can be adjusted by turning the ENTER (UP/DOWN) knob during the program.
Users can set a desired WATTS value between 10-350 watts using the UP/DOWN knob. To fix the WATTS constant value, press the ST/STOP key. This mode allows training at different constant WATTS levels.
Create custom program profiles through U1~U4 by setting the resistance level for each segment. These programs are automatically saved for future use. U0 ENTER can be set similarly to U1~U4, but this program cannot be saved.
Select a target Heart Rate from preset programs: 55% (DIET PROGRAM), 75% (HEALTH PROGRAM), or 90% (SPORTS PROGRAM). Users can also set a TARGET-USER SET TARGET HEART RATE. Enter your age in the User Data to ensure correct target heart rate calculation. The PULSE display will flash when the target heart rate is reached.
After a workout, press RECOVERY. For this function to work correctly, heart rate input is needed. TIME will count down from 1 minute, then your fitness level (F1 to F6) will be displayed. During RECOVERY, no other displays will operate.
U0~U4 are user's Personal Programs. Users should enter their gender, age, height, and weight. Only data for U1 to U4 will be saved; U0 is for casual users.
Aerobic exercise is any sustained activity that delivers oxygen to your muscles via your heart and lungs. It enhances the fitness of your lungs and heart, which are vital muscles. Aerobic fitness is achieved through activities that engage large muscle groups (arms, legs, buttocks), causing your heart to beat faster and you to breathe deeply. An aerobic exercise should be an integral part of your overall exercise routine.
Alongside aerobic exercise, which helps manage excess body fat, weight training is a crucial component of an exercise routine. Weight training tones, builds, and strengthens muscles. If you are working above your target zone, you may need to reduce the number of repetitions. Always consult your physician before starting any exercise program.
The exercise routine performed on the cycle primarily develops the lower body muscle group. It also conditions the circulatory system and provides an excellent aerobic workout. The muscle groups highlighted in the manual's muscle chart include:
Before starting your workout, perform the following warm-up stretches:
Stand with one hand against a wall for balance. Reach behind you and pull your right foot up, bringing your heel as close to your buttocks as possible. Hold for 15 counts, then repeat with your left foot.
Sit with the soles of your feet together and your knees pointing outward. Pull your feet as close to your groin as possible. Gently push your knees towards the floor. Hold for 10 counts.
Slowly bend forward from your waist, allowing your back and shoulders to relax as you stretch towards your toes. Reach down as far as you can and hold for 15 counts.
Sit with your right leg extended. Rest the sole of your left foot against your right inner thigh. Stretch towards your right toe as far as possible. Hold for 15 counts, relax, and then repeat with your left leg extended.
| Resistance System | Magnetic |
|---|---|
| Resistance Levels | 16 |
| Display | LCD |
| Programs | Yes |
| Number of Programs | 12 |
| Heart Rate Monitoring | Yes |