USER MANUAL
Model: ET-7A(W)
Programmable Radiant Floor Thermostat
Installation
1.Loosen the bottom screw by a Phillips screwdriver, then open the thermostat from the below
as shown.
Note: You do not need to unscrew the screw completely.
2. Wire as shown:
L/N lead: Connect the power cord using the terminal block.
L1/N1 lead: Use a terminal block to connect the load line.
OUT terminal: Connect to IN/SNR of Power Module.
Note: Disconnect the main power supply before wiring.
power module. [Wiring diameter: 12 to 22 AWG]
3. Install the back cover into the terminal box and secure it with the set screw.
4. Install the power back cover from the top and press down until the bottom screw holes are
aligned .Turn on the power and test the GFCI function.
WARNINGS
To avoid risk of electric shock, disconnect all power coming to heater at main service panel
before installing the thermostat. Keep thermostat air vents clean and free from obstructions.
All wiring must conform to local and national electrical codes and ordinances. Installation
The thermostat is a Class II device (reinforced insulation) and used for controlling electrical
floor heating. The product must be connected to the following leads:
L/N lead: Connect the power cord using the terminal block.
L1/N1 lead: Use a terminal block to connect the load line(Max 15A).
terminals are designed to handle a cross-section of wire measuring 12-22AWG.
Supply voltage: 120/240 VAC 50/60 Hz
Load: max.15 A (resistive load)
GFCI: Class A (5 mA trip level)
Setpoint range: +5 to +40°C / +41 to +104°F
Temperature range: +5 to +45°C / +41 to +113°F
Ground Fault Circuit Interrupter (GFCI)
This thermostat has a built-in GFCI function that protects people from electric shock. It is very
important to check whether the GFCI function is normal or not every month using these check
steps:
2. Press the [Test] button. If a red light appears in the upper left corner of the thermostat and
GROUND FAULT appears on the screen, the GFCI function is normal. If there is no response,
it means the function is invalid; please contact the dealer or electrical installer.
Note: Do not press and hold the [
Test Monthly] button.
4. Press the [Reset] button again. The thermostat is turned on. If in daily use, the red light is
on and the screen appears GRO UND FAULT, then you need to check if the ground fault is
present by pressing the [Reset] button.If the red light is off and the screen shows the shutdown
status, it is nuisance tripping. If not, it means that ground fault has occurred. Please contact
your dealer or professional technician immediately.
Instruction
running in 4 or 2 stages per day, 7 days a week. The default weekly program parameters
satisfies most usage scenarios, however you can also modify the weekly program parameters
in the thermostat. When there is no one in the house, it is recommended to set the
temperature down to save energy. The thermostat also has built-in adaptive function. When
The thermostat controls your floor heating system based on built-in weekly program,
this function acts, the thermostat heats or stops heating in advance of next stage to bring
the room temperature to the set temperature of the next stage. Please note that after turning
adaptive on, the thermostat takes a few days to learn the time required.
Functions and operation
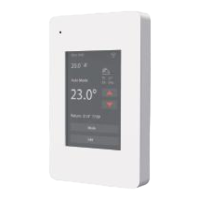
Temporary temperature setting
Please press the button for temporary temperature setting
Mode
Edit
Temperature
GFCI Test Button
GFCI Reset Button
Setting temperature
Mode state
WIFI
Heating
Weather
Up and down regulation
Mode
Next Schedule
8:00
Wake : 21.0° 8:00
Mon
20.0°
Mode
Edit
21.0°
Auto Mode
Heating Schedule
Mode selection
Auto Mode
Manual Mode
Anti-frozen Mode
OFF
Child lock: Lock all keys to prevent the setting from being changed.
Child lock: (Hold on the up button for 3s to unlock)
Date: Set date.
Time: Set Time.
Display Brightness: 1-9.
5-60
Unit:
°F/°C.
Power Set: 0W-4500W.
When enabled,the thermostat will adjust automatically in daylight
saving time.
Daylight Saving Time:
Set Backlight Delay:
Language: English/Francais
Support :P lease ref er to the manual.for furt her support,
please cont act your installer.
User Reset: This will reset the users settings to factory default .
Adapt ive Funct ion: When this feature is enabled, the room will have
reached the target/set temperature when the event begins.If
Open W indow: Thermostat can detect an open window and will
shut off heating temporarily to save energy. ;
Sensor Ty pe: B3950-10K/B3380-10K/B3700-10K/
B3600-12K/
B3450-15K
Sensor Application: Floor/Room/Floor Protection/Room.
Floor Sensor Calibration:Measure the temperature by adjusting
the calibration. ±9°
Room Sensor Calibration:Measure the temperature by adjusting
the calibration. ±9°
Floor P rote ction:
Reference value:Laminate-max.28°C(82.4°F)/Tile-max.40°C(104°F)
The value ranges from 20°C(68°F)to 50°C(122°F).If
Factory Reset: This will reset the thermostat to factory settings, Personal
settings will be lost.
Location: Home/Office.
Floor protection is enabled only when the sensor
type is selected for room and floor simultaneously.
Energy Use
User Settings
Installer Settings
Menu
Heating Schedule
Energy Use
User Settings
Installer Settings
Wifi /Weather
Wifi Config
...... ......
Select days to program
MON
TUE
WED
THU
FRI
SAT
SUN
√
√
√
√
√
7:00 22.0°
8:30 19.0°
17:00 22.0°
22:00 19.0°
1
2
3
4
√
Energy Use
0000KWh
Wake
Time
6:00
21.0°
Temp
√
User Settings
Time
Date
Child Lock
Unit
Power Set
Display Brightness
Language
Daylight Saving Time
Set Backlight Delay
Support
User Reset
Installer Settings
Adaptive Function
Open Window
Sensor Application
Sensor Type
Floor Sensor Calibration
Room Sensor Calibration
Floor Protection
Location
Factory Reset
Room/Floor sensor failure alarm:
13:28
Jun 06 2022
Floor Sensor Error
--°
Wifi connection
Step 1: Scan the QR code or download the Warmme from APP
store/Google browser.
2
3
4
5
6
7
8
Step 3
Make sure the thermostat
wifi is blinking.Click ‘Add Device’ or
‘+’ on the top-right to add device.
Click ‘Thermostat (Wi-Fi)’.
You need to enable Bluetooth and
give the APP permission.The APP
will actively discover the device.
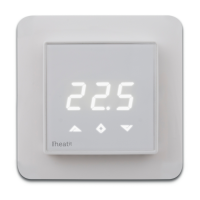
13:28
Wake : 23° 9:00
Mon
23.0°
--°
Mode
Edit
IN/SNR terminal:Connect the floor sensor
If an electric floor heating cable or mat system requires more than 15 Amps,install a
must be carried out by qualified personnel.
Note: Electric floor heating cable/mat must be in accordance with the supply voltage.The
Dimensions (inches)
1.Confirm that the thermostats is turned on.
3. Press the [Reset] button. The red light is off and the screen shows the power off state.
Assign seven days a week to the following two schedules:
Provides two modes for wifi connection:
Note:If you already have your device connected to WiFi, you can reset it here.
This option is used to calculate data on energy usage.The user sets the power in the Power Set.
The thermostat will automatically count the heating time and calculate the energy consumption.
5+1+1: The Event parameter is the same from Monday to Friday, with separate Event parameters
on Saturday and Sunday.
7: With separate Event parameters every day.
1
2
3
4
8
4
5
5
6
6
7
7
11
12
8
9
9
10
10
13
11
12
Edit
13
1
2
Time
3
Mode selection
Edit selection
This thermostat provides three operating modes:
Automatic mode:
According to the weekly program, the thermostat automatically adjusts the set
temperature operation.
Manual mode:
The thermostat runs continuously according to the set temperature.
Frost protection mode:
OFF:
This mode is used when you want to keep your room at a lower temperature when you
are on vacation.Prevent cold wave, home water supply equipment and other damage.
Range is set from 41°F to 59°F(5°C -15°C) in this mode.
Manually turn off all functions of the thermostat. When the device needs to be started,
Press and hold the on/off button in screen for 3s.
Wifi Config
Default Mode
AP Mode
Press Default Mode button
Wifi icon blink rapidly.
Press AP Mode button Wifi
icon blink slowly.
Step 2:
:
Step 4
:
Step 5 Enter Wifi password,and
click “Next”.You can choose 2.4/5G
network according to your needs.
This step is to ensure that
the wifi of the thermostat blinks. If
yes, click “Next” skip this step.
If device added successfully,
you can change the device the device
name and set region,then click “Done”.
You can enjoy remote control.
Check the real-time temperature and
set temperature ect.And adjust the
Settings.
:
Step 6 :
Register and log in with
mobile number/email
address in
the
AP
P.
Attention: Please read and agree
‘Privacy
Policy and Service
agreement’ before
registration.
Step 7 :
Step 8 :
T:27℃
H:53%
Period set
T:27℃
:53% H
Temp Tolerance: default 1°C /2°F
Note:Set schedules, the week can be multiple selection, complete batch change.
Air Sensor Error
Auto Mode