Do you have a question about the Heatstore HSR45 and is the answer not in the manual?
Ensure wall or supporting structure has adequate strength to support the heater as per Table 1.
Minimum 350mm clear space above heater lid required for float valve replacement.
Heater base must be level with, or higher than, the highest draw-off point.
Install servicing valves on inlet and outlet pipes as per regulations.
Decide heater position based on clearance and inlet/outlet connections; float valve can fit either side.
Use template to mark top fixing holes; check for hidden services before drilling.
Recommended 10mm wall fixings; drill, insert fixings, assemble spacing collars, and mark bottom holes.
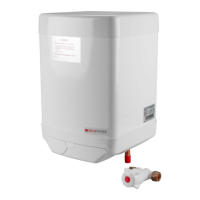
Fit float valve to cistern tank; swap seating for pressures below 1 bar.
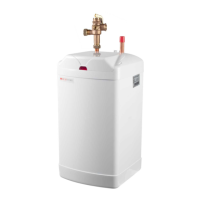
Fit overflow fitting with dip tube; install blanking plugs in unused holes.
Make electrical connection and set controls, but do not switch on until section 3 is complete.
Fit 3/4" BSP female to 22mm compression fitting to the 3/4" BSP outlet boss.
Locate heater onto top fixing collars and fit/tighten bottom fixings.
Connect heater outlet to services, supporting fitting and allowing clearance for plate removal.
Connect mains water using 15mm pipe to float valve; fit 1/2" BSP coupling and servicing valve.
Connect 22mm overflow pipe; ensure continuous fall to a safe, visible position.
Fit washer to screened breather, insert into lid hole, and secure with plastic nut.
Supply fused at 13A, via accessible double pole isolating switch with at least 3mm contact separation.
Use heat-resisting cable (85°C) with min. 1.5 mm² cross-sectional area for connections.
Remove terminal cover, check and adjust thermostat and thermal cut-out.
Strip cable sheath and conductor insulation; ensure sheath is held by cable grip.
Connect brown to thermal cut-out (L), blue to neutral, green/yellow to earth stud.
Refit terminal cover and tighten cable grip screws securely.
Ensure electrical supply is off; connect supply cable to connection point after heater is wall-mounted.
Adjust Cotherm TSD 01105 thermostat (no calibration); set to '+' then back 45°.
Thermal cut-out interrupts power on overheating; reset manually. Set 15°C above thermostat, max 85°C.
Do not switch on power until unit is filled with water and leaks are checked.
Ensure outlet isolating valve is open and all connected taps are closed.
Verify cold feed and vent pipes are free from obstructions.
Open inlet isolating valve, a hot tap, and mains supply; purge air from pipework.
Allow unit to fill, run hot tap briefly to purge air and flush pipes, then close tap.
Check water level in cistern tank after float valve shuts off; adjust if necessary.
Perform a thorough check of the entire installation for any leaks.
Fit the heater lid securely using the four provided screws.
Once all checks are complete, turn on the main electrical supply.
Isolate unit electrically, check water temp, then turn off water supply at servicing valve.
Remove terminal cover, disconnect supply cable from element, and undo heater plate retaining nuts.
Carefully remove the heater plate; use screws in marked holes if it is stuck.
Verify thermostat and thermal cut-out settings on the replacement heater plate.
Re-assemble in reverse order, using the new gasket, then refit drain nut and terminal cover.
| Brand | Heatstore |
|---|---|
| Model | HSR45 |
| Category | Water Heater |
| Language | English |