4 / 16
EN
EN - oriGiNAL iNtruCtioNS for uSE
SPECifiCAtioN
uSE of PurPoSE
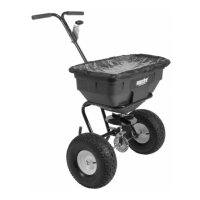
• Garden spreader 220 is designed to spread fertilizer, seed and salt.
• The saw is designed for home work. It is not designed for professional use.
• The machine can be operated only by one person.
• Improper use of this device may cause serious injuries. Before working with your
device, read all instructions carefully and make yourself familiar with all controls. In
case of doubt, get in touch with your service center. Keep this manual in a safe place
to have necessary information at any time.
ENViroNmENt for uSE of tHE ProduCt
• Do not use the product in places where you do not have a stable position and support for the
feet, such as slopes or after rain. Such areas may be slippery and dangerous.
• Operating temperature range is from – 15 ° – +35 ° C
uSErS of tHE ProduCt
The product must not be used by: tired people, people under the influence of alcohol, people
who take drugs or other substances decreasing attention, pregnant women, persons with poor
physical condition, people who do not read instructions, children
SAfEtY
• Never use the machine when there are other people or pets nearby.
• Work only in daylight or in good lighting.
• Before starting work with the device, carefully read instructions and familiarize yourself with
all the operating parts. If in doubt, contact an expert. This manual in a safe place to have the
necessary information whenever available.
• Do not run with the device. When handling the spreader, wear solid closed shoes. Watch out
for icy surfaces or wet grass.
• When fertilization follow the safety instructions ordered by the manufacturer of fertilizer.
• Do not use the product in strong wind or rain.
ASSEmBLY
Figure A. Installation of the wheels on the axis: - Put the wheels (2) onto the axis (1), slide the
washer (3) on them tightly and fasten the wheels with M5x10 screws (4). - Press the wheel
covers (5) to the wheels and tighten them in place.
Figure B. Supply bin support assembly: - Slide the support (7) into the bottom front part of supply
bin (6). - Fasten the support with screw
Figure C. Stepped regulator completation: - Attach the plastic grip (9) to the stepped regulator lever (10).
Figure D. - E. Handle assembly: - Put a total three parts of handle (11) together and fasten them
with screws (12), - Now insert the handle to the designated holes on the upper end of the supply
bin (6) and then attach by using screws (12).
 Loading...