13
1
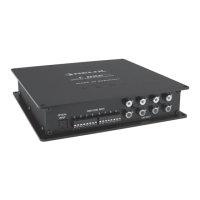
Optical Input
Optical input in SPDIF format for connection to si-
gnal sources with a digital audio output. The sam-
pling rate of this input must be between 6 and 192
kHz. The input signal is automatically adjusted to
the internal sampling rate.
2
Highlevel Input
8-channel high level loudspeaker input
Use this input to connect the processor directly to
loudspeaker outputs on an OEM or aftermarket ra-
dio that does not have any pre-amplier outputs.
The connection terminals are pluggable. The input
sensitivity of the high level input is adjustable from
6 to 20 Volts via the potentiometers on top of the C-
DSP for each channel-pair. Please note that the in-
put sensitivity must be adjusted to a level where no
clipping of the input stage is possible. See page 15.
3
Line Input
8-channel pre-amplier input to connect signal
sources such as radios. The input sensitivity of the
low level input is adjustable from 1,8 to 6 Volts via
the potentiometers on top of the C-DSP for each
channel-pair. Please note that the input sensitivity
must be adjusted to a level where no clipping of
the input stage is possible. See page 15.
4
Line Output
8-channel pre-amplier output
These are used to connect ampliers. The Output
voltage is max. 6 Volts. These outputs can be as-
signed inputs as desired in the DSP PC Tool soft-
ware.
5
Control Input
This multifunctional input is used to connect DSP
accessories like a „Bluetooth Interface“ or a remote
control.
6
MicrosSD card reader
The MicroSD card reader can be used to download
software updates as well as complete DSP setup
les containing all DSP settings. The setup le is
copied automatically to the C-DSP when the card
is inserted. Copying is shown by the status LED
(9) blinking red; when it reverts to green or orange
copying has been completed. Once the le‘s been
copied the card must be removed.
Attention: Do not remove the MicroSD card du-
ring copying.
The C-DSP can handle four different le extensions.
These les have “af1”/“ac1”, “af2”/“ac2”, “af3“/“ac3“
or “af4“/“ac4“ sufxes. The C-DSP has two internal
memories for storing DSP setup les which can be
toggled via the control button (7).
Please note: You have to upload always two setup
les at the same time due to the two processors
inside the C-DSP. So you have to upload the les
always as a pair. For the rst memory a pair con-
sists out of an „af1“ and „af3“ le and for the second
memory the pair consists out of an „af2“ and „af4“
le. During the update via the MicroSD card reader
both les have to be stored on the MicroSD at the
same time. Software updates are available from
www.audiotec-scher.com or www.helix-
hi.com (US).
7
Control Pushbutton
The control pushbutton allows the user to switch
between memory 1 („af1“ and „af3“ les) and me-
mory 2 („af2“ and „af4“ les). In addition this push-
button can be used to erase the whole memory.
To switch between the setups, the button must be
pressed and held for 1 second. Switching is indi-
cated by a singular red ash of the Status-LED (9).
Pressing the button for 5 seconds completely era-
ses the internal memory. This is indicated by a con-
stant ashing of the Status-LED (8).
Attention: After erasing the setups from memo-
ry the C-DSP will not reproduce any audio out-
put signal.
Please note: The C-DSP is delivered in factory
mode with two identical setup les stored in the in-
ternal memory.
8
Status LED
The Status LED indicates the current active DSP-
setup. Green means that setup 1 („af1“ and „af3“) is
loaded, orange means that setup 2 („af2“ and „af4“)
is loaded.
A ashing red light indicates that no setup is loaded.
Initial start-up and functions
 Loading...