Operating instruction • EVO7 • 12-2014 • 031-93157
Tension force
6
7 Tension force
The tension force that the application tool uses to tension the cable ties can be set via the
adjustment dial 5 (Figure A ).
7.1 Recommended tension force
The following formula can be used as a guideline for the recommended tension force on the
application tool.
Minimum tensile strength
= recommended pulling force
2
The minimum tensile strength is the force that the cable tie can withstand before it deforms or
tears (see cable tie technical specifications).
7.2 Adjustment lock
The adjustment lock prevents unintentional adjustment of the pulling force.
f Using a T8 Torx screwdriver, unscrew the screw
1 (Figure C ) of the adjustment lock from
position 2 .
f Tighten the screw 1 before locking in position
3 (Figure D ).
7.3 Setting the tension force via the adjustment dial
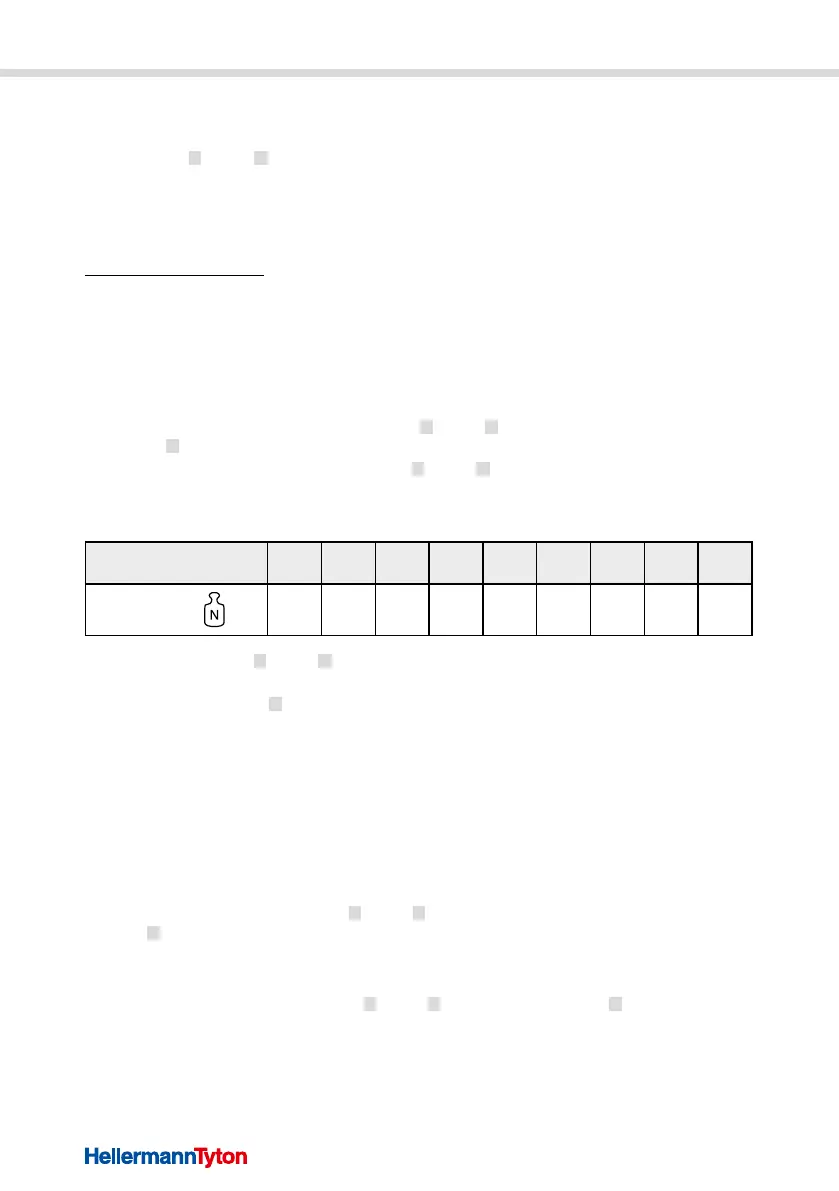
The tension force is selected in N (Newton) using the tension force scale.
Setting
(tension force scale) 0 1 2 3 4 5 6 7 8
Tension force in
20 38 51 68 85 104 125 143 165
f Press the thumb lever 3 (Figure A ) to the front in the direction of the arrow and hold it in this
position.
f Adjust the tension knob
5 to the desired tension setting.
f Release the thumb lever.
The tension forces specified are only general reference values. Due to the diversity of possible
influences during processing and use, we recommend to check the tension cut off forces with a
conventional force meter (frequency of the data recording should be at least 10 kHz).
7.4 Fine adjustment of the pulling force using the CALTOOL
Fine or readjustment is possible using the accessory part CALTOOL.
The factory setting (Setting 0-8) is changed (see table in “Setting the tension force via the
adjustment dial“).
f Insert the wide side of the CALTOOL
1 (Figure E ) into the three recesses of the adjustment
knob 2 .
f Dial the CALTOOL anti-clockwise to undo the cap.
f Remove the cap from the adjustment dial.
f Insert the narrow side of the CALTOOL
1 (Figure F ) into the adjustment unit 2 . Both tips of the
CALTOOL must engage in the recesses of the adjustment unit.

 Loading...