The HemoCue Hb 801 System is a portable, point-of-care device designed for the quantitative determination of hemoglobin in whole blood. It is intended for professional in vitro diagnostic use and can be used with capillary or venous whole blood samples (K₂EDTA and Li-Heparin) from adults, adolescents, children, and infants above 1 month old. The system comprises the HemoCue Hb 801 Analyzer and HemoCue Hb 801 Microcuvettes, which are single-use components.
Function Description
The core function of the HemoCue Hb 801 System is to measure hemoglobin concentration. The microcuvette acts as both a pipette and a sample carrier. Blood is drawn into the microcuvette cavity via capillary action. Once inserted into the analyzer, the device measures the absorbance of the whole blood at an Hb/HbO₂ isosbestic point (506 nm) and at an additional wavelength (880 nm) to compensate for potential interfering background substances like turbidity. The system is factory calibrated against the hemiglobincyanide (HiCN) method, which is the international reference method recommended by the International Council for Standardization in Haematology (ICSH), and requires no further calibration by the user.
The analyzer features a display that provides various information, including date, time, battery status, previous results, cleaning and quality control reminders, connectivity status (Bluetooth® and USB), measurement results, and error codes. LED indicators and audio signals provide immediate feedback on the device's status, such as a green flash and audio for a successful measurement, a green flash for a self-test in progress, and a red flash and audio for an error.
Usage Features
The HemoCue Hb 801 Analyzer is designed for ease of use in point-of-care settings. It can be powered by multiple sources: a USB cable connected to an electrical outlet or a computer, disposable or rechargeable AA batteries, or a HemoCue Rechargeable Battery (an optional feature set at the time of ordering). When using the HemoCue Rechargeable Battery, no other batteries should be installed. For storage, it is recommended to remove batteries.
Starting the device involves placing it on a horizontal, stable surface and pressing and holding the on/off button until all display segments are shown. Releasing the button allows the analyzer to enter the Ready State. To ensure all measurement result segments are functioning, the on/off button can be held longer during start-up for comparison with the full display segment view. The device can be turned off by pressing and holding the on/off button until it enters the Busy State, then releasing it and waiting for it to power down. The analyzer also has a power-save feature, automatically turning off after a period of inactivity (5 minutes on batteries, 30 minutes on USB cable), which can be adjusted in the settings.
The device allows for easy adjustment of date, time, and Bluetooth® settings. These settings are accessed by pressing and holding both buttons until the relevant areas on the display flash. The left button is used to change values, and both buttons are pressed once to exit the settings menu.
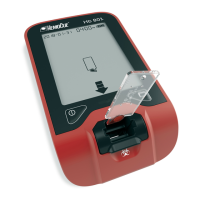
Measuring capillary blood involves a specific procedure to ensure accurate results. This includes ensuring the patient's hand is warm and relaxed, selecting the middle or ring finger (avoiding fingers with rings), cleaning and drying the fingertip, stimulating blood flow, puncturing with a high-flow lancet, wiping away the first few drops of blood, and then collecting a new drop to fill the microcuvette completely in one single step without refilling. It is crucial to fill the microcuvette within 40 seconds of collection. After filling, excess blood from the outside of the microcuvette should be wiped off, ensuring no blood is drawn out. A visual inspection of the microcuvette is necessary to confirm it is completely filled and free of air bubbles. Once ready, the filled microcuvette is inserted into the holder and pressed down, and the result is displayed within a second. After the result is shown, the microcuvette should be removed and discarded.
For venous blood and control material, the procedure is similar but includes additional steps. Venous samples should be anticoagulated (K₂EDTA or Li-Heparin) and can be stored for up to 24 hours at room temperature or in a refrigerator. If refrigerated, samples must be allowed to reach operating conditions and thoroughly mixed before use (at least 2 minutes on a mixer or 8-10 manual inversions). A drop of blood or control material is placed on a hydrophobic surface using a suitable transfer device, and then the microcuvette is filled in one single step, again within 40 seconds. Visual inspection and proper insertion into the analyzer follow the same steps as for capillary blood.
The analyzer stores up to 4000 previous results, which can be viewed by pressing the previous results button from the Ready State. The most recent result is always sequence number 0001. Users can scroll through stored results using the left or right buttons, or press and hold for quick scrolling. Exiting the previous results view is done by pressing both buttons once.
Connectivity features allow the analyzer to be connected to external software applications via a USB cable or Bluetooth® Low Energy (wireless connection). This enables changes to default features and data transfer. Security guidelines emphasize turning off Bluetooth® when not in use, connecting only to known and trusted devices, and not leaving the analyzer exposed or unattended.
Maintenance Features
The HemoCue Hb 801 Analyzer incorporates an internal quality control system, performing a self-test every time it is turned on, when the microcuvette holder is reinserted after removal, and hourly during use. This verifies the analyzer's performance. External quality control, if required by local regulations, should follow the procedures outlined for venous blood and control material measurement, using HemoCue-recommended controls.
Cleaning and disinfection are critical maintenance aspects. The process involves first cleaning and then disinfecting the analyzer. Cleaning agents such as water, alcohol (20–70%), mild detergent, or recommended disinfectants can be used. For disinfection, the recommended product is Super Sani-Cloth Germicidal Disposable Wipe, EPA Reg. No. 9480-4.
The cleaning procedure begins by turning off the analyzer and removing the microcuvette holder. A lightly dampened cotton swab with cleaning agent is used to clean all surfaces within the cavity, ensuring thorough cleaning. The microcuvette holder is also cleaned with the agent and allowed to dry separately. All outer surfaces of the analyzer are then cleaned with a lightly dampened wipe. After cleaning, all parts must be completely dry before reattaching the microcuvette holder if no disinfection is needed.
For disinfection, the analyzer must first be cleaned as described. The microcuvette holder is wiped repeatedly with a new Super Sani-Cloth Germicidal Disposable Wipe, ensuring all surfaces remain wet for 2 minutes. The same process is applied to all outer surfaces of the analyzer, maintaining wetness for the entire 2-minute contact time. After disinfection, any excess disinfectant is removed, or the parts are allowed to air dry completely before reattaching the microcuvette holder and turning on the analyzer.
Troubleshooting guidance is provided for various symptoms, including error codes, non-measurement, unexpected results, out-of-range results, and issues with the microcuvette holder or insertion. Main actions to resolve most problems include removing the microcuvette, turning the analyzer off and on, cleaning the analyzer, ensuring proper operating conditions, and following the operating manual. For persistent issues, further actions are suggested, such as checking battery status, setting date and time, or contacting HemoCue America. The warranty is void if the analyzer's cover is opened. Prior to service or disposal, the analyzer must be cleaned and disinfected.