English
8
g) Support any oversized workpiece to minimize
the risk of wheel pinching and kickback. Large
workpieces tend to sag under their own weight.
Supports must be placed under the workpiece near
the line of cut and near the edge of the workpiece on
both sides of the wheel.
ADDITIONAL SAFETY WARNINGS
1. Use the normal cut-off wheel on its normal working
surface.
2. Guard against cut-off sparks.
3. Properly replace the cut-off wheel.
4. Always pay attention that the cut-off wheel clamping
parts are never impaired. Defective parts will cause
damage to the cut-off wheel.
5. Ensure that the workpiece is free of foreign matter such
as nails.
6. Abrasive wheels shall be stored and handled with care in
accordance with manufacturer’s instructions.
7. Ensure that mounted wheel are fi tted in accordance with
the manufacture’s instructions.
8. Do never use the machine without the guard in place.
Always use the blade guard. A blade guard protects
the user against broken off parts of the cutting disc and
against accidental touching of the cutting disc.
9. Make sure that the guard operates properly and that it
can move freely. Never lock the guard in place when
opened.
10. Secure the workpiece. A workpiece clamped with
clamping devices or in a vice is held more secure than by
hand.
11. Do not use saw blade.
12. Store the machine in a safe manner when not being
used. The storage location must be dry and lockable.
This prevents the machine from storage damage, and
from being operated by untrained persons.
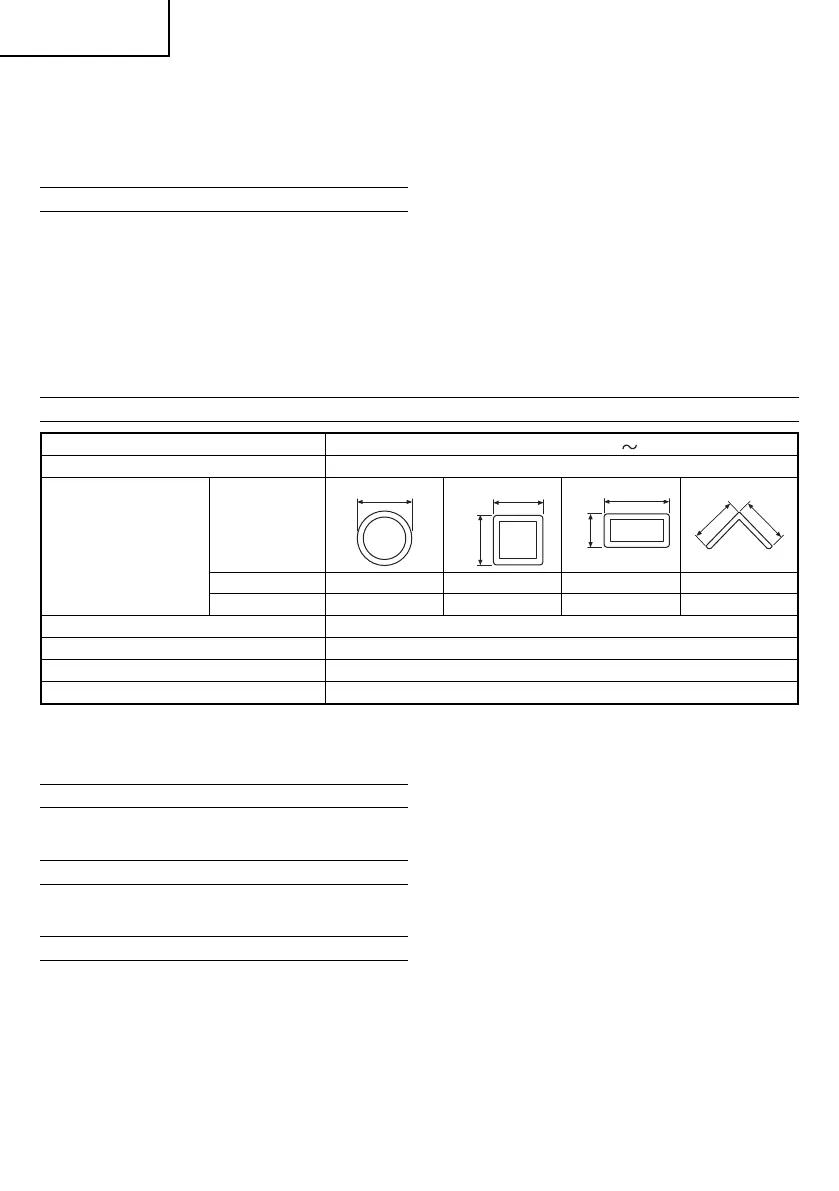
SPECIFICATIONS
Voltage (by areas)*
1
(220 V, 230 V, 240 V)
Power Input*
1
2200 W
Max. cutting dimensions*
2
Height × width
Shape of material
to be cut
A
A
A
B
A
A × B
A
A
Cutting angle 0° 120 mm 115 mm 90 mm × 200 mm 130 mm
Cutting angle 45° 115 mm 104 mm
110 mm × 104 mm
100 mm
Cut-off wheel ø355 × ø25.4 × 4 mm (Reinforced resinoid cut-off wheel)
No-load Speed 4100 min
-1
Max. working peripheral speed 4800 m/min
Weight 17.0 kg
*1 Be sure to check the nameplate on product as it is subject to change by areas.
*2 The maximum cutting dimensions are the permissible cutting dimensions when the cut-off wheel is not remarkably worn
by cutting material.
STANDARD ACCESSORIES
(1) Cut-off wheel ................................................................. 1
(2) Hex. bar wrench ............................................................ 1
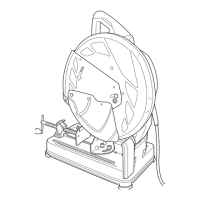
APPLICATIONS
Cutting of various metallic materials such as pipes, round
bars and shaped steel.
PRIOR TO OPERATION
1. Power source
Ensure that the power source to be utilized conforms
to the power requirements specifi ed on the product
nameplate.
2. Power switch
Ensure that the power switch is in the OFF position. If the
plug is connected to a receptacle while the power switch
is in the ON position, the power tool will start operating
immediately, which could cause a serious accident.
3. Extension cord
When the work area is removed from the power source,
use an extension cord of suffi cient thickness and rated
capacity. The extension cord should be kept as short as
practicable.
4. Install the machine on a level fl at place, and keep it in
a stable condition. Prior to shipping, the equipment is
subjected to a rigid factory inspection to prevent electric
shocks during operation.
5. Since movable portions are secured by tension of a chain
while in transit, remove the chain from the chain hook by
slightly depressing the switch handle.
6. Ascertain that all cut-off wheels are in perfect condition,
and do not display scars and cracks.
7. Although they have been fully clamped at the factory
prior to delivery, reclamp the clamping nuts securely for
safety.
8. Possible accidents such as a cracked cut-off wheel
is prevented by this protective cover (wheel cover).
Although it has been fully clamped at the factory prior
to delivery, securely reclamp the mounting screws for
safety.
000BookCC14STTurUkRu.indb8000BookCC14STTurUkRu.indb8 2019/01/219:54:502019/01/219:54:50
 Loading...