9
English
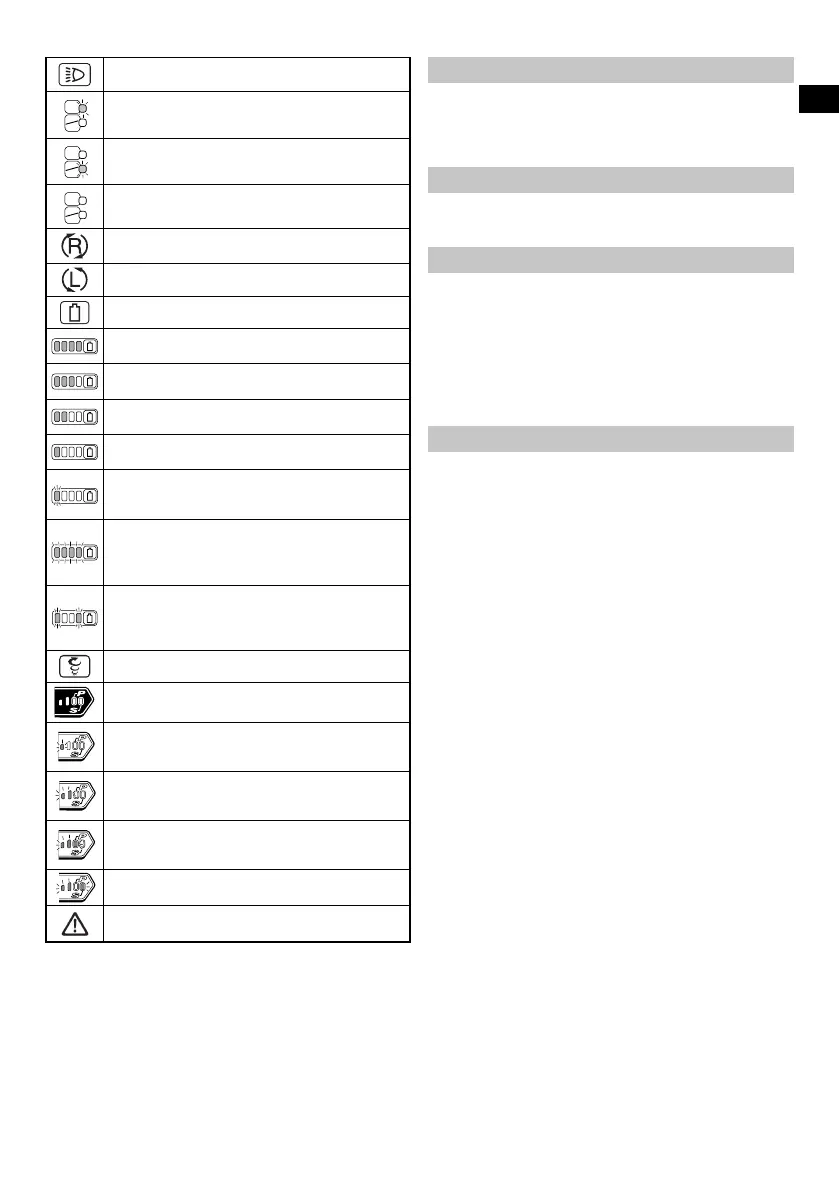
Light section switch
ON
ON
OFF
Always ON (turn o after 2 minute)
ON
ON
OFF
Light only SW-ON
ON
ON
OFF
Always OFF
Clockwise rotation
Counterclockwise rotation
Remaining battery indicator switch
Lights ;
The battery remaining power is over 75%.
Lights ;
The battery remaining power is 50% – 75%.
Lights ;
The battery remaining power is 25% – 50%.
Lights ;
The battery remaining power is less than 25%.
Blinks ;
The battery remaining power is nearly empty.
Recharge the battery soonest possible.
Blinks ;
Output suspended due to high temperature.
Remove the battery from the tool and allow it to
fully cool down.
Blinks ;
Output suspended due to failure or malfunction.
The problem may be the battery so please
contact your dealer.
Tightening mode selector switch
Tightening mode indicator lamp
Lights ; “Delicate work”
Tightening small diameter screws (M6 or
similar), etc.
Lights ; “Normal work”
Tightening short screws, A xing plasterboard,
etc.
Lights ; “Heavy load work”
Tightening long screws, coach screws, bolts,
etc.
Lights ;
Self drilling screw tightening
Warning
STANDARD ACCESSORIES
In addition to the main unit (1 unit), the package contains the
accessories listed on page 244.
Standard accessories are subject to change without notice.
APPLICATIONS
Driving and removing of machine screws, wood screws,
tapping screws, etc.
SPECIFICATIONS
The specifi cations of this machine are listed in the Table on
page 244.
NOTE
Existing batteries (BSL3660/3620/3626, BSL18xx and
BSL14xx series) cannot be used with this tool.
Due to HiKOKI’s continuing program of research and
development, the specifi cations herein are subject to
change without prior notice.
CHARGING
Before using the power tool, charge the battery as follows.
1. Connect the charger’s power cord to the receptacle.
When connecting the plug of the charger to a receptacle,
the pilot lamp will blink in red (At 1- second intervals).
2. Insert the battery into the charger.
Firmly insert the battery into the charger as shown in
Fig. 3 (on page 2).
3. Charging
When inserting a battery in the charger, the charge
indicator lamp will blink in blue.
When the battery becomes fully recharged, the charge
indicator lamp will light up in green. (See Table 1)
(1) Charge indicator lamp indication
The indications of the charge indicator lamp will be as
shown in Table 1, according to the condition of the
charger or the rechargeable battery.
0000BookWH36DB.indb90000BookWH36DB.indb9 2018/09/0415:45:012018/09/0415:45:01