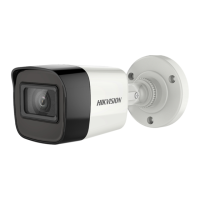
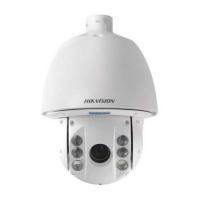
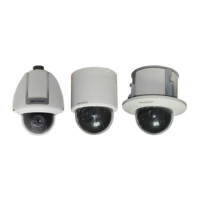
This document outlines the features, usage, and maintenance guidelines for the Hikvision Turbo HD D3T Series Bullet, Turret, and Dome Cameras. These cameras are designed to provide high-quality video surveillance with a range of adjustable settings to suit various environmental conditions.
Function Description
The Hikvision Turbo HD D3T Series cameras are advanced surveillance devices featuring a high-performance CMOS sensor. They are equipped with an IR cut filter with auto switch, enabling them to capture clear images in varying light conditions, from bright daylight to complete darkness. The cameras support an OSD (On-Screen Display) menu, which allows users to configure various parameters to optimize image quality and camera behavior. Internal synchronization ensures stable video output, while the SMART IR mode intelligently adjusts infrared illumination to prevent overexposure of objects close to the camera, ensuring balanced lighting for night vision. A key feature is their versatile 4-in-1 video output, supporting TVI, AHD, CVI, and CVBS formats, making them compatible with a wide range of DVRs and monitoring systems. The 3-axis adjustment capability provides flexibility in mounting and aiming the camera, ensuring comprehensive coverage of the desired area.
Usage Features
The cameras offer a user-friendly experience with easily accessible controls and configurable settings.
Video Output Switching: A significant usage feature is the ability to switch between different video output formats (TVI, AHD, CVI, and CVBS) by pressing and holding a dedicated switch button for 5 seconds. This flexibility ensures compatibility with various existing surveillance infrastructures, simplifying integration and upgrades.
OSD Menu Navigation: The OSD menu is the primary interface for configuring camera settings. It can be accessed through the PTZ (Pan-Tilt-Zoom) control interface of a connected TVI DVR or by calling preset No. 95. Once in the menu, users can navigate using direction arrows (up/down to select items, left/right to adjust values) and the Iris+ button to confirm selections.
Video Format Selection: Users can select the video format, typically 2MP at 25fps or 30fps. When the video output is set to CVBS, the format can be adjusted to PAL or NTSC, catering to different regional standards.
Exposure Settings: The EXPOSURE menu allows for fine-tuning of brightness-related parameters.
- EXPOSURE MODE: This offers GLOBAL, BLC (Backlight Compensation), and WDR (Wide Dynamic Range) options.
- GLOBAL: Provides normal exposure based on the overall image brightness.
- BLC: Compensates for bright backgrounds to make foreground objects clearer, useful in scenarios with strong backlighting.
- WDR: Balances brightness levels across very bright and very dark areas in the same image, ensuring details are visible in both extremes.
- AGC (Automatic Gain Control): Optimizes image clarity in low light. Users can set the AGC level to HIGH, MEDIUM, or LOW. It's important to note that higher AGC levels may amplify noise in the image.
- SLOW SHUTTER: Increases exposure time to enhance sensitivity in low-lux conditions, allowing the camera to produce images even in very dim environments. Options range from OFF to x16, depending on light conditions.
Day/Night Settings: The DAY/NIGHT menu controls how the camera adapts to changing light.
- COLOR: Keeps the image in color during the day.
- B/W (Black White): Provides a black and white image, which is often preferred in low light conditions, especially when IR LIGHT is enabled.
- AUTO: Automatically switches between day and night modes.
- IR LIGHT: Can be turned on or off to meet specific lighting requirements.
- SMART IR: Adjusts the intensity of the IR light to prevent overexposure. It offers MODE 1 (default, suitable for both indoor and outdoor) and MODE 2. MODE 1 provides more pronounced IR effects.
- LEVEL: Adjusts the intensity of SMART IR from 0 to 3, with higher values yielding more obvious effects.
- D-N THRESHOLD (Day to Night Threshold): Controls the sensitivity for switching from day to night mode (1 to 9). A larger value makes the camera more sensitive to light changes.
- N-D THRESHOLD (Night to Day Threshold): Controls the sensitivity for switching from night to day mode (1 to 9). A larger value makes the camera more sensitive.
Video Settings: The VIDEO SETTINGS submenu offers comprehensive image adjustments.
- IMAGE MODE: Adjusts image saturation, with options like STD (Standard) or HIGH-SAT (High Saturation).
- WHITE BALANCE: Corrects color temperature to remove unrealistic color casts.
- AUTO: Automatically adjusts white balance based on scene illumination.
- MANUAL: Allows users to manually set R-GAIN/B-GAIN values (1 to 255) to fine-tune red/blue color shades.
- BRIGHTNESS: Adjusts the overall brightness of the image (1 to 9).
- CONTRAST: Enhances the difference between light and dark parts of the image (1 to 9).
- SHARPNESS: Determines the level of detail reproduced by the imaging system (1 to 9).
- SATURATION: Changes the intensity of colors (1 to 9).
- 3DNR (Digital Noise Reduction): Reduces noise, especially in moving images under low light, resulting in clearer and sharper video (1 to 9).
- MIRROR: Flips the image. Options include OFF, H (horizontal 180°), V (vertical 180°), and HV (both horizontal and vertical 180°).
Factory Default: This option allows users to reset all camera settings to their original factory defaults.
Exit and Save & Exit: Users can exit the menu without saving changes or save all current settings and then exit.
Maintenance Features
Proper maintenance ensures the longevity and optimal performance of the camera.
Physical Protection:
- Avoid Physical Shock: Do not drop the camera or subject it to physical shock.
- Handle with Care: Avoid touching sensor modules with fingers to prevent damage or smudges.
- Environmental Protection: Do not place the camera in extreme temperatures (-40°C to 60°C), dusty, or damp locations. Protect it from high electromagnetic radiation.
- Sun/Bright Light Avoidance: Do not aim the camera directly at the sun or other extremely bright light sources, as this can damage the sensor.
- Laser Beam Protection: Ensure the sensor surface is not exposed to laser beams, as this can burn out the sensor.
- Ventilation: Good ventilation is required to prevent heat accumulation, especially in the operating environment.
- Liquid Avoidance: For non-waterproof devices, keep the camera away from liquids.
Cleaning:
- Gentle Cleaning: If cleaning is necessary, use a clean cloth with a small amount of ethanol and wipe gently.
Troubleshooting and Safety:
- Electrical Safety: Always comply with national and regional electrical safety regulations.
- Power Supply: Ensure the input voltage meets SELV (Safety Extra Low Voltage) and Limited Power Source standards (12 VDC according to IEC60905-1).
- Avoid Overload: Do not connect multiple devices to a single power adapter to prevent overheating or fire hazards.
- Secure Connections: Make sure the power plug is firmly connected to the socket.
- Secure Mounting: If wall or ceiling mounting is used, ensure the device is firmly fixed.
- Malfunction Response: If smoke, odor, or noise is detected, immediately turn off the power, unplug the cord, and contact the service center.
- Professional Service: Never attempt to disassemble the camera unless you are a trained professional.
Packaging:
- Original Packaging: For delivery, the camera should be packed in its original packaging or packaging of the same texture to prevent damage during transit.
These features collectively provide a robust and adaptable surveillance solution, allowing users to achieve optimal video quality and reliable performance across diverse applications and environments.