Do you have a question about the HIKVISION iDS-7204HUHI and is the answer not in the manual?
Outlines the manual's scope, applicability to Turbo HD DVR, and update information.
Details warranty limitations, liability, and compliance responsibilities for product use.
Covers FCC compliance, conditions, and EU conformity for EMC, LVD, RoHS, WEEE, and battery directives.
States compliance with Industry Canada ICES-003 standards for digital devices.
Explains the meaning of NOTE, WARNING, and DANGER symbols used in the manual.
Provides critical safety guidance on configuration, electrical compliance, and voltage requirements.
Offers advice on installation environment, operation, and handling to prevent damage or hazards.
Lists specific power supply models approved for different DVR models, categorized by region.
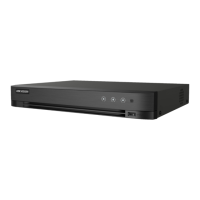
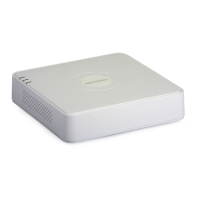
Details common interfaces found on the rear panels of various DVR models.
Provides essential instructions and considerations for installing the DVR unit.
Details various methods for installing Hard Disk Drives (HDDs) into the DVR.
Guides on connecting PTZ controllers to the DVR using the RS-485 interface.
Instructions for correctly starting up the DVR and checking its power status.
Process for initial device activation, including setting an admin password and security questions.
Details on configuring unlock patterns and the standard user login process.
Covers logging out, shutting down, rebooting, and configuring signal inputs.
Guides for adding IP cameras and connecting PoC cameras with power management.
Instructions for setting up general network parameters and Hik-Connect for remote access.
Explains live view, recording settings, and playback functionalities.
Instructions for accessing the DVR via web browser, including activation and login steps.
This document serves as a Quick Start Guide for a Hikvision Digital Video Recorder (DVR), specifically covering Turbo HD DVR models. It provides essential information for installation, operation, and basic configuration.
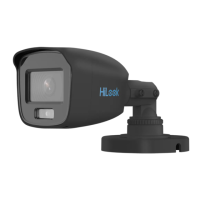
The Hikvision Digital Video Recorder is designed for surveillance applications, enabling the recording and management of video from both analog (Turbo HD, AHD, HDCVI, CVBS) and IP cameras. It supports various signal input types and offers features for live viewing, recording, and playback of video footage. The DVR can be accessed and managed locally through its menu system or remotely via a web browser or the Hik-Connect mobile application/platform. It also supports Power over Coaxitron (PoC) for compatible cameras, simplifying power and data transmission over a single coaxial cable.
The DVR supports multiple power supply models depending on the specific device model (e.g., DS-7104HQHI-K1, DS-7108HQHI-K1, DS-7104HUHI-K1, DS-7108HUHI-K1). Power input requirements are 100~240 VAC, 12 VDC, or 48 VDC, adhering to the IEC60950-1 standard for SELV (Safety Extra Low Voltage) and Limited Power Source.
Rear Panel Interfaces:
Environmental Conditions:
HDD Support:
Network Access:
Device Activation: Upon first-time access, the DVR requires activation by setting an admin password. This can be done locally via the device menu, a web browser, SADP tool, or client software. A strong password (8-16 characters, including at least three categories: upper case, lower case, numbers, special characters) is highly recommended for security. Password resetting options include Export GUID, Security Question Configuration, or Reserved E-mail Settings.
Login Methods:
Signal Input Configuration: For some models, users can manually configure analog and IP signal input types, including 5 MP long distance transmission. Other models automatically recognize and connect Turbo HD, AHD, HDCVI, CVBS, and IP signal inputs.
IP Camera Management: IP cameras can be added to the device's connection list for live video and recording. This involves entering the IP address, protocol (e.g., ONVIF), management port, and login credentials for the IP camera.
PoC Camera Connection: For compatible models, the DVR supports PoC cameras, automatically detecting and managing their power consumption via coaxial communication. The DVR provides power to these cameras via coaxitron. Users can enable/disable PoC for specific channels and monitor the status of connected PoC cameras. Warnings are provided regarding insufficient power for PoC and the importance of using Hikvision PoC cameras to prevent damage.
Network Settings: Essential network settings include configuring NIC Type, IPv4 Address, IPv4 Gateway, MTU, and DNS Server.
Hik-Connect Integration: The DVR can be integrated with Hik-Connect for remote access and management via a mobile application or web platform. This requires enabling the function, agreeing to service terms and privacy statements, and setting a verification code (6-12 letters/numbers, case-sensitive). Stream encryption can also be enabled for remote access and live view.
Live View: Users can enter live view mode, select a window, and double-click a camera from the list to display its video. A toolbar provides options for capture, instant playback, audio on/off, digital zoom, live view strategy, information display, and recording start/stop.
Recording Settings: Before recording, a hard disk must be installed and initialized. Recording can be initiated from the live view mode by selecting a camera window and clicking the record icon.
Playback: The DVR supports various playback modes for recorded video files and pictures: instant playback, all-day playback for specific channels, and playback by normal/event/smart/tag/system logs/sub-periods/external file search/picture. Users can select channels, dates from a calendar, and control playback progress using a dedicated interface.
System Operations: The DVR allows users to log out of the system, shut down, or reboot the device from the menu bar.
HDD Installation: The manual provides detailed instructions for installing Hard Disk Drives (HDDs), including bracket installation (removing the cover, fixing HDD with screws, connecting data and power cables) and front panel plug-pull installation (fixing mounting ears, unlocking and opening the front panel, inserting HDD). It emphasizes disconnecting power before installation and using factory-recommended HDDs.
Safety Instructions:
Preventive and Cautionary Tips:
Regulatory Compliance: The device complies with FCC regulations (Class A digital device, Part 15) and EU conformity standards (EMC Directive 2014/30/EU, LVD Directive 2014/35/EU, RoHS Directive 2011/65/EU, WEEE directive 2012/19/EU, battery directive 2006/66/EC). It also meets Industry Canada ICES-003 compliance.
General Maintenance: