Do you have a question about the HIKVISION TURBO HD DS-2CE56D5T and is the answer not in the manual?
Details FCC compliance, rules, and conditions for digital devices operating in commercial environments.
Explains CE marking, conformity to European directives (Low Voltage, EMC, RoHS), and disposal information.
Highlights the camera's high-sensitivity sensor, advanced circuit design, high resolution, low distortion, and low noise.
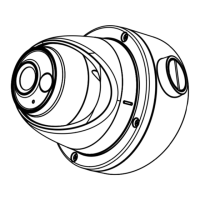
Provides labeled diagrams identifying key components for Type I and Type II dome cameras.
Outlines essential pre-installation checks, including package contents, power status, environment, and wall strength.
Details the steps for mounting the camera on a ceiling, including drilling, removing the bubble, and securing the device.
Guides users on installing the camera within a ceiling, requiring a separate in-ceiling mount and detailing the steps.
Explains the process for in-ceiling installation using a gang box, specifically for Type 1 cameras.
Allows selection between PAL and NTSC video output formats for the camera.
Enables the user to choose the OSD menu language from a list of supported languages.
Covers scene selection, exposure settings, backlight compensation, white balance, day/night modes, and noise reduction.
Includes settings for camera title, freeze, mirror, D-ZOOM, sharpness, monitor type, and LSC.
Provides options to reset all camera settings to default and exit the menu system.
This document describes the TURBO HD 1080P Dome Camera, a surveillance device designed for high-quality image capture and processing in various environments.
The camera utilizes a new generation CMOS sensor with high sensitivity and an advanced circuit board design. This combination allows it to deliver high-resolution images with low distortion and minimal noise, making it suitable for both supervisory systems and general image processing applications. The camera supports an IR cut filter with auto-switching capabilities, enabling effective operation in varying light conditions. An On-Screen Display (OSD) menu provides access to configurable parameters, allowing users to fine-tune settings for optimal performance. Key functions include auto white balance, auto gain control, electronic shutter control, and internal synchronization, all contributing to consistent and clear image output. The inclusion of SMART IR mode ensures intelligent infrared illumination, preventing overexposure of objects close to the camera while providing adequate lighting for distant subjects. Unit transmission control is also supported, facilitating integration into existing surveillance infrastructures.
The camera is designed for versatile installation, with advanced 3-axis adjustability to meet diverse mounting requirements. This allows for flexible positioning and aiming, ensuring optimal coverage of the desired area. The OSD menu, accessible via a coaxial camera controller (purchased separately) or a supported TVI DVR, offers comprehensive control over the camera's functions.
Scene Settings: Users can select predefined scene modes such as "indoor," "outdoor," "indoor 1," and "low-light" to optimize camera performance for specific environmental conditions.
Lens Control: The camera is equipped with a fixed lens, simplifying setup and ensuring consistent focal performance.
Exposure Control:
Backlight Compensation (BLC):
White Balance (WB): Multiple white balance modes are available, including MANUAL, ATW (Auto-tracking White Balance), and AWC SET, ensuring accurate color reproduction under different lighting conditions.
Day & Night Switch: The camera supports Color, B/W, and EXT modes for automatic or manual switching between day and night vision.
Noise Reduction (NR):
Special Features:
Motion Detection: Users can define specific MOTION areas, toggle their display status (ON/OFF), adjust sensitivity from 0 to 60, and enable or disable the MOTION VIEW status.
Privacy Masking: Users can define PRIVACY areas, set their display status (INV, MOSAIC, COLOR, or OFF), and adjust their position and size to obscure sensitive regions.
Defect Correction: LIVE DPC, STATIC DPC, and Black DPC are adjustable, allowing for correction of pixel defects.
Image Adjustment:
Reset: All settings can be reset to their default values.
The device is designed for durability and ease of use, but proper installation and handling are crucial for long-term performance.
Installation Guidelines:
Cleaning and Handling:
Regulatory Compliance:
By adhering to these guidelines and utilizing the camera's extensive configuration options, users can ensure reliable and high-quality surveillance performance for an extended period.
| Signal System | PAL/NTSC |
|---|---|
| Day & Night | ICR |
| IR Range | 20 m |
| Power Consumption | Max. 4W |
| Ingress Protection | IP66 |
| Image Sensor | 2MP CMOS Image Sensor |
| Resolution | 1920 x 1080 |
| Lens | 3.6 mm |
| Minimum Illumination | 0.01 Lux @ (F1.2, AGC ON) |
| Video Frame Rate | 25/30fps @ 1080P |
| Power Supply | 12 VDC ± 15% |
| Operating Conditions | Humidity 90% or less (non-condensing) |