Chapter 5 Hardware Maintenance and Replacement | Hillstone
Hillstone SG-6000 E-Series Hardware Reference Guide
2. Pull the fan tray out of the chassis by holding the provided handle.
Note: To avoid over-heating, insert a replacement fan tray immediately after
removing the existing one.
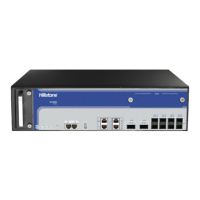
Installing and Removing the Anti-dust Mesh
SG-6000-E6368, SG-6000-E6360, SG-6000-E6168, SG-6000-E6160, SG-6000-
E5568, SG-6000-E5560, SG-6000-E5268, SG-6000-E5260, SG-6000-E5168 and
SG-6000-E3965 are designed with anti-dust mesh. This section describes the
installation and remove of anti-dust mesh. The anti-dust mesh is hot-swappable.
Take the following steps to install the anti-dust mesh:
1. Hold the screws of the anti-dust mesh and slide the anti-dust mesh into the
slot cage until you feel resistant.
2. Tighten the screws on the anti-dust mesh.
Take the following steps to remove the anti-dust mesh:
1. Loosen the screws.
2. Hold the screws and pull the anti-dust mesh straight out of the chassis.
Figure 5-2: Pulling Anti-dust Mesh Out