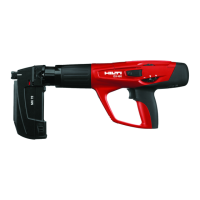
The Hilti DX 460 is a powder-actuated tool designed for professional fastening applications. It utilizes the well-proven piston principle to drive nails, threaded studs, and composite fasteners into concrete, steel, and sand-lime block masonry. This principle ensures optimal working and fastening safety, as approximately 95% of the kinetic energy is absorbed by the piston, driving fasteners at a much reduced velocity (less than 100 m/sec) in a controlled manner, making dangerous through-shots virtually impossible when used correctly.
Function Description:
The tool operates by transferring energy from a propellant charge to a piston, which then drives the fastener into the base material. After firing, gas pressure from the used cartridge automatically returns the piston to its starting position and feeds the next cartridge into the firing chamber. This automatic process allows for quick and economical fastenings. The DX 460 is compatible with 6.8/11 caliber cartridges. The use of a nail magazine significantly enhances the speed and convenience of fastening, particularly for large numbers of identical fastenings.
The DX 460 incorporates a 5-way safety system for the protection of both the operator and bystanders. Key safety features include:
- Contact Pressure Safety Device: The tool requires significant force to be pressed against the work surface to fire. It will only fire when correctly pressed against the surface (1.) and the trigger is then pulled (2.).
- Unintentional Firing Safety Device: This prevents the tool from firing if the trigger is pulled before the tool is pressed against the work surface.
- Drop-Firing Safety Device: The firing mechanism is coupled with the cocking movement, preventing the tool from firing if dropped onto a hard surface, regardless of the impact angle.
- Trigger Safety Device: The cartridge cannot be fired by simply pulling the trigger; the tool must be pressed against the work surface.
Important Technical Specifications:
- Weight: 3.25 kg (7.16 lb) without magazine, 3.51 kg (7.78 lb) with magazine.
- Tool Length: 458 mm (18.03″) without magazine, 475 mm (18.7") with magazine.
- Max. Nail Length: 72 mm (27/8").
- Recommended Maximum Fastening Rate: 700 per hour.
- Cartridges: 6.8/11 M (27 cal. short) in green (low), yellow (medium), red (heavy), and black/purple (extra heavy) power levels.
- Power Regulation: 4 cartridge power levels with a locking function.
- MX 72 Magazine:
- Weight: 0.653 kg (1.44 lb).
- Max. Nail Length: 72 mm (27/8").
- Magazine Capacity: Max. 13 nails.
Usage Features:
- Loading:
- Single-fastener tool: Insert the fastener head-first until the washer is held, then insert the cartridge strip (narrow end first) into the grip until flush. The last visible number on the strip indicates the next cartridge to be fired.
- Magazine tool: Release and pull down the magazine cover, load a new nail strip, push the cover up until it snaps closed, then push the cartridge strip (narrow end first) into the grip until flush.
- Power Adjustment: Start with the lowest power level (setting 1) and increase if the fastener does not penetrate deeply enough. Use a more powerful cartridge if necessary.
- Fastening: Press the tool firmly against the work surface at right angles and pull the trigger.
- Reloading: Remove the cartridge strip and fastener from the tool. For the magazine tool, release and pull down the magazine cover, ensure no nail strip is present, then push the cover up.
- Fastener Guides: Various fastener guides are available for different applications, including standard, improved accessibility, and spall stop guides.
- Pistons: Different pistons are available for specific applications, such as standard, AL nails, wood, and insulation fasteners.
- Safety Precautions:
- Always read operating instructions before use.
- Wear eye protection, a hard hat, and ear protection.
- Avoid unfavorable body positions and ensure the workplace is clear of objects that could cause injury.
- Never point the tool at yourself or bystanders.
- Do not drive nails into unsuitable materials (e.g., glass, marble, thin-gauge sheet metal).
- If a cartridge misfires, keep the tool pressed for 30 seconds, then withdraw it carefully, ensuring it's not pointed at anyone.
- Never attempt to pry a cartridge from the magazine or tool.
- Unload the tool before cleaning, servicing, changing parts, or storage.
- Store cartridges and unloaded tools in a dry, high, and locked place out of reach of children.
- Do not disassemble the tool while hot.
- Do not exceed the recommended maximum fastener driving rate to prevent overheating.
Maintenance Features:
- Regular Inspection: Check all external parts for damage and ensure controls operate properly. Do not use a damaged tool.
- Cleaning:
- Clean the outer casing with a slightly damp cloth. Do not use spray or steam-cleaning systems.
- Clean ventilation slots to keep them unobstructed.
- Clean the threaded section of the fastener guide/magazine with a flat brush and lightly spray with Hilti spray.
- Clean the piston return unit (spring, front end, and end face holes) with flat and small round brushes, then lightly spray with Hilti spray.
- Clean inside the housing with a large round brush and lightly spray with Hilti spray.
- Clean the cartridge strip guideway with the provided scraper, lifting the rubber cover slightly.
- Lightly spray the power regulation wheel with Hilti spray.
- Part Replacement:
- Buffer: Replace if the metal ring is loose or broken, the buffer no longer holds on the fastener guide, or excessive/uneven wear is noticed.
- Piston: Replace if broken, the tip is heavily worn (90° segment chipped off), piston rings are broken or missing, or it is bent. Do not modify or grind pistons.
- Fastener Guide Nosepiece: Replace if the tubular section is damaged (e.g., bent, widened, or cracked).
- Disassembly/Assembly: Instructions are provided for disassembling and assembling the tool for cleaning and part replacement, including removing the fastener guide/magazine, buffer, piston, and piston return unit.
- Post-Maintenance Check: After care and maintenance, ensure all protective and safety devices are fitted and function correctly.
- Lubricants: Use only Hilti spray; other lubricants may damage rubber parts, especially the buffer.
The DX 460 is part of a "technical unit" system, meaning optimal fastening is achieved when using Hilti fasteners, cartridges, and accessories, or products of equivalent quality. The tool bears the PTB approval mark (S 812), guaranteeing compliance with approved types.