6
English
Fig. 8
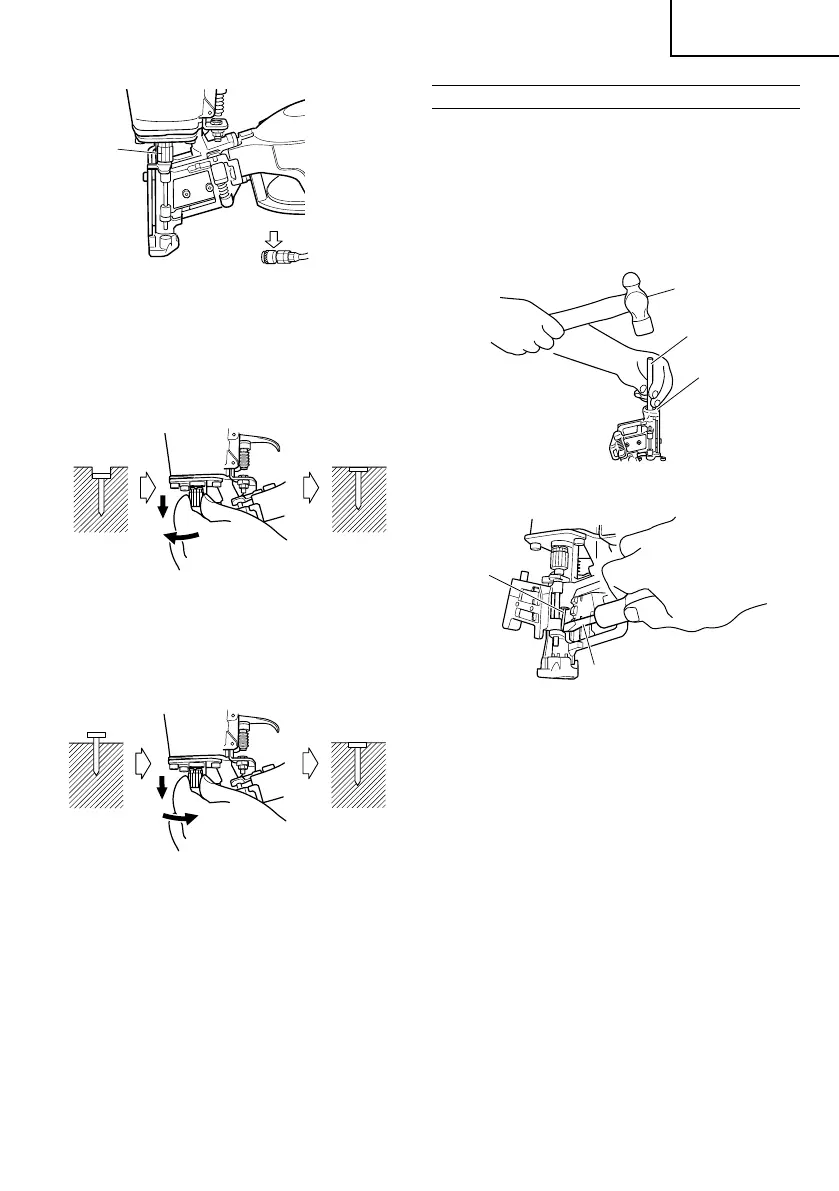
2 If nails are driven too deep, turn the adjuster
counterclockwise while pulling it downward.
When the adjuster is released, it returns upward.
Furthermore, turn the adjuster until it reaches a position
where it gets fixed with a clock. (Fig. 9)
Fig. 9
If nails are driven too shallow, turn the adjuster
clockwise while pulling it downward.
When the adjuster is released, it return upward.
Furthermore, turn the adjuster until it reaches a position
where it gets fixed with a clock. (Fig. 10)
Fig. 10
The adjuster can be fiexed each at 1/4 rotation.
The adjuster moves approximately 0.25mm per 1/4
rotation.
3 Stop turning the adjuster when a suitable position is
reached for a nailing test.
4 Connect the air hose.
ALWAYS WEAR EYE PROTECTOR.
Perform a nailing test.
5 DISCONNECT AIR HOSE FROM NAILER.
6 Choose a suitable position for the adjuster.
NOTE:
䡬 The nail-driving depth can also be adjusted by changing
the air pressure used. Carry this out together with
movement of the adjuster. Using a high air pressure
that does not match the nail-driving resistance will
shorten the life of this nailer.
INSPECTION AND MAINTENANCE
CAUTION:
Be sure to disconnect the hose during cleaning
jams, inspection, maintenance and cleaning.
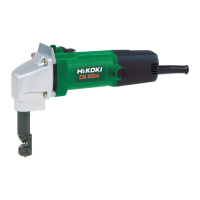
1. Countermeasure for nail jamming
(1) Remove the nail roll from the magazine, open the nail
guide, insert a rod into the outlet and tap the rod with
a hammer. (Fig. 11).
(2) Remove the jammed nail with slotted screwdriver.
(Fig. 12)
Fig 11
Fig 12
(3) Cut off the defective part of the steel wire which links
the nails with cutting nippers, correct the deformation,
then load the nail roll in the magazine.
(4) In case of frequent jams, consult the Authorized Service
Center from which you bought this machine.
2. Check on mounting screws for each part
At regular intervals check every part for loose
mounting screws and whether or not there are any
air leaks. Retighten any loose screws. Operating the
equipment with loose screws untightened will incur
a hazard.
3. Protection against dirt
䡬 Remove dirt from the inlet port and interior of the
hose.
䡬 Use only clean oil to protect the air intake port and
sliding part against clogging or damage.
4. Inspecting the feeders
(1) Occasionally clean the knob sliding part and then
apply the recommended oil. (See Fig. 13)
Adjuster
Disconnect
air hose
15
Too Deep Flush
Turn Adjuster
2
Too Shallow Flush
Turn Adjuster
2
Hammer
Rod
Outlet
Nail
Slotted Screw Driver