EasyManua.ls Logo

Hitachi CP-S225 User Manual

Hitachi CP-S225
51 pages
To Next Page IconTo Next Page
Page #1 background imageLoading...
Page #1 background image
USER'S MANUAL Vol.1 Basic
Please read this user's manual thoroughly to ensure correct usage through understanding.
BEDIENUNGSANLEITUNG Teil 1 Grundlagen
Bitte lessen Sie diese Benutzerhandbuch zugunsten der korrekten Bedienung aufmerksam.
MANUEL D'UTILISATION Vol.1 Fondements
Nous vous recommandons de lire attentivement ce manuel pour bien assimiler le fonctionnement de l'appareil.
MANUALE D'ISTRUZIONI Vol.1 Informazioni di base
Vi preghiamo voler leggere attentamente il manuale d'istruzioni in modo tale da poter comprendere quanto riportato
ai fini di un corretto utilizzo del proiettore.
MANUAL DE USUARIO Vol.1 Básico
Lea cuidadosamente este manual del usuario para poder utilizar corretamente el producto.
GEBRUIKSAANWIJZING Vol.1 Basis
Lees voor het qebruik alstublieft deze handleiding aandachtig door, om volledig profijt te hebben van de
uitgebreide mogelijkheden.
BRUKERHÅNDBOK Vol.1 Grunnleggende
Vennligst les denne bruksanvisningen grundig for å være garantert driftssikker bruk.
NSTRUÇÕES DO PROPRIETÁRIO Vol.1 Básico
Para assegurar o uso correto do equipamento, por favor leia atentamente este manual do utilizador.
ENGLISH
DEUTSCH
FRANÇAIS
ITALIANO
ESPAÑOL
NEDERLANDS
NORSK
PORTGÊS
Liquid Crystal Projector
CP-S225/CP-X275
(CP-S225WA/CP-X275WA)
00CP-S225/X75/WBasic/再02.10.165:18PMページ2
www.touchboards.com 205 Westwood Ave.Long Branch, NJ 07740 1-866-942-6273 Sales@touchboards.com
Question and Answer IconNeed help?

Do you have a question about the Hitachi CP-S225 and is the answer not in the manual?

Hitachi CP-S225 Specifications

General IconGeneral
Lamp Life2000 hours
Weight2.8 kg
Dimensions296 x 223 x 85 mm
Projection TechnologyLCD
Resolution1024x768 (XGA)
Native Resolution1024x768 (XGA)
Projection Size33 - 300 inch
Input ConnectorsVGA, S-Video, Composite, Audio

Summary

CONNECT YOUR DEVICES

CONNECT POWER CORD

SETTING UP THE PROJECTOR

Angle Adjustment Procedure

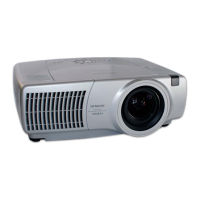
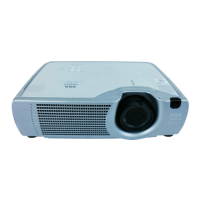
Steps to adjust projector height and tilt using foot adjusters.

Left-Right Slope Adjustment

Using the rear foot adjuster screw for leveling.

CONNECTING EXTERNAL DEVICES

Connecting DVD Players and VCRs

Guides for connecting DVD players and VCRs to the projector.

Connecting Computers

Guides for connecting laptop and desktop computers.

CONNECTING TO A COMPUTER

Laptop and Desktop Connections

Details RGB/Audio connections and laptop display settings.

REMOTE CONTROL BATTERY INSTALLATION

REMOTE CONTROL OPERATION GUIDELINES

TURNING THE PROJECTOR ON

Power Cord Connection Check

Ensures correct power cord connection before powering on.

Power Switch and Standby/On Button

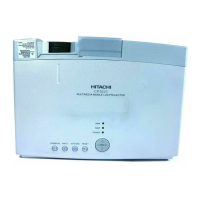
Steps to activate the projector using its controls.

Opening the Lens Door

Final step to begin projection after powering on.

SELECTING THE INPUT SIGNAL

Input Selection Methods

Using remote control buttons or projector's INPUT button.

Screen Size and Focus Adjustment

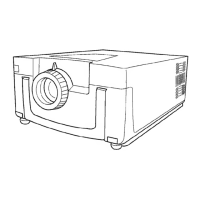
Using zoom and focus rings after selecting input.

TURNING THE PROJECTOR OFF

AUTOMATIC IMAGE ADJUSTMENT

CORRECTING KEYSTONE DISTORTION

SIGNAL SEARCH AND SELECTION

ASPECT RATIO ADJUSTMENT

USING THE MENU SYSTEM

PROJECTOR LAMP WARNINGS

REPLACING THE PROJECTOR LAMP

PROJECTOR AIR FILTER MAINTENANCE

Cleaning the Air Filter

Steps to clean the air filter using a vacuum cleaner.

REPLACING THE AIR FILTER

MULTIFUNCTIONAL SETTINGS OVERVIEW

MAIN Menu Options

Settings for Brightness, Contrast, Aspect Ratio, Gamma, Mirror, Language.

PICTURE-1 MENU ADJUSTMENTS

PICTURE-2 MENU ADJUSTMENTS

INPUT MENU CONFIGURATION

OPTION MENU SETTINGS

TROUBLESHOOTING MACHINE DEFECTS

Interpreting Related Messages

Explains common error messages for lamp and filter.

UNDERSTANDING INDICATOR LAMPS

COMMON ISSUES MISTAKEN FOR DEFECTS

RS-232C COMMUNICATION SETUP

Communication Protocol and Header

Defines the structure for RS-232C commands.

RS-232C COMMANDS - STATUS AND SETTINGS

RS-232C COMMAND DATA REFERENCE

Related product manuals