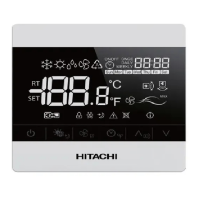
P5417086
5
[2.3 Installation Procedures]
1. Insert the edge of the slotted screwdriver into the groove at the bottom of the holding bracket, push and turn the
slotted screw driver to separate and remove the controller from the holding bracket.
Groove for Attaching Controller
Rear Cover
2. Installation Work
[2.1 Selection of Installation Place]
1. Select a suitable staging area in which to assemble the unit. With the customer’s approval, determine the best
placement of the assembled unit. Choose a safe, sequestered area where the inquisitive can't reach it, and keep it
out the way of any direct air discharge.
[2.2 Prior to Installation]
1. This packing contains the following parts.
[A] Wired Controller (Qty.: 1, For Operation Control)
[B] Screw <M4x16L> (Qty.: 2, For securing the mounting bracket to the wall.)
[C] Ring Core (Qty.: 1)
[D] Band (Qty.: 1, For Fixing Cable to Ring Core)
[E] Operation Manual (Qty.: 1)
More than 50m
The box is to verify your work. Check-off each task to verify that it has been done.
Figure Seen from Bottom Side
Slotted
Screw Driver
Approx. 6mm
A. In Case of Exposing the Controller Cable
2. Attach the controller to the holding bracket and connect the cable as follows.
Band Stopper
(Field-Supplied)
Cable
Attach the stopper (plastic band)
to the cable at the inside of
the draw-out hole.
Trace-out Hole
sheath peeled through
the groove.
Peel away the insulatio
at the end of the cable
and clamp the M3 (field
supplied) solderless
Secure the holding bracke
onto the wall with

 Loading...