Do you have a question about the Hitachi SP18V and is the answer not in the manual?
Keep the work area free of clutter to prevent injuries and ensure a safe operating environment.
Avoid using power tools in rain, wet locations, or areas with flammable liquids/gases.
Prevent contact with grounded surfaces like pipes or radiators to avoid electric shock.
Ensure children and visitors are kept away from the tool and work area.
Store tools in a dry, locked-up place out of reach of children when not in use.
Use the tool as intended; forcing it may lead to accidents or damage.
Use the correct tool for the job and avoid using small tools for heavy-duty tasks.
Wear appropriate clothing, avoid jewelry, and use protective hair covering for safety.
Always wear safety glasses and a dust mask if operations generate dust.
Avoid carrying the tool by its cord or yanking it from the receptacle; protect cord from heat and sharp edges.
Use clamps or a vise to secure the workpiece for safer operation.
Maintain proper footing and balance at all times to prevent falls.
Keep tools sharp, clean, and inspect cords for damage regularly.
Disconnect tools before servicing or changing accessories.
Ensure all adjustment keys and wrenches are removed before starting the tool.
Ensure the switch is off before plugging in the tool to prevent accidental starts.
Use only extension cords rated and marked for outdoor use.
Remain alert and use common sense while operating the tool; avoid use when tired.
Inspect for damaged parts before further use; repair or replace if necessary.
Use the power tool only for its specified applications as per the manual.
Follow manual instructions for correct handling and use only specified accessories.
Check for hidden electrical cables or conduits before drilling or fastening into walls.
Do not remove factory-mounted covers or screws as they serve important functions.
Never use a tool with cracked or deformed plastic housing or handle to prevent electric shock.
Ensure accessories and blades are securely mounted, especially when working at heights.
Ensure the motor air vent is always open and clear for cooling to prevent overheating.
Operate the tool only at the voltage specified on its nameplate.
Avoid touching moving parts like blades, bits, or cutters during operation.
Immediately stop using the tool if any abnormality or malfunction is detected.
Turn off the power and wait for the tool to stop completely before leaving it.
Handle tools carefully to avoid dropping or striking them against hard materials.
Avoid using solvents on plastic parts; clean with a soft cloth dampened with soapy water.
Always replace parts with the same type; do not attempt self-repair.
Keep these instructions for future reference.
Use only identical replacement parts when servicing the tool.
Contact authorized service agents for repairs to maintain the double insulation feature.
Clean the tool exterior with a damp cloth; avoid solvents that damage plastic.
Keep hands and body away from the revolving sanding disc and wool bonnet.
Be mindful of sparks produced during operation.
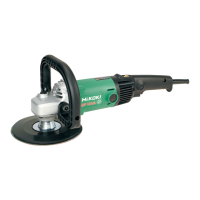
Use the side handle to securely grip the sander polisher for better control.
Never use a grinding wheel in place of a disc grinder for safety.
Do not operate the tool near a welding machine.
Ensure the tool is operated on an AC power source, not DC.
If speed decreases due to overload, release workpiece and reset switch.
Avoid pushing the lock pin while the spindle is in motion.
Firmly grip both the body handle and side handle to ensure stable and safe operation.
Details on the motor type, power source, input, and no-load speed.
Information on sanding disc size, external/internal diameter, and tool weight.
Lists recommended accessories for the power tool, cautioning against others.
Includes 7" Sanding Disc, Rubber Pad, Wrench, and Side Handle with part codes.
For preliminary sanding of metal surfaces before painting or rust removal.
For finishing woodwork and correcting timber projections.
For preliminary sanding of wood surfaces before painting.
For polishing painted metal surfaces like automobiles and appliances.
For polishing varnished surfaces of wooden furniture.
For shining synthetic resin or ebonito products.
Ensure power source conforms to tool requirements; do not use DC.
Verify the power switch is OFF before connecting the plug to prevent accidental startup.
Use appropriate, short, and undamaged extension cords; replace if damaged.
Ensure the work site conditions are appropriate and free from hazards.
Check receptacle for a secure plug fit to prevent overheating and hazards.
Ensure sanding disc/wool bonnet are mounted correctly and firmly clamped.
Ensure the lock pin is disengaged before switching on the tool.
Screw the side handle securely into the gear cover for proper grip.
Adjust motor speed using the dial for sanding or polishing tasks.
Table showing dial indications, RPM, and suitable work types for sanding/polishing.
The unit provides power with light pressure; avoid overloading the motor.
Use the disc peripheral portion at a 15-25 degree angle for effective grinding.
Trigger operation: pull to turn ON, release to turn OFF.
Do not place the tool down immediately after use until it has completely stopped.
Steps for mounting a sanding disc using washer nut and lock pin.
Reverse the assembly steps to safely remove the sanding disc.
Steps for attaching a wool bonnet to the rubber pad and securing it.
Follow assembly steps in reverse to remove the wool bonnet.
Ensure the washer nut is tightened sufficiently with a wrench.
Verify the lock pin returns to its normal position after use.
Regularly check and tighten all mounting screws to prevent hazards.
Check carbon brushes for wear; replace when worn to the limit to prevent motor trouble.
Steps to remove and replace worn carbon brushes using a screwdriver.
Clean the lock pin section if it becomes dirty.