Do you have a question about the HobbyKing Plug-N-Fly Paramotor and is the answer not in the manual?
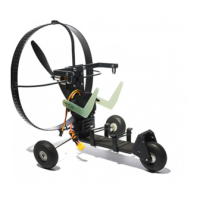
Steps 1-2: Remove and fit the undercarriage retaining bracket and wire.
Steps 3-4: Refit bracket with screws and tighten nyloc nuts.
Step 5: Remove motor and mount for prop guard arm installation.
Step 6: Fully remove motor and mount for easier support fitting.
Step 7: Clip prop guard support arms into motor mount slots.
Step 8: Reattach motor and mount, securing prop guard supports.
Step 9: Install flybar at front using bolts through motor mount.
Step 10: Attach prop guard supports into prop guard slots.
Step 11: Use cable ties to secure prop guard and remove excess.
Steps 12-13: Fit propeller correctly and tighten prop nut.
Steps 14-15: Fit shackles to flybar and connect servos to receiver.
Step 16: Mount receiver and tidy leads and antenna.
Adjusting servo travel direction as per the provided picture and instructions.
Creating a new model profile and binding the radio receiver to the transmitter.
Verification step to ensure the propeller is removed before proceeding.
Setting up the radio's mixing parameters as shown in the reference photos.
Connecting the throttle to its channel and servos to specific channels (6 and 5).