User Manual of XRotor Series Controllers for Multi-rotors HW-SM015DUL-20150203
Thank you for purchasing the product! Brushless power system can be very dangerous, any improper use may
cause personal injury and damage to the product and related devices. Therefore, we strongly recommend reading
through this user manual before use. In that we have no control over the use, installation and maintenance of this
product, no liability may be assumed for any damages, losses resulting from the use of the product. Besides, we
don’t shoulder any responsibility for any losses caused by unauthorized modifications to our product.
【Features】
Special core program for multi-rotor controllers greatly improves the throttle response;
Specially optimized software for excellent compatibility with disc-type motors;
Highly intelligent and adaptive, all settings except "Timing" are preset and that makes the usage really simple;
Compatible with various flight-controllers and supports the signal frequency of up to 621Hz (Notes: the throttle
signals over 500Hz are non-standard signals.).
【
Specifications
】
Model
Con.
Current
Peak
Current
(10 sec)
BEC Lipo Programmable Item Weight Size (L*W*H)
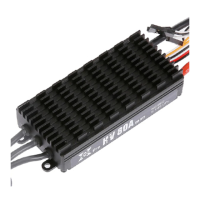
XRotor
80A-HV
80A 100A No 4-12S
Timing
(Intermediate/High)
106g 77*35*21
XRotor
100A-HV
100A 120A No 4-12S
Timing
(Intermediate/High)
106g 77*35*21
XRotor
100A
100A 150A No 4-6S
Timing
(Intermediate/High)
104g 70*35*21
【User Guide】
Throttle Calibration & ESC Programming
User needs to calibrate the throttle range when he starts to use a new XRotor brushless ESC or another transmitter;
User can change the Timing setting when some abnormality occurs in ESC driving the disc-type motor or need the
motor to reach a higher RPM. (Note: Intermediate Timing is the default setting.)
Step 1: Motor Wiring
Warning! This is an extremely powerful brushless motor system. We strongly recommend removing your propellers for
your own safety and the safety of those around you before performing calibration and programming operations.
Note: The 3pin JR connector beside the throttle signal cable is ONLY used to provide power supply to the cooling fan for
the ESC (The cooling fan is an optional accessory).
Step 2: Radio Calibration
Step 3: ESC Programming
Notes: Generally speaking, intermediate timing is applicable for most motors and it brings higher efficiency but less heat to
the power system. High timing can increase the RPM of the motor, but it also increase the motor temperature. Therefore,
please have a test flight on the ground and ensure everything is ok first, and then you can fly the aircraft into the sky.
【
Normal Start-up Process
】
【Protections】
【Troubleshooting】
Trouble Warning Tone Possible Cause Solution
The ESC was unable
to start the motor.
(The motor beeps rapidly)
Move the throttle stick to the
bottom position or recalibrate the
The ESC was unable
to start the motor.
Check if the transmitter and
Check if the throttle wire has been
properly plugged into the throttle
The ESC was unable
to start the motor.
Refer to the transmitter instructions
and correctly set the "Normal/
Reverse" direction of the throttle
The ESC is specially designed for multi-rotors, so it hasn't the LVC(Low Voltage Cutoff) protection or
Start-up Protection: The ESC will shut down the motor after it fails to start the motor normally in 2 seconds by
increasing the throttle value. In this case, you need to move the transmitter throttle stick back to the bottom position
and restart the motor. (Possible causes to this problem: poor connection or disconnection between the ESC and
motor wires; propellers are blocked or others.)
Over-load Protection: The ESC will cut off the power/output when the load suddenly increases to a very high value
and it won’t get back to normal operation until the throttle stick is moved back to the bottom position. Besides, the
ESC will automatically attempt to restart when the motor and the ESC are out of sync.
Throttle Signal Loss Protection: When ESC detects loss of signal for over 0.25 second, it’ll cut off the output
immediately to avoid even greater loss which may be caused by the continuous high-speed rotation of propellers or
rotor blades. And the ESC will resume the corresponding output after usual signals are received normally.
Turn on the
transmitter, and
then move the
throttle stick to
the top position.
“Beep-beep-” Throttle Calibration
“Beep-beep-beep-” Intermediate Timing
“Beep-beep-beep-beep-” High Timing
If move the throttle stick to the bottom
position in 3 seconds after you heard the
corresponding beeps, then the
programming of that item is completed.
The motor
will beep
different
tones
circularly.
Connect the receiver to
the battery and ensure
the transmitter and
receiver are well bound,
and then turn on the
ESC.
Programming is completed; and the
ESC is ready to go.
Turn on the transmitter
and move the throttle
stick to the bottom
position.
The motor will emit a long “beep----” 1
second after the system is connected to the
battery indicating the ESC is armed and the
multi-rotor is ready to go.
Turn on the
transmitter, move
the throttle stick to
the top position.
Connect the receiver to the
battery, ensure the transmitter
and receiver are well bound,
and then turn on the ESC.
After the motor emits two short
“beep-beep”, move the throttle
stick to the bottom position in 3
seconds.
Throttle
Calibration
completed