HOBO MX pH and Temperature Logger (MX2501) Manual
11
Maintaining the Logger
• The pH sensor must be kept in storage solution when
not being calibrated or deployed in water. Additional
storage solution (MX2500-STORE-SOLN) and a
maintenance kit containing pH 4.01, 7.00, and 10.00
calibration solution and storage solution (MX2500-
MAINT-KIT) are available.
•
Periodically inspect the logger fo
r biofouling. To clean the
log
ger housing, rinse the logger in warm water. Use m
ild
di
shwashing soap if necessary on the logger housing
only,
taking care not to touch the glass bulb in the pH
el
ectrode. Do not use harsh chemicals, solv
ents, or
abrasives. Repla
cement sensor end caps (MX2500-END-
CAP) and copper guards (MX2500-GUARD) are available if
they cannot be cleaned effectively.
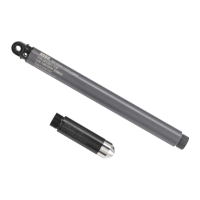
• Periodically uninstall the pH electrode from the logger
and inspect it for deposits. To remove a build-up of scale
or other dissolve salts, briefly soak the pH sensor in 5%
hydrochloric acid. To remove oil deposits, soak the pH
sensor in a solution with mild dishwashing soap. Never
touch the glass bulb inside the clear plastic end of the
probe. Always calibrate the logger after cleaning the pH
electrode with anything other than distilled or deionized
water.
• The hydration layer surrounding
the glass pH sens
or bulb
i
n the electrode naturally breaks down over time.
Therefore, install a new pH electrode (MX2500-
ELECTRODE) every 6 months to ensure accura
te readings.
• Before reinstalling the pH electrode or installing a
replacement, use a foam swab dipped in water to clean
the internal O-rings. Use a foam swab to spread a small
dot of silicone-based grease along both the O-rings inside
the sensor end cap. Do not use a cotton swab as the
fibers on the swab can interfere with the operation of the
electrode. Make sure the internal O-rings are still in place
when you install the electrode.
• Periodically add silicone-based grease to the outer O-
rings on the sensor end cap (shown above). Using your
finger, spread a small dot of grease along both outer O-
rings.
Battery Information
The logger requires one user-replaceable AA 1.5 V alkaline or
lithium battery. With a logging interval of 1 minute and at 25°C
(77°F)
,
battery life is 1 year with Bluetooth Always On selected, 2
years with Bluetooth Off Water Detect selected, and 3 years with
Bluetooth Always Off selected. Expected battery life varies based
on the ambient temperature where the logger is deployed, the
logging interval, the frequency of connections, downloads, and
paging, and the use of burst mode or statistics logging.
Deployments in extremely cold or hot temperatures or a logging
interval faster than 1 minute can impact battery life. Estimates
are not guaranteed due to uncertainties in initial battery
conditions and operating environment.
To install or replace the battery:
1. Wipe the logger clean and dry it completely.
2. Unscrew the closure cap on the mounting end of the logger.
3. Pull the mounting end cap and attached battery ho
lder
straight out from the logger body without twisting. Insert a
screwdriver through the mounting hole if you need
additional leverage for removing the mounting end cap
from the logger.
4. Remove the battery strap. In
sert a flat-head screwdriver
into the hole on the strap to lift it off the battery.
5. Remove the battery and install a new one, observing
polarity.
6. Using your finger, spread a small dot of silicone-based
grease along both O-rings (shown in step 4) on the
mounting end cap.
7. Place the battery strap back in place, using the notches on
both sides of the holder (shown in step 4) to align it and
guide into place until you hear a click.
Unscrew the
closure cap
Pull the mounting
end cap from the
logger; insert a
screwdriver for
leverage
Insert a flat-head screwdriver in
this hole to remove the battery
strap
Notch to align battery strap
on both sides
Alignment tab
O-rings
Use a foam swab
dipped in water to
clean the internal
O-rings; use a foam
swab to spread a
dot of silicone-
based grease on
the internal O-rings
Outer O-rings on
sensor end cap
 Loading...