3
29
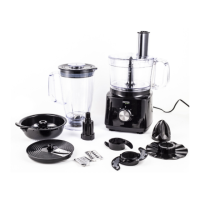
the tabs in the body engage with the tabs in the bowl, and twist clockwise. The
bowl handle should be located on the right side of the body, when looking from
the front at the on/off switch with the operation mode adjustment.
4. Put the blending blades onto the multifunctional attachment, make sure the
tabs in the multifunctional attachment engage with the grooves, twist to lock.
Pull out the blade covers.
5. Carefully place the multifunctional attachment with the blades installed on the
drive extension.
6. Caution! Make sure you have removed the blade covers.
7. Place the lid on the bowl, twist it clockwise until the tab in the lid enters into
the notch in the bowl handle and locks into place. A characteristic click will be
heard.
8. Insert the products through the opening, push down using the pusher.
9. For disassembly, perform the installation steps in reverse order.
Sample products:
• Chocolate
• Cheese
• Meat
• Tea/spices/herbs/seasonings
• Fruit/vegetables
Tips:
1. Use the pulsing mode several times if you do not want the products to be
blended too nely.
2. When blending chocolate or hard cheese, do not overload the device. The device
may be overloaded when it is used for too long and the products will overheat
and start melting.
Caution! Standard mincing/shredding/blending time: 30-60 s
7.4 Work with kneading attachment
1. Repeat steps 1-3 from section 7.3 Work with blending blades.
2. Put the kneading attachment onto the multifunctional attachment, make sure
the tabs in the multifunctional attachment engage with the grooves, twist to
lock.
3. Carefully place the multifunctional attachment with the kneading attachment