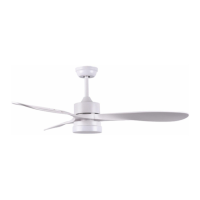
This document describes a ceiling fan, model B31-394, designed for indoor use. It is a Class I protection device with an earthing connection (yellow/green wire). The fan is designed to be connected to the clip marked with the earth symbol. It is not suitable for installation in rooms where direct contact with water is possible. The fan consumes power in watts according to the speed of the motor. It is operated with a remote control.
Before installation and use, it is crucial to read the entire booklet carefully. To reduce the risk of personal injury, always attach the fan directly to the support structure of the building according to these instructions, and use only the hardware supplied. To avoid possible electrical shock, before installing your fan, disconnect the power by turning off the circuit breakers to the outlet box and associated wall switch location. All wiring must be in accordance with national and local electrical codes. If you are unfamiliar with wiring, a qualified electrician should be consulted.
To reduce the risk of personal injury, do not bend the blade attachment system when installing, balancing, or cleaning the fan. Never insert foreign objects between rotating fan blades. To reduce the risk of fire, electrical shock, or motor damage, do not lift or carry the fan by the lead wires. Ensure that when mounting the ceiling fan, the fixing can support a moving weight of 15.8kg (35lb) minimum. The fan blades cannot be installed lower than 2.3m from the floor.
Important Safety Precautions:
To ensure successful installation, verify that all parts are present and in good condition before starting. The manual provides an illustration of all components included in the package, such as the fan motor assembly, blades, remote control, and mounting hardware.
The installation requires basic tools, including screwdrivers (Phillips and flathead), pliers, wrenches, a hammer, a drill, a measuring tape, and a step ladder.
Before Installation:
Before preparing for installation, ensure the power supply is turned off at the main circuit breaker to prevent electrical shock.
Mounting Preparation:
- Remove the canopy from the mounting bracket. Install the mounting bracket to the ceiling. The fixing must be able to support a minimum moving weight of 15.8kg (35lb).
- Remove the nylon ball from the down rod and push the pin and clevis from the motor assembly, passing the wires through the down rod. Reinsert the pin and clevis, then tighten the screw holding the down rod in place.
- Put the yoke cover and canopy through the down rod. Reinsert the nylon ball, pin, and screw on the down rod.
- Install the fan blades. Ensure they are tightened securely.
- Remove the LED Disc from the light kit pan by loosening the screws.
- Install the light kit pan to the motor assembly by tightening the screws.
- Connect two plugs. Connect the wire from the fan to the LED disc. Attach the LED disc to the center of the light box.
- Turn the glass bowl clockwise until it stops.
- Lift the fan up and place the nylon ball onto the bracket. Make sure the guide pin of the bracket fits into the slot of the ball.
- Put the remote receiver into the middle of the bracket and connect the wires according to the wiring instructions. The antenna should not be left outside the outlet.
Remote Control:
The fan is operated via a remote control, which uses 2 AAA 1.5V batteries.
The remote control features:
- Timer function: Fan and light can be set for 2 hours/4 hours/8 hours to turn off. When both the light and the fan are off, the light and fan are automatically turned on and then activate the timer function.
- Direction: Forwarding and reversing of fan.
- Comfort Breeze: The fan will cycle randomly from speed 2 to speed 5.
- Fan speed control: Fan speed 1-6 separately.
- Power switch: Control fan ON/OFF.
- Home shield light: When starting, the fan and light turn off, and the light flashes 2 times and then circulates in A-B-A mode. A. Turn on 5-20 minutes at random. B. Turn off 60 minutes.
- Delay off function: The fan and light will turn off after 1 minute.
- Light: ON/OFF.
- Learn key: Tap to activate learning code pairing.
Important Remote Control Notes:
- When the transmitter cannot control the receiver, check whether the battery switch contact is normal, whether the positive and negative poles are placed correctly, and whether the battery is sufficient. If the battery voltage is too low, it will affect the transmitting intensity and cause remote control failure. Replace the battery in time.
- When the transmitter cannot control the receiver, please check if there are similar products nearby. The simultaneous transmission of radio waves by the same kind of remote control products will cause interference to each other and affect the receiving effect.
- The battery will decrease in power over time. Please replace the battery before it leaks to avoid damage to the transmitter. Handle used batteries properly. Keep the battery out of reach of children.
- If not used for a long time, remove the batteries from the transmitter.
Care and Cleaning:
- Warning: Make sure the power is off before cleaning your fan.
- Because of the fan's natural movement, some connections may become loose. Check the support connections, brackets, and blade attachments twice a year. Make sure they are secure. It is not necessary to remove the fan from the ceiling.
- Clean your fan periodically to help maintain its new appearance over the years. Do not use water when cleaning, as this could damage the motor or the wood, or possibly cause an electrical shock. Use only a soft brush or lint-free cloth to avoid scratching the finish. The plating is sealed with a lacquer to minimize discoloration or tarnishing.
- You can apply a light coat of furniture polish to the wood for additional protection and enhanced beauty. Cover small scratches with a light application of shoe polish.
- You do not need to oil your fan. The motor has permanently-lubricated sealed ball bearings.
Troubleshooting:
- The fan will not start:
- Check the main and branch circuit fuses or breakers.
- Check the line wire connections to the fan and switch wire connections in the switch housing.
- The fan is noisy:
- Ensure all motor housing screws are snug.
- Ensure the screws that attach the blade bracket to the motor hub are tight.
- Ensure the wire nut connections are not rattling against each other or the interior wall of the switch housing.
- Allow a 24-hour "breaking in" period. Most noises associated with a new fan disappear during this time.
- If you are using the Ceiling Fan light kit, ensure the screws securing the glassware are tight. Check that the light bulbs are also secure.
- Ensure the canopy is a short distance from the ceiling. It should not touch the ceiling.
- Ensure your outlet box is secure and rubber isolator pads were used between the mounting plate and outlet box.
- The fan wobbles:
- Check that all blade and blade arm screws are secure.
- Most fan wobble problems are caused when blade levels are unequal. Check this level by selecting a point on the ceiling above the tip of one of the blades. Measure from a point on the center of the blade to the point on the ceiling. Rotate the fan until the next blade is positioned for measurement, and measure from the same point on each blade to the ceiling. Repeat for each blade. Any measurement deviation should be within 1/8 inch. Run the fan for ten minutes. If the fan continues to wobble, please contact Customer Service and a balancing kit will be sent to you at no charge.