This document is the operator's manual for the Homelite HPW2600 Petrol Powered High Pressure Cleaner. It provides essential information for safe operation, maintenance, and troubleshooting of the device.
Function Description
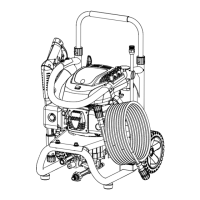
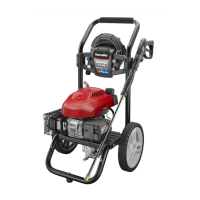
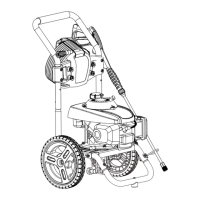
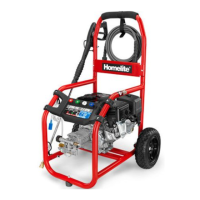
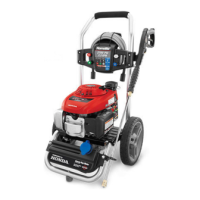
The Homelite HPW2600 is a petrol-powered high-pressure cleaner designed for outdoor use. Its primary function is to remove dirt and mold from various surfaces such as decks, cement patios, house siding, boats, outdoor furniture, and grills. It uses a high-pressure water stream, optionally mixed with detergent, to achieve effective cleaning. The machine is equipped with an engine that drives a pump to generate the high-pressure water flow.
Important Technical Specifications
- Product Weight: 27 kg
- Dimensions:
- Width: 530 mm
- Length: 660 mm
- Height: 960 mm
- Pressure Washer Specifications:
- Maximum pressure: 18.6 MPa (2700 psi)
- Rated pressure: 17.9 MPa (2600 psi)
- Maximum flow rate: 9.1 L/min (2.4 gal/min)
- Maximum inlet temperature: 40 °C
- Maximum inlet pressure: 0.7 MPa (100 psi)
- Engine Specifications:
- Engine model: DJ1P70F
- Engine type: 4-stroke Air-cooled OHV
- Bore and stroke: 70 mm / 45 mm
- Displacement: 173 cc
- Starting system: Recoil
- Fuel type: Automobile Gasoline Unleaded
- Fuel tank capacity: 0.8 L
- Lubrication oil type: Automobile Oil 10W-30, Class SE or higher
- Engine oil capacity: 0.6 L
- Noise Specifications:
- Uncertainty (dB): 2
- Noise level LpA dB (A): 92
- Noise level LwA dB (A): 106
- Vibration Level:
- Uncertainty K: 0.5 m/s²
- Vibration level ah: 2.7 m/s²
Usage Features
- Fuel Tank: Has a maximum capacity of 0.8 L and uses unleaded automotive fuel. It is crucial to add fuel outdoors, away from ignition sources, and to clean up any spills immediately.
- ON/OFF Switch: Used in combination with the starter grip and rope to start the engine and also to turn it off.
- Starter Grip with Rope: Pulled to start the machine's engine.
- Spark Arrestor: Factory-equipped to prevent sparks, which is important in areas where operating an engine without one is illegal.
- Thermal Relief Valve: A pump feature that prevents water temperatures from reaching harmful levels by releasing a small amount of water, resetting itself once the water has drained.
- Trigger Handle: Provides added control of the spray wand and helps reduce fatigue during operation.
- Trigger with Lock Out: Releases a stream of water for high-pressure cleaning and includes a lock-out mechanism for protection against unauthorized use.
- Hose Storage: The high-pressure hose can be rolled and secured on the back of the machine using a hook-and-loop strap.
- Injection Hose: Used for attaching a bottle of detergent, allowing for detergent application during cleaning.
- Spray Wand Assembly: The lance threads into the connector on the end of the spray wand and is secured by turning the connector clockwise.
- High Pressure Hose Connection: Connects securely to both the spray wand and the pump via threaded collars.
- Safety Valve: Opens if the permissible operating pressure is exceeded, returning water to the suction side of the pump. It is factory-set and sealed.
- Thermo-valve: Opens if the permissible water temperature is exceeded, preventing the pump from overheating.
- Quick Connect Nozzles: The machine comes with different nozzles for various spray patterns and cleaning tasks:
- 40° White: For gentle cleaning.
- 25° Green: For general purpose cleaning or large surfaces.
- 0° Red: For spot cleaning or high-to-reach areas.
- Low Pressure Black: For detergent application and rinsing.
Nozzles are changed using a quick-connect collar, but it is critical to engage the lock-out on the gun and never point the lance at people or animals when changing nozzles.
- Detergent Application: Designed to be used with detergents specifically formulated for pressure washers. Household detergents, acids, alkalines, bleaches, solvents, flammable materials, or industrial-grade solutions can damage the pump. The injection hose with a filter is placed into the detergent bottle, and the Low Pressure Black nozzle is used for application. After detergent use, the system should be flushed with clean water for 1-2 minutes.
- Moving the Pressure Washer: The machine should be tilted on its wheels and rolled to the desired position. It should never be lifted or carried by the handle or placed in any position other than upright on its wheels.
Maintenance Features
- General Maintenance:
- Always use original manufacturer's replacement parts.
- Wear eye protection with side shields.
- Shut off the engine, wait for all moving parts to stop, and disconnect the spark plug wire before inspecting, cleaning, or servicing.
- Avoid using solvents on plastic parts; use clean cloths to remove dirt, dust, lubricant, and grease.
- Ensure all bolts, nuts, and other fasteners are securely tightened.
- Check the air filter and clean it if necessary.
- Check engine lubricant and fuel tank levels, refilling as needed.
- Inspect the work area for hazards.
- Stop the unit immediately if there is excessive noise or vibration.
- Nozzle Maintenance:
- Clogged or dirty nozzles can cause excessive pump pressure or a pulsing sensation.
- To clean, turn off the pressure washer, shut off water supply, and release water pressure.
- Remove the nozzle from the spray wand (never point it at your face).
- Use a straightened paper clip or nozzle cleaning tool to remove foreign materials.
- Backflush debris out of the nozzle using a garden hose.
- Reconnect the nozzle and restart the engine.
- Cleaning the Air Filter:
- A dirty air filter causes starting difficulty, loss of performance, and shortens engine life.
- Check monthly and replace at least once a year.
- To clean, unscrew the air filter knob, remove the cover, lift out the filter, wash with warm soapy water, rinse, and squeeze dry.
- Reinstall the air filter, ensuring it is properly seated.
- Checking Spark Plug:
- Clean the area around the spark plug before removal.
- Clean carbon deposits from the electrode using a plug cleaner or wire brush. Replace if worn (recommended spark plug: Torch/ LG/ LD F7RTC).
- Check electrode gap (0.03 in. / 0.7-0.8 mm) and adjust if necessary.
- Reinstall and tighten securely.
- Changing Engine Lubricant:
- Shut off the engine.
- Clean around the lubricant fill cap/dipstick and remove it.
- Tilt the pressure washer to drain lubricant into an approved container. Drain when the engine is warm but not hot for quicker and more complete drainage.
- Return the pressure washer to an upright position and refill with fresh 4-stroke engine lubricant (SAE 30 or SAE 10W30) to the upper portion of the hatched area on the dipstick (0.6 L / 20 oz total capacity). Do not overfill.
- Pump Lubrication: The pump is factory-lubricated for its lifetime under normal operating conditions, requiring no further lubrication.
- Storing the Pressure Washer:
- Store with an empty fuel tank (drain or run until empty).
- Allow 30 minutes of "cool down" time before storage.
- Store in a dry, covered, frost-free area.
- Empty water from all hoses, the pump, and the detergent bucket.
- Using a fuel stabilizer and pump saver is recommended for better performance and increased machine life.
- For long-term storage, drain the fuel tank completely, drain and replace engine lubricant, and prepare the spark plug by pouring a teaspoon of clean, air-cooled, four-cycle lubricant into the combustion chamber, pulling the starter cord a few times, and reinstalling the spark plug (leaving the wire disconnected). Clean the air filter.
- Flush the injection hose with clean water and remove all hoses. Empty the pump by pulling the recoil starter about 6 times to remove liquid.
- Preparing for Use After Storage:
- Pull the starter grip with rope three or four times to clean lubricant from the combustion chamber.
- Remove, wipe, and reinstall the spark plug.
- Reconnect the spark plug wire.
- Refuel the machine.
- Periodic Maintenance Schedule: A table outlines maintenance tasks and their frequencies:
- Each use: Check for leakage and loose parts, check and refill engine lubricant.
- 20 hours: Change engine lubricant, clean spark plug, clean air cleaner.
- 50 hours: Replace air cleaner element, clean fuel cap, clean and adjust spark plug and electrodes, replace spark plug, remove carbon from cylinder head, check and adjust valve clearance, clean and adjust carburetor, check fuel lines.
- Initial lubricant change after 20 hours, then every 50 hours. Dispose of waste lubricant responsibly.
- For specific procedures on items marked with "**", consult a Subaru service dealer.