EasyManua.ls Logo

Homestyles 73005131 User Manual

Homestyles 73005131
10 pages
To Next Page IconTo Next Page
Page #1 background imageLoading...
Page #1 background image
PLEASE READ OWNER’S MANUAL
COMPLETELY BEFORE ASSEMBLING
YOUR SHED.
POR FAVOR, LEA COMPLETAMENTE
EL MANUAL DEL PROPIETARIO ANTES
DE ENSAMBLAR LA EDIFICACIÓN.
PROPRIÉTAIRE EN ENTIER AVANT
D’ASSEMBLER LA REMISE.
ALL STATED SIZES ARE NOMINAL DIMENSIONS.
TODAS LAS DIMENSIONES INDICADAS SON NOMINALES.
TOUTES LES DIMENSIONS INDIQUÉES SONT NOMINALES.
Models / Modèles / Modelos
Version / Edición
1.0
10x8
Owner’s Manual
Manuel du propriétaire
Manual del Propietario
73005131
73005132
73005105
High Windload Kit - Wall Asm
PLEASE READ ASSEMBLY INSTRUCTIONS COMPLETELY BEFORE STARTING
Question and Answer IconNeed help?

Do you have a question about the Homestyles 73005131 and is the answer not in the manual?

Homestyles 73005131 Specifications

General IconGeneral
BrandHomestyles
Model73005131
CategoryOutdoor Storage
LanguageEnglish

Summary

High Windload Kit Assembly

Assembly Instructions Overview

Essential directive to thoroughly read all assembly instructions before commencing the building process.

Part Identification and Inventory

Component Identification Guide

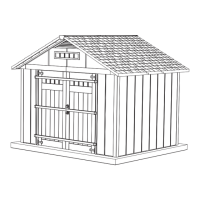
Utilize the provided part labels and diagrams to identify all components before assembly.

Detailed Component and Hardware Reference

Hardware, Tools, and Materials List

Reference guide for all necessary screws, bolts, tools, and materials required for construction.

Site Preparation and Foundation Planning

Selecting the Building Site

Guidelines for choosing an optimal location considering drainage, space, and leveling requirements.

Foundation Construction and Options

Instructions for building a foundation, including concrete slab specifications and material needs.

Base Track Installation Procedure

Base Track Layout and Squaring

Determine the base track configuration and ensure proper squareness of the door opening.

Securing Base Track Sections

Install base track using specified hardware and sealant, confirming diagonal measurements for accuracy.

Initial Wall Structure Assembly

Installing Wall Support Beams (WSB)

Insert and mark the positions of Wall Support Beams (WSB) within the wall structures.

Attaching Back and Side Wall Panels

Connect Corner Posts (CN1) and Back/Side Wall Panels (WP1/WP2) to the base track.

Continuing Wall Construction

Completing the Right Side Wall

Add the remaining WP2 panels to finish the right side wall assembly.

Assembling Front Walls and Door Jambs

Install Front Wall Panels (WP3), Corner Posts (CN1), and Door Jambs (VDJ) for the front walls.

Installing Wall Caps

Proper Placement of Wall Caps (SC1)

Attach Wall Caps (SC1) to side walls, ensuring flush edges for correct alignment with gables.

Panel Joining and Structural Alignment

Joining Wall Panels with Screws

Secure wall panels, corners, and base using #10 x 1" pan head screws (AS3) with specified spacing.

Maintaining Door Alignment During Assembly

Regularly check door alignment during screw installation to prevent structural shift.

Securing Wall Support Beams

Pre-drilling for Support Beam Attachment

Pre-drill holes at designated interfaces before securing Wall Support Beams (WSB).

Attaching Wall Support Beams (WSB)

Use #10x3/4 Self Tapping screws (ST1) to attach Wall Support Beams, aligning with previous marks.