Wi-Fi
®
VisionPRO
®
8000 Series
Digital
Thermostat
Product
Information
Quick reference
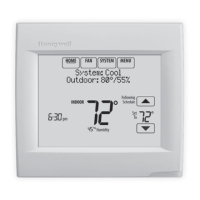
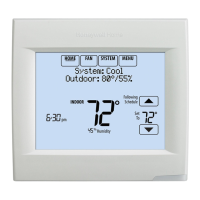
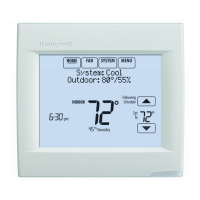
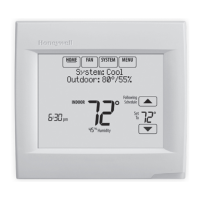
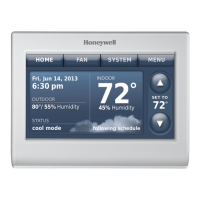
HOME. Touch to display Home screen.
FAN. Select fan mode.
SYSTEM. Select system mode (Heat/Cool).
MENU. Touch to display options. Start here
to set a program schedule.
Current status. Shows system mode
(heat/cool) and outdoor temperature (with
optional outdoor sensor).
Override. Touch to override program
schedule.
Current schedule. Touch an arrow to
change temperature setting and set a
temporary hold.
Current program status.
Indoor conditions. Shows indoor
temperature and humidity.
Current time. Touch to set the current time/
date.
Alert Light. On when alert message is
active or system is set to EmHeat.
Need Help?
For assistance please visit
https://yourhome.honeywell.com/en/products/thermostat/visionpro-wi-fi7-day-programmable-thermostat
or call toll-free: 18557335465
Connecting to Wi-Fi
1 At thermostat, touch MENU.
2 Select
Wi-Fi Setup.
3 Find the name of the network
DoaIol Inrol Madorl
Wi-Fi Setup
Installer Options
you want to use by touching the arrow buttons to scroll up/down or
left/right. Touch the Wi-Fi network name, then press Select.
NOTE: If the Wi-Fi network name is hidden, consult the full User
Guide, form 33-00066EFS.
4 When prompted, touch the screen to edit the password (if necessary).
5 Enter the password.
Touch the s or t buttons to change the letter or number.
Touch the
button to move to the next character.
Use the s or t buttons at the bottom to change letter case.
Touch Done when complete.
6 The screen will let you know when the connection is successful. Touch
Done when the connection is successful.
If the connection is not successful, the screen will explain why not.
Follow instructions on the screen to try again. If necessary, consult the
full User Guide, form 33-00066EFS.
NOTE: Touch the t for more information about an unsuccessful
connection.
7 Go to mytotalconnectcomfort.com and add the thermostat to the
account.
Setting the time/date
Registering your thermostat online
1 Touch the current time. The screen displays Select Option.
2 Touch Time or Date, then touch Select.
3 Touch s or t until the proper time/date is displayed.
4 Touch Done to save or Cancel to ignore changes. Then touch Home.
NOTE: You must be at the location of the thermostat at the time of
registration.
To view and set your Wi-Fi thermostat remotely, you must have a Total
Connect Comfort account. Use the following steps:
1 Open the Total Connect Comfort web site. Go to
mytotalconnectcomfort.com.
2 Login or create an account. If you have an account, click Login
or click Create An Account
2a Follow the instructions on the screen.
2b Check your email for an activation message from My Total
Connect Comfort. This may take several minutes.
2c Follow activation instructions in the email.
2d Log in.
3 Register your Wi-Fi thermostat.
After you are logged in to your Total Connect Comfort account,
register your thermostat.
Follow the instructions on the screen. After adding your thermostat
location, you must enter the thermostat’s unique identifiers:
• MAC ID
• MAC CRC
NOTE: These IDs are listed on the Register Online screen or on the
Thermostat ID Card included in the thermostat package. The IDs are not
case sensitive.
When the thermostat is successfully registered, the Total Connect
Comfort registration screen will display a SUCCESS message.
You can now control your thermostat from anywhere through your laptop,
tablet, or smartphone using the Total Connect Comfort app.
Setting system mode
1 Touch SYSTEM to display system settings.
2 Touch desired option:
Heat, Cool, Off, Auto, or Em Heat (heat pumps
with aux. heat).
NOTE: The Auto and Em Heat system settings may not appear,
depending on how your thermostat was installed.
3 Touch Done to save and exit.
Adjusting program schedules
1 Touch MENU.
2 Select Edit Schedule to display Use Scheduling Assistant?
• Touch Yes to create a schedule by answering simple questions.
Adjusting humidification, dehumidification,
or ventilation settings
1 Touch MENU and select Humidification, Dehumidification, or Ventilation.
2 Touch Select to access settings.