This document provides assembly instructions for a Hornby footbridge model, designed for use in model railway layouts. The footbridge serves as a realistic architectural element, allowing model figures to cross over railway tracks or other obstacles within a miniature landscape. Its design incorporates features typical of real-world footbridges, enhancing the authenticity and visual appeal of a model railway scene.
The assembly process is broken down into several stages, each clearly illustrated and described to guide the user through constructing the footbridge. The instructions emphasize the modular nature of the kit, where various components are fitted together to form the complete structure.
Function Description
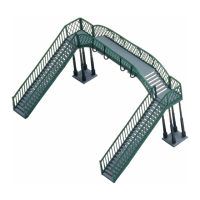
The Hornby footbridge is a static model designed to enhance the realism of a model railway layout. Its primary function is aesthetic, providing a visual representation of a pedestrian crossing over railway lines. While it does not have moving parts or interactive features, its detailed construction and realistic appearance contribute significantly to the overall immersive quality of a model scene. The footbridge can be integrated into various settings, such as station platforms, trackside areas, or even as part of a larger urban or rural diorama. Its design allows for flexibility in placement, accommodating different layout configurations and themes. The structure is intended to be a permanent fixture once assembled, though the instructions note that polystyrene cement can be used for a more secure and lasting construction.
Usage Features
The assembly instructions highlight several key usage features that make the Hornby footbridge kit user-friendly and adaptable:
- Modular Construction: The footbridge is composed of several distinct parts, including sidewalls, an overbridge base, outriggers, side steps, support posts, support bases, and inner/outer walls for the side steps. This modular approach simplifies assembly, allowing users to build the structure step-by-step.
- Alternative Assembly Options: The instructions mention that the footbridge "may be assembled in alternative ways as shown on the sides of the pack." This suggests a degree of flexibility in how the final model can appear, potentially offering different configurations or aesthetic choices to suit individual layout designs.
- Snap-Fit and Flexible Components: Many components are designed for a snap-fit assembly, reducing the need for adhesives during initial construction. For instance, sidewalls fit onto the overbridge base, outriggers clip into place, and side steps engage with pegs. The instructions specifically mention using the "flexibility" of certain components, such as the sidewalls and side steps' inner walls, to engage them with other parts. This flexibility is also crucial for the "hinges" of the side steps' outer walls, which need to be flexed to ensure they bend at neat right angles.
- Detailed Insets and Illustrations: The manual includes detailed illustrations and insets (e.g., inset 5 for outrigger engagement, inset 8 for support post placement, inset 12 for hinge preparation) to clarify complex steps or specific component orientations. These visual aids are invaluable for ensuring correct assembly and understanding how parts interact.
- Optional Permanent Securing: While many parts are designed to fit together, the instructions suggest using "polystyrene cement (not included)" for a "more permanent structure." This option allows users to secure the side steps to the overbridge base and fasten the support posts and bases, ensuring the model's durability and stability within a permanent layout. This feature caters to users who desire a robust and long-lasting model.
- Smoke Deflector Projections: The overbridge base includes "smoke deflector projections" (3) over which the sidewalls (1) are sprung. This detail suggests a thoughtful design that considers the interaction of the footbridge with passing model trains, adding to the realism.
- Clear Numbering System: Each component and step is clearly numbered, making it easy to follow the sequence of assembly and identify specific parts mentioned in the text.
Maintenance Features
As a static model, the Hornby footbridge requires minimal maintenance once assembled. The primary "maintenance" considerations revolve around its initial construction and ensuring its longevity:
- Adhesive for Permanence: The recommendation to use polystyrene cement for a more permanent structure is a key maintenance-related feature. By securing components with adhesive, the model becomes more robust and less susceptible to accidental disassembly or damage over time, especially if the layout is frequently moved or handled. This proactive step during assembly reduces the need for future repairs.
- Careful Handling of Flexible Parts: The instructions advise flexing certain parts, like the sidewalls and the hinges of the outer walls, to ensure proper fit and bending. While not strictly maintenance, understanding and correctly executing these steps during assembly prevents stress on the plastic and potential breakage, thus contributing to the model's long-term integrity. Incorrect flexing or forcing parts could lead to damage that would then require repair.
- Dusting and Cleaning: Like any model railway accessory, the footbridge will benefit from occasional dusting to maintain its appearance. The open structure of the footbridge, with its railings and steps, might accumulate dust, which can be gently removed with a soft brush or air blower.
- Storage Considerations: If the footbridge is not permanently fixed to a layout, storing it in a safe place where it won't be crushed or exposed to extreme temperatures will help preserve its condition. The modular nature, while aiding assembly, also means that if not glued, parts could potentially detach if mishandled.
In summary, the Hornby footbridge kit is designed for ease of assembly with a focus on realistic detail and structural integrity. Its modular design, use of flexible components, and option for permanent securing with adhesive make it a versatile and durable addition to any model railway enthusiast's collection. The clear instructions and visual aids ensure that even novice modelers can successfully construct this intricate piece.