This document is a comprehensive guide for the Hotpoint Ariston dishwasher, covering product description, first-time use, programs, options, loading, daily use, care, maintenance, and troubleshooting.
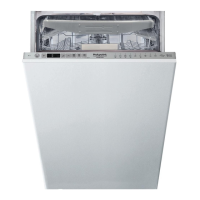
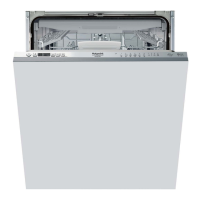
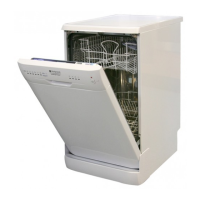
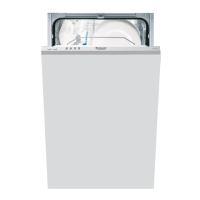
Product Description
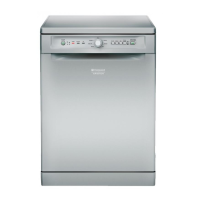
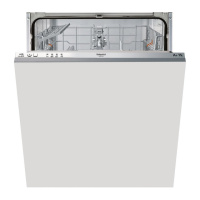
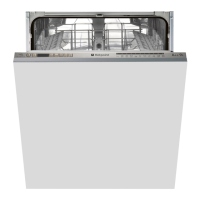
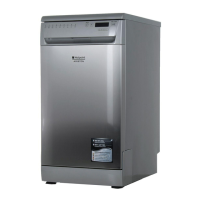
The Hotpoint Ariston dishwasher features an intuitive design with clearly labeled components. The appliance includes an upper rack, foldable flaps, and an upper rack height adjuster for flexible loading. Washing is facilitated by upper and lower spray arms, ensuring thorough cleaning. The lower rack accommodates larger items and includes a cutlery basket. Filtration is managed by a filter assembly, while a salt reservoir and detergent and rinse aid dispensers ensure optimal cleaning performance. The control panel, located on the front, provides access to various functions and program selections, with a display showing program number and delay time.
Control Panel Features:
- ON-OFF/Reset button: Powers the appliance on or off and resets programs.
- Program selection button (P): Allows users to choose from various wash programs.
- Salt refill indicator light: Illuminates when the salt reservoir needs refilling.
- Rinse Aid refill indicator light: Indicates when rinse aid needs replenishing.
- Program number and delay time indicator: Displays the selected program and any set delay.
- Tablet indicator light: Activates when using all-in-one detergent tablets.
- Display: Provides visual feedback on program status and settings.
- Half Load indicator lights: Show when the Half Load option is active.
- Half Load button: Activates the Half Load option for smaller loads.
- Delay button: Sets a delayed start time for the wash cycle.
- START/Pause button with indicator light / Tab: Initiates or pauses a program and activates the Tablet option.
First Time Use
Before initial use, stoppers and elastic elements should be removed from the racks.
Filling the Salt Reservoir:
The salt reservoir prevents limescale buildup. It should be filled when the SALT REFILL indicator light is on.
- Remove the lower rack and unscrew the reservoir cap.
- For the first time, fill the reservoir with water.
- Use the provided funnel to fill the reservoir with approximately 1 kg of dishwasher salt.
- Remove the funnel and clean any spilled salt.
- Ensure the cap is tightly screwed to prevent detergent contamination.
It is recommended to add salt before starting a wash cycle.
Setting Water Hardness:
Accurate water hardness setting ensures optimal softener performance. This information can be obtained from local water suppliers. The factory setting is "Average" (level 3).
- Turn the appliance ON, then OFF.
- Press and hold button P for 5 seconds until a beep is heard.
- Turn the appliance ON. The current selection level and salt indicator light will flash.
- Press button P to select the desired hardness level according to the Water Hardness Table:
- Level 1 (Soft): 0-6 °dH / 0-10 °fH
- Level 2 (Medium): 7-11 °dH / 11-20 °fH
- Level 3 (Average): 12-17 °dH / 21-30 °fH
- Level 4 (Hard): 17-34 °dH / 31-60 °fH
- Level 5 (Very hard): 35-50 °dH / 61-90 °fH
- Turn the appliance OFF to save the setting.
After this procedure, run a program without loading. Only use dishwasher-specific salt. Failure to fill the salt container can damage the water softener and heating element.
Filling the Rinse Aid Dispenser:
Rinse aid aids in drying and should be refilled when the RINSE AID REFILL indicator light is on.
- Open dispenser B by pressing and pulling up the tab.
- Pour in rinse aid (max. 110 ml), wiping any spills immediately.
- Close the lid until it clicks.
Never pour rinse aid directly into the appliance tub.
Adjusting Rinse Aid Dosage:
To optimize drying results, the rinse aid quantity can be adjusted.
- Turn the dishwasher ON, then OFF.
- Press button P three times until a beep is heard.
- Turn the dishwasher ON. The current selection level and rinse aid indicator light will flash.
- Press button P to select the desired rinse aid quantity (1-4 levels).
- Low numbers (1-2) for bluish streaks.
- Mid-range numbers (3-4) for water drops or limescale marks.
- Turn the dishwasher OFF to save the setting.
If set to ZERO (ECO), no rinse aid will be supplied, and the LOW RINSE AID indicator light will not illuminate.
Filling the Detergent Dispenser:
- Open the detergent dispenser using device A.
- Introduce detergent into the dry dispenser B, referring to the dosing indications.
- Remove any detergent residues from the edges and close the cover until it clicks.
- Close the lid by pulling it up until the closing device is secured.
The dispenser opens automatically during the program. For all-in-one detergents, use the TABLET button for optimized washing and drying.
Programs Table
The dishwasher offers a range of programs tailored to different soiling levels and crockery types.
- 1 Eco (50°C): Standard program for normally soiled crockery, most efficient in terms of energy and water consumption. Duration: 4:00 h:min, Water consumption: 11.5 litres, Energy consumption: 0.83 kWh.
- 2 Intensive (65°C): For heavily soiled crockery, especially pans and saucepans (not for delicate items). Duration: 2:30 h:min, Water consumption: 15.0 litres, Energy consumption: 1.50 kWh.
- 3 Normal (55°C): For mixed soil and dried food residues. Duration: 2:30 h:min, Water consumption: 15.0 litres, Energy consumption: 1.30 kWh.
- 4 Daily (50°C): Everyday cycle for normally soiled crockery, ensuring optimal cleaning and drying in shorter time. Duration: 1:20 h:min, Water consumption: 11.5 litres, Energy consumption: 1.10 kWh.
- 5 Delicates (45°C): For delicate items sensitive to high temperatures, such as glasses and cups. Duration: 1:40 h:min, Water consumption: 11.5 litres, Energy consumption: 1.00 kWh.
- 6 Express 30' (50°C): For lightly soiled dishes with no dried food residues. Duration: 0:30 h:min, Water consumption: 8.5 litres, Energy consumption: 0.50 kWh.
- 7 Soak: To refresh crockery planned for later washing. No detergent needed. Duration: 0:10 h:min, Water consumption: 4.5 litres, Energy consumption: 0.01 kWh.
Technical Specifications:
ECO program data is measured under laboratory conditions according to European Standard EN 50242. Pre-treatment of dishes is not needed. Program durations are estimates and may vary based on factors like water temperature, pressure, load amount, and selected options. Standby consumption: Left-on mode: 5W, Off mode: 0.5W.
Options and Functions
Options can be selected directly via the control panel. Incompatible options will cause the corresponding LED to flash rapidly three times, accompanied by beeps, and the option will not be enabled.
-
Half Load:
- Function: For smaller loads, this option saves water, electricity, and detergent.
- Usage: Select a program, then press the HALF LOAD button. The indicator light will illuminate. Press again to deselect.
- Important: Halve the amount of detergent used.
-
Tablet (Tab):
- Function: Optimizes program performance for combined detergent tablets (rinse aid, salt, and detergent in one dose).
- Usage: Press the START/PAUSE button for 3 seconds. The corresponding symbol will light up.
- Important: This option should be off when using powder or liquid detergent.
-
Delay:
- Function: Delays the start time of the program by 1 to 12 hours.
- Usage:
- Press the DELAY button. The '' symbol appears on the display. Each press increases the delay by 1 hour (up to 12h).
- Select the wash program, then press the START/PAUSE button and close the door within 4 seconds. The timer will begin counting down.
- Once the delay elapses, the '' indicator light switches off, and the wash cycle begins.
- Adjustment/Cancellation: Press the DELAY button repeatedly to adjust or to turn off the '' indicator light to cancel.
- Important: The DELAY function cannot be set once a wash cycle has started.
Loading the Racks
Proper loading ensures optimal washing performance.
Upper Rack:
- Load delicate and light dishes: glasses, cups, saucers, low salad bowls.
- Adjusting Height: The upper basket height can be adjusted to accommodate bulky crockery in the lower basket or to maximize space for tip-up compartments.
- The upper rack has a height adjuster. To raise, simply lift the rack sides until it's stable. To lower, press levers (A) on the sides and move the basket down.
- Recommendation: Do not adjust the rack height when loaded. Never raise or lower one side only.
- Foldable Flaps: These can be positioned at three different heights to optimize crockery arrangement. Wine glasses can be placed securely by inserting their stems into the slots. Incline flaps more for optimum drying. To change inclination, pull up, slide slightly, and reposition.
Lower Rack:
- Load pots, lids, plates, salad bowls, cutlery, etc.
- Large plates and lids should be placed at the sides to avoid interfering with the spray arm.
Cutlery Basket:
- Fitted with top grids for improved cutlery arrangement.
- Must be positioned at the front of the lower rack.
- Knives and sharp utensils should be placed with points facing downwards or horizontally in the upper rack's tip-up compartments.
Sliding Tray:
- Located in the upper rack, this tray holds small crockery and cutlery.
- For optimal washing, avoid placing bulky crockery directly below the tray.
- The tray is removable.
Daily Use
- Check Water Connection: Ensure the dishwasher is connected to the water supply and the tap is open.
- Switch On: Open the door and press the ON/OFF button.
- Load Racks: Load crockery as per the instructions in "LOADING THE RACKS."
- Fill Detergent Dispenser: Add detergent as described in "FILLING THE DETERGENT DISPENSER."
- Choose Program and Customize Cycle: Select the appropriate program using the P button and any desired options (see "PROGRAMS DESCRIPTION" and "OPTIONS AND FUNCTIONS").
- Start: Press the START/Pause button (its LED will light up) and close the door within 4 seconds. A single beep indicates the program has started. If the door is not closed in time, an alarm will sound; open the door, press START/Pause, and close it again.
- End of Wash Cycle: The end of the cycle is indicated by beeps and the flashing program number on the display. Open the door and switch off the appliance using the ON/OFF button. Wait a few minutes before unloading to avoid burns, starting with the lower rack.
Energy Saving: The machine automatically switches off during extended periods of inactivity. For lightly soiled or pre-rinsed crockery, reduce the amount of detergent used.
Modifying a Running Program: If a wrong program was selected, it can be changed if it has just begun. Open the door, press and hold the ON/OFF button to switch off the machine. Switch it back on, select the new program and options, then press START/Pause and close the door.
Adding Extra Crockery: Without switching off the machine, open the door (START/Pause LED blinks, beware of hot steam!). Place crockery inside, then press START/Pause and close the door within 4 seconds. The cycle will resume from where it was interrupted.
Accidental Interruptions: If the door is opened during a cycle or there's a power cut, the cycle stops. To resume, press START/Pause and close the door.
Advice and Tips
Tips for Loading:
- Remove all food residues and empty glasses before loading. Pre-rinsing under running water is not necessary.
- Arrange crockery firmly to prevent tipping. Containers should face downwards or obliquely to allow water to reach all surfaces.
- Ensure lids, handles, trays, and frying pans do not obstruct spray arm rotation.
- Place small items in the cutlery basket.
- Very soiled dishes and pans should be placed in the lower basket for stronger water sprays and better washing performance.
- After loading, ensure spray arms can rotate freely.
Hygiene: To prevent odors and sediment, run a high-temperature program at least once a month. Use a teaspoon of detergent and run it without loading to clean the appliance.
Unsuitable Crockery:
- Wooden crockery and cutlery.
- Delicate decorated glasses, artistic handicraft, and antique crockery (decorations may not be resistant).
- Parts made of synthetic material that cannot withstand high temperatures.
- Copper and tin crockery.
- Crockery soiled with ash, wax, lubricating grease, or ink.
- Glass decorations and aluminum/silver pieces may change color and fade. Some types of glass may become opaque after multiple washes.
Damage to Glass and Crockery:
- Only use dishwasher-safe glasses and porcelain.
- Use a delicate detergent suitable for crockery.
- Unload glasses and cutlery as soon as the wash cycle is over.
Care and Maintenance
Cleaning the Filter Assembly:
Regularly clean the filter assembly to prevent clogging and ensure proper wastewater flow. The assembly consists of three filters that remove food residues.
- Turn cylindrical filter A anti-clockwise and pull it out (Fig 1).
- Remove cup filter B by exerting slight pressure on the side flaps (Fig 2).
- Slide out stainless-steel plate filter C (Fig 3).
- Inspect the trap and remove any food residues. Never remove the wash-cycle pump protection (black detail) (Fig 4).
After cleaning, replace the filter assembly and fix it correctly to maintain efficient dishwasher operation. The dishwasher must not be used without filters or if a filter is loose.
Cleaning the Spray Arms:
Food residues can encrust spray arm holes. Check and clean arms periodically with a small non-metallic brush.
- To remove the upper spray arm, turn the plastic locking ring anti-clockwise. Replace it with the side having more holes facing upwards.
- The lower spray arm can be removed by pulling it upwards.
Cleaning the Water Inlet Hose: If water hoses are new or unused for a long time, let the water run to clear impurities before connecting to prevent blockages and damage to the dishwasher.
Troubleshooting
Before contacting Service Centre, check the following common issues and solutions:
Maintenance and Troubleshooting Guide
For more information, maintenance procedures, and troubleshooting, refer to the Use and Care Guide, available via After-Sales Service, website (docs.hotpoint.eu), or QR code.
When contacting After-Sales Service, provide the codes shown on the rating plate inside the dishwasher door. Phone numbers are listed in the warranty booklet or on the website (www.hotpoint.eu).
Technical Datasheet
Energy consumption data is available for download from docs.hotpoint.eu.