Do you have a question about the Hotpoint RLA36 and is the answer not in the manual?
Safety advice for installation, usage, and disposal of the appliance.
Optimal placement, ventilation, and door clearance for fridge installation.
How to level the fridge and set up electrical connections safely.
Adjusting the fridge compartment temperature using the control wheel.
Understanding the temperature indicator for correct operation.
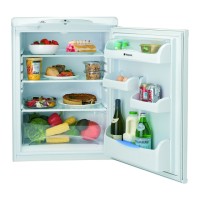
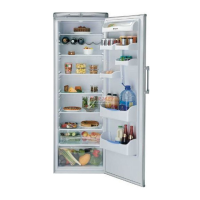
Guide to different storage zones and recommended food types.
Tips for best usage, food storage, and efficient cooling.
How to adjust shelves, use split shelves, salad bins, and racks.
Instructions for interior/exterior cleaning and automatic defrosting.
Step-by-step guide for replacing the interior light bulb.
Instructions for changing the door hinge side.
Troubleshooting common problems like non-operation and temperature issues.
Explanation of normal operational sounds the fridge may make.
Information on the 12-month parts and labour guarantee.
Contact information for service, repairs, and spare parts.
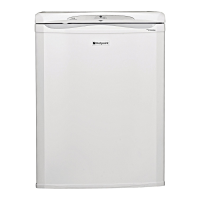
This document provides comprehensive instructions for the installation, use, and maintenance of Hotpoint Larder Fridges, specifically models RLA34, RLA36, RLM34, and RLM36. It aims to guide users through setting up their appliance efficiently and ensuring its longevity.
The primary function of this appliance is to store domestic foodstuffs, keeping them cool and fresh. It operates as a larder fridge, meaning it is designed for refrigeration rather than freezing.
The installation process begins with selecting an appropriate location. The fridge should be placed away from heat sources like cookers or radiators and direct sunlight to prevent affecting its performance. Adequate ventilation is crucial, requiring a minimum 30mm (1¼ inch) gap above the fridge. When moving the fridge into position, care must be taken to avoid damaging the refrigerant circuit pipework at the rear. After positioning, the fridge should be left in its final location for at least 15 minutes before plugging it in and switching it on, allowing the refrigerant to settle. Leveling the fridge by adjusting its front feet is essential to prevent rocking or vibration and to ensure the door is properly aligned, contributing to reliable and efficient operation.
For fridges installed under a worktop, Hotpoint recommends fitting a vent at the rear of the worktop to minimize running costs. This vent is particularly important if there is less than 30mm clearance above the fridge to ensure adequate ventilation. The manual also details how to fit a bottle retainer, which involves locating its groove at one end of the bottle rack and pressing it down along the top edge until it is fully in place.
Electrical supply instructions emphasize that the appliance must be earthed and positioned so that the plug remains accessible after installation. It comes fitted with a 13A plug and fuse, and instructions are provided for replacing the fuse or changing the plug if necessary, including a warning against inserting a discarded plug into another socket. The wiring code for the mains lead (Green/Yellow for Earth, Blue for Neutral, Brown for Live) is clearly outlined. In case of damage, the mains lead should be replaced by a qualified electrician using a special lead available from Hotpoint Service.
The fridge's temperature is controlled by a wheel located on the front of the worktop. Turning it clockwise (to a higher number) makes the fridge colder, while turning it anti-clockwise (to a lower number) makes it warmer. The normal set point, marked by a '3' and 'N' on the dial, is usually suitable. Some models include a temperature indicator on the bottom right-hand side of the refrigerator wall. This indicator shows "OK" when the compartment is operating at the correct temperature. If it's completely black, the temperature is too high, and adjustment is needed. After any temperature adjustment, a minimum of 10 hours should be allowed for the temperature to stabilize before rechecking the indicator.
The manual provides useful advice for making the best use of the fridge, including following food packaging instructions for storage times, keeping foods covered to retain moisture and prevent odour transference, avoiding unnecessary door openings, and allowing hot food to cool before placing it inside. It also recommends packing cooked and fresh food separately, wrapping raw meat and poultry to prevent contamination, and storing cheese in greaseproof paper. Food should be positioned to allow cold air to circulate freely, ensuring nothing blocks the interior back wall or the defrost gutter drain hole.
The fridge features different storage zones:
The appliance includes adjustable shelves, allowing users to customize storage space for various item heights. A split glass shelf offers flexibility, functioning as a standard shelf or two half shelves, with the front half being repositionable. Salad bins are provided for fruit and vegetables and should be cleaned regularly. Commodity and bottle racks in the door are also repositionable. An egg rack, easily removable for cleaning, can be used with any commodity rack.
A key feature is the Microban® antibacterial protection built into the interior components. This technology inhibits the growth of harmful and odour-causing bacteria on the fridge surfaces, maintaining a fresher and more hygienically clean environment. This protection is continuous and does not wash out or wear out, although regular cleaning is still recommended.
The fridge compartment features automatic defrosting, meaning water droplets form on the interior back wall and refreeze. It's crucial to keep the defrost drain hole clear to ensure water flows out easily and to prevent stored food from contacting the back wall.
For cleaning, the appliance must be switched off and unplugged. Interior cleaning involves removing food, salad bins, racks, and shelves, washing them in warm soapy water, and drying them thoroughly. The interior should be wiped with a clean cloth wrung out in a solution of bicarbonate of soda or sterilizing fluid, then dried completely. The exterior can be cleaned with a soft cloth, warm water, and washing-up liquid. Abrasive powders, household cleaners, bleach, or wax polish should not be used as they can damage the exterior and leave smells. Dust should be removed from underneath the fridge and from the compressor and condenser at the back using a soft brush or vacuum cleaner, taking care not to damage the pipework. The door seal should be cleaned with warm water and a soft cloth, avoiding detergents or sharp objects that could damage it.
If the fridge is not in use for an extended period, it should be switched off, unplugged, emptied, and cleaned. The door should be left ajar to prevent odour accumulation.
Instructions are also provided for changing the interior light bulb, which requires a replacement SES 15W bulb. The process involves removing shelves, un-clipping the lamp guard, replacing the bulb, and reassembling.
The manual also covers door reversal, a maintenance task that allows the door hinge side to be changed. This procedure requires small hand tools and involves carefully supporting the door, removing hinges, repositioning the hinge bracket and footplate, and then reattaching the door. It is advised to allow the appliance to stand upright for at least 15 minutes after reversal before plugging it in.
A troubleshooting section helps users diagnose common issues before contacting service. It addresses problems such as the appliance not working (checking plug, power supply, fuse, and door closure), excessive noise (checking pipework clearance, leveling, and operating sounds), warm or cold temperatures (adjusting the control wheel, checking heat sources, ventilation, and door closure), water beneath the salad bin (checking defrost drain hole and food contact with the back wall), and the interior light not working (checking bulb and referring to light bulb replacement instructions). It also provides advice for rapid ice build-up, suggesting checking door closure and covering foods/liquids.
The manual explains normal operating sounds of a fridge, including the buzzing/humming of the compressor, gurgling/bubbling of gases, clicking of the temperature control, and cracking noises from expanding/contracting parts.
This comprehensive guide ensures users can effectively install, operate, and maintain their Hotpoint Larder Fridge for optimal performance and longevity.
| Energy Rating | A+ |
|---|---|
| Dimensions (H x W x D) | 85 x 60 x 62 cm |
| Noise Level | 42 dB |
| Number of Shelves | 3 |
| Reversible Door | Yes |
| Appliance placement | Freestanding |
| Product colour | White |
| Hinge type | Right |
| Number of compressors | 1 |
| Climate class | SN-T |
| Fridge interior light | Yes |
| Lamp type | LED |
| Number of shelves/baskets in fridge | 3 |
| Number of vegetable drawers | 1 |
| Door balconies | 3 |
| Egg balcony | Yes |
| Bottle rack | Yes |
| Energy efficiency class | A+ |
| Width | 60 cm |
| Depth | 62 cm |
| Height | 85 cm |
| Defrost Type | Manual |
| Energy Star Certified | No |
| Freezer net capacity | 0 L |
| Freezer gross capacity | 0 L |
| Storage time during power failure | 0 h |
| Number of shelves/baskets in freezer | 0 |
| Freezer Capacity | 0 L |
| Annual Energy Use | 119 kWh |