7. Record the power meter reading in the calculation sheet (\Power Meter Reading" column).
8. Repeat the following steps until a power sweep completed.
a.
Press
NNNNNNNNNNNNNNNNNNNN
MANUAL
to set the source power to the next measurement point listed in Table 2-4.
The sweep indicator moves to the last measurement point on the sweep. (The sweep
indicator indicates the last measurement point on the sweep, not the current point.)
b. Wait for the power meter reading to settle.
c. Record the power meter reading in the calculation sheet.
9. Change the start and stop power of the HP 4395A as follows:.
Control Settings Key Strokes
Power Sweep
4
Sweep
5
,
NNNNNNNNNNNNNNNNNNNNNNNNNNNNNNNNNNNNNNNNNNNNNNN
SWEEP TYPE MENU
,
NNNNNNNNNNNNNNNNNNNNNNNNNNNNNNNNNNN
POWER SWEEP
CW Frequency: 50 MHz
4
Source
5
,
NNNNNNNNNNNNNNNNNNNNNNN
CW FREQ
,
4
5
5
,
4
0
5
,
4
M/
5
Start Power:
0
5 dBm
4
Start
5
,
4
-
5
,
4
5
5
,
4
x1
5
Stop Power: 15 dBm
4
Stop
5
,
4
1
5
,
4
5
5
,
4
x1
5
Number of Points: 5
4
Sweep
5
,
N
NNNNNNNNNNNNNNNNNNNNNNNNNNNNNNNNNNNNNNNNNNNNNNNNN
NUMBER of POINTS
,
4
5
5
,
4
x1
5
Trigger: Manual
4
Trigger
5
,
NNNNNNNNNNNNNNNNNNNNNNNNNNNNNNNNNNNNNN
TRIGGER[xxx]
,
NNNNNNNNNNNNNNNNNNNN
MANUAL
Trigger Event:On Point
4
Trigger
5
,
NNNNNNNNNNNNNNNNNNNNNNNNNNNNNNNNNNNNNN
TRIGGER[xxx]
,
NNNNNNNNNNNNNNNNNNNNNNNNNNNNNNNNNNNNNNNNNNNNNNNNNNNNNNNNNNNNNNNNN
TRIG EVENT [ON SWEEP]
(Then the softkey label changes to
N
NNNNNNNNNNNNNNNNNNNNNNNNNNNNNNNNNNNNNNNNNNNNNNNNNNNNNNN
TRIGGER [ON POINT]
10.
Press
4
Trigger
5
,
NNNNNNNNNNNNNNNNNNNN
SINGLE
,
NNNNNNNNNNNNNNNNNNNNNNNNNNNNNNNNNNNNNNNNNNNNNNNNNN
TRIGGER:[MANUAL]
,
NNNNNNNNNNNNNNNNNNNN
MANUAL
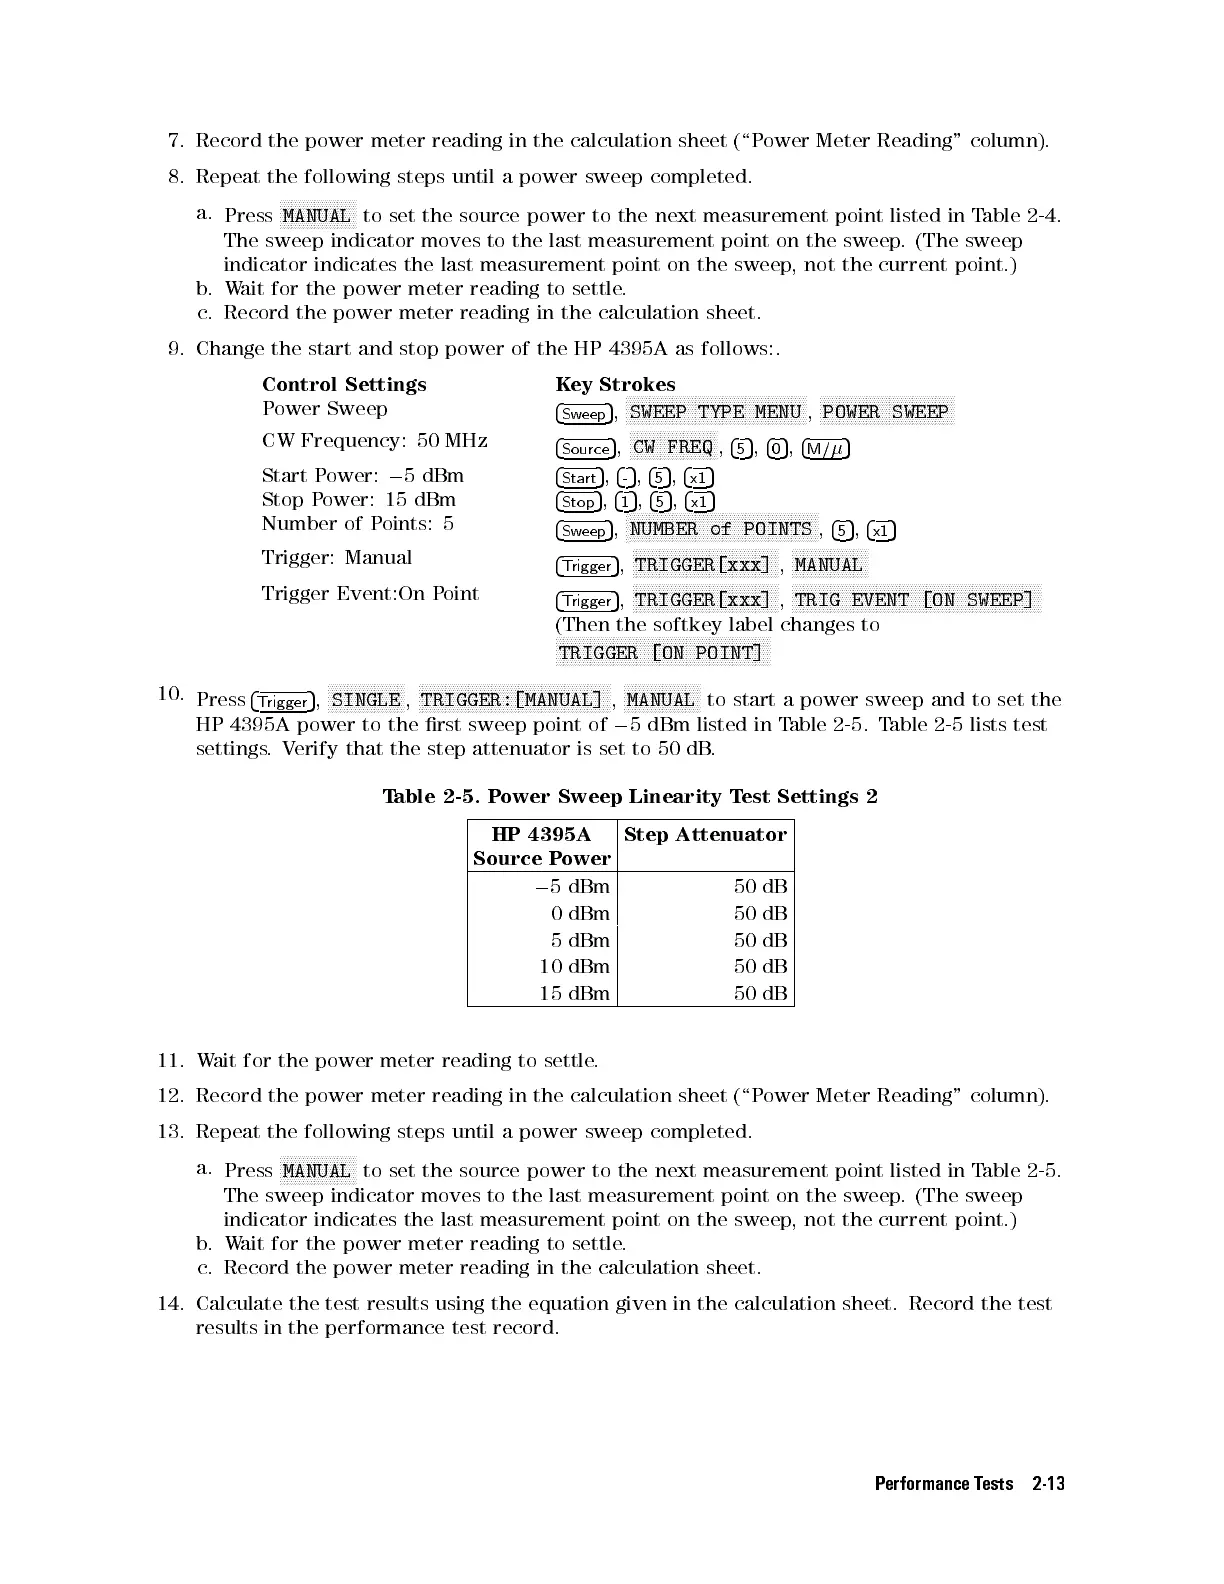
to start a power sweep and to set the
HP 4395A power to the rst sweep point of
0
5 dBm listed in Table 2-5. Table 2-5 lists test
settings.Verify that the step attenuator is set to 50 dB
.
Table 2-5. Power Sweep Linearity Test Settings 2
HP 4395A
Source Power
Step Attenuator
0
5 dBm 50 dB
0 dBm 50 dB
5 dBm 50 dB
10 dBm 50 dB
15 dBm 50 dB
11. Wait for the power meter reading to settle.
12. Record the power meter reading in the calculation sheet (\P
ower Meter Reading" column).
13. Repeat the following steps until a power sweep completed.
a.
Press
NNNNNNNNNNNNNNNNNNNN
MANUAL
to set the source power to the next measurement point listed in Table 2-5.
The sweep indicator moves to the last measurement point on the sweep. (The sweep
indicator indicates the last measurement point on the sweep, not the current point.)
b. Wait for the power meter reading to settle.
c. Record the power meter reading in the calculation sheet.
14. Calculate the test results using the equation given in the calculation sheet. Record the test
results in the performance test record.
Performance Tests 2-13
 Loading...