EasyManua.ls Logo

HP ac100 - User Manual

HP ac100
26 pages
Print Icon
To Next Page IconTo Next Page
Loading...
ac100
Action Camcorder
User Manual

Other manuals for HP ac100

Question and Answer IconNeed help?

Do you have a question about the HP ac100 and is the answer not in the manual?

Summary

Important Information and Precautions

Handling and Storage Precautions

Details essential precautions for product care, avoiding damage, and safety during use and storage.

Device Usage: Charging

Charge the battery

Details the procedure and time required to charge the camcorder's battery using a USB connection.

Device Usage: Memory Card

Use of Memory Card

Provides instructions on inserting and removing the micro-SD card, along with warnings.

Device Usage: Startup and Shutdown

Startup;Shutdown Procedures

Explains how to turn the camera on, off, and manage auto power-off features and low battery indicators.

Device Usage: Modes and Indicators

Switching Function Modes

Describes how to navigate between different operational modes like video, photo, and playback.

Indicator Light Meanings

Explains the meaning of different colors and states of the indicator light for status indication.

Video Recording Mode

Photo Mode Operations

Vehicle Recording Mode

Playback and File Management

File Deletion and Playback

Connecting to a High-Definition TV

Computer Connectivity and Remote Control

Remote Control Usage

Waterproof Case Usage

Overview

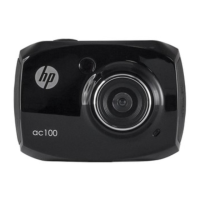
The HP Action Cam ac100 is a high-definition video camera designed for capturing dynamic images with excellent continuity. Its ultraportable design makes it suitable for various applications, enhancing daily life with convenience, fun, and vibrant visuals. The camera supports high-speed USB 2.0 and can be connected to a computer or laptop for data transfer and charging.

Function Description

The ac100 offers four primary operating modes: video recording, vehicle recording, photo mode, and playback mode. These modes can be easily switched by touching the corresponding icon on the LCD display.

  • Video Recording Mode: This is the default mode upon startup. To begin recording, press the shutter button or touch the focus brackets on the LCD. To stop recording, press the shutter button again or touch the focus brackets. The camera automatically stops recording if the memory card is full or the battery is depleted. Video resolutions include FHD (1080p @30fps), HD (720p @60fps), and HD (720p @30fps), which can be selected by touching the resolution icon on the screen. The display shows the remaining recording time, date and time settings, battery level, and digital zoom controls (up to 4x).

  • Photo Mode: To switch to photo mode, touch the mode icon until the photo icon is displayed. Photos can be taken by pressing the shutter button or touching the focus brackets. Photo sizes available are 12M, 10M, 8M, and 5M, selectable via an on-screen icon. The display also shows the approximate number of remaining photos, face tracking options, date and time settings, battery level, and digital zoom controls. Additional photo features include a 10-second self-timer and a 3-photo burst mode.

  • Vehicle Mode: This mode is specifically designed for vehicle use. It offers the same video resolutions as the standard video recording mode. A unique feature in this mode is the ability to flip the display 180 degrees, which is useful for adjusting to different mounting orientations. This orientation flip can be toggled by touching a dedicated icon on the screen.

  • Playback Mode: This mode allows users to review recorded videos and captured photos. It is accessed by touching the playback icon on the LCD. Within playback, users can select to view recorded video files, vehicle video files, or captured photo files. For videos, there are controls to pause, fast forward, and fast rewind. For photos, users can navigate through images using "next" and "previous" icons. The playback mode also includes a file deletion function, allowing users to remove unwanted files.

Usage Features

  • Charging: The Action Cam is charged by connecting it to a computer/laptop or a standard USB AC power adapter using the provided USB cable. A red indicator light signals charging, which turns off when fully charged. Typical charging time is 2-4 hours.
  • Memory Card: The device uses a micro-SD memory card (up to 32GB, class 6 or faster recommended). The card is inserted by pushing it into the slot until it clicks. To remove, gently press the card inward until it clicks, then release. It's crucial not to remove the memory card while recording or when the camera is powered on to prevent data corruption.
  • Startup/Shutdown: To power on, press and hold the POWER button for 2 seconds. To shut down, press and hold the POWER button until the camera powers off.
  • Auto Screen-off and Shutdown: To conserve battery, the screen automatically powers off after about a minute of inactivity. Touching the screen or pressing the display screen off/on button will resume it. If idle for approximately 5 minutes, the camera will automatically shut down.
  • Low Battery Warning: A battery icon on the LCD indicates the battery level. When the battery is low, the icon turns red and flashes, prompting the user to charge the device before it automatically shuts down.
  • HDMI Output: The Action Cam supports HDMI video output, allowing users to connect it to a high-definition TV to play back videos and photos with clear and sharp pictures.
  • Remote Control: A remote control is included for convenient operation, enabling users to record videos, take photos, and shut down the camera without direct interaction. The remote's signal transmitter port should be aimed at the infrared receiver light on the camera.
  • Computer Connection: When connected to a PC via USB, the Action Cam functions as a removable hard disk. Photos are saved in an "I:\jpg" folder, and video files in an "I:\video" folder (where "I" represents the removable disk drive letter). Drivers are typically not required for Windows 2000 or newer operating systems.

Maintenance Features

  • General Care: Avoid storing the product in dusty, dirty, sandy, hot, or cold environments. High temperatures can damage components and batteries, while cold conditions can lead to moisture buildup and circuit damage. Do not attempt to open the casing or repair the device yourself, as internal high-voltage components pose a risk of electric shock. Avoid dropping or knocking the product, as this can damage internal components.
  • Cleaning: Do not use harsh chemicals, cleaning solvents, or strong detergents. Instead, wipe the product with a slightly damp, soft cloth.
  • Battery and Memory Card Handling: Do not open the battery cover while recording, as this can prevent image storage and corrupt existing data. Replace memory cards regularly as their service life expires.
  • Waterproof Case: Before using the waterproof case, ensure its rubber seal is clean and free of debris. Always test the waterproof case by submerging it without the camera for about a minute to check for leaks. After use in salt water, rinse the outside of the housing with tap water and dry it to prevent corrosion and salt buildup. When cleaning the seal, rinse it in fresh water and shake it dry (avoid using a cloth, which can leave lint). Re-install the seal properly into the grooves. Remember to set the desired recording mode (photo or video) on the Action Cam before inserting it into the waterproof case, as the remote control can be used to switch modes once inside.
  • Troubleshooting: If the product or accessories are not working properly, take them to a qualified service center for assistance and repair. Always test the camcorder for proper operation before use.

HP ac100 Specifications

General IconGeneral
Product NameHP ac100
CategoryCamcorder
Sensor TypeCMOS
Effective Pixels5 MP
Display TypeLCD
Battery TypeLithium-ion
Storage MediaSD card

Related product manuals