8 9 10
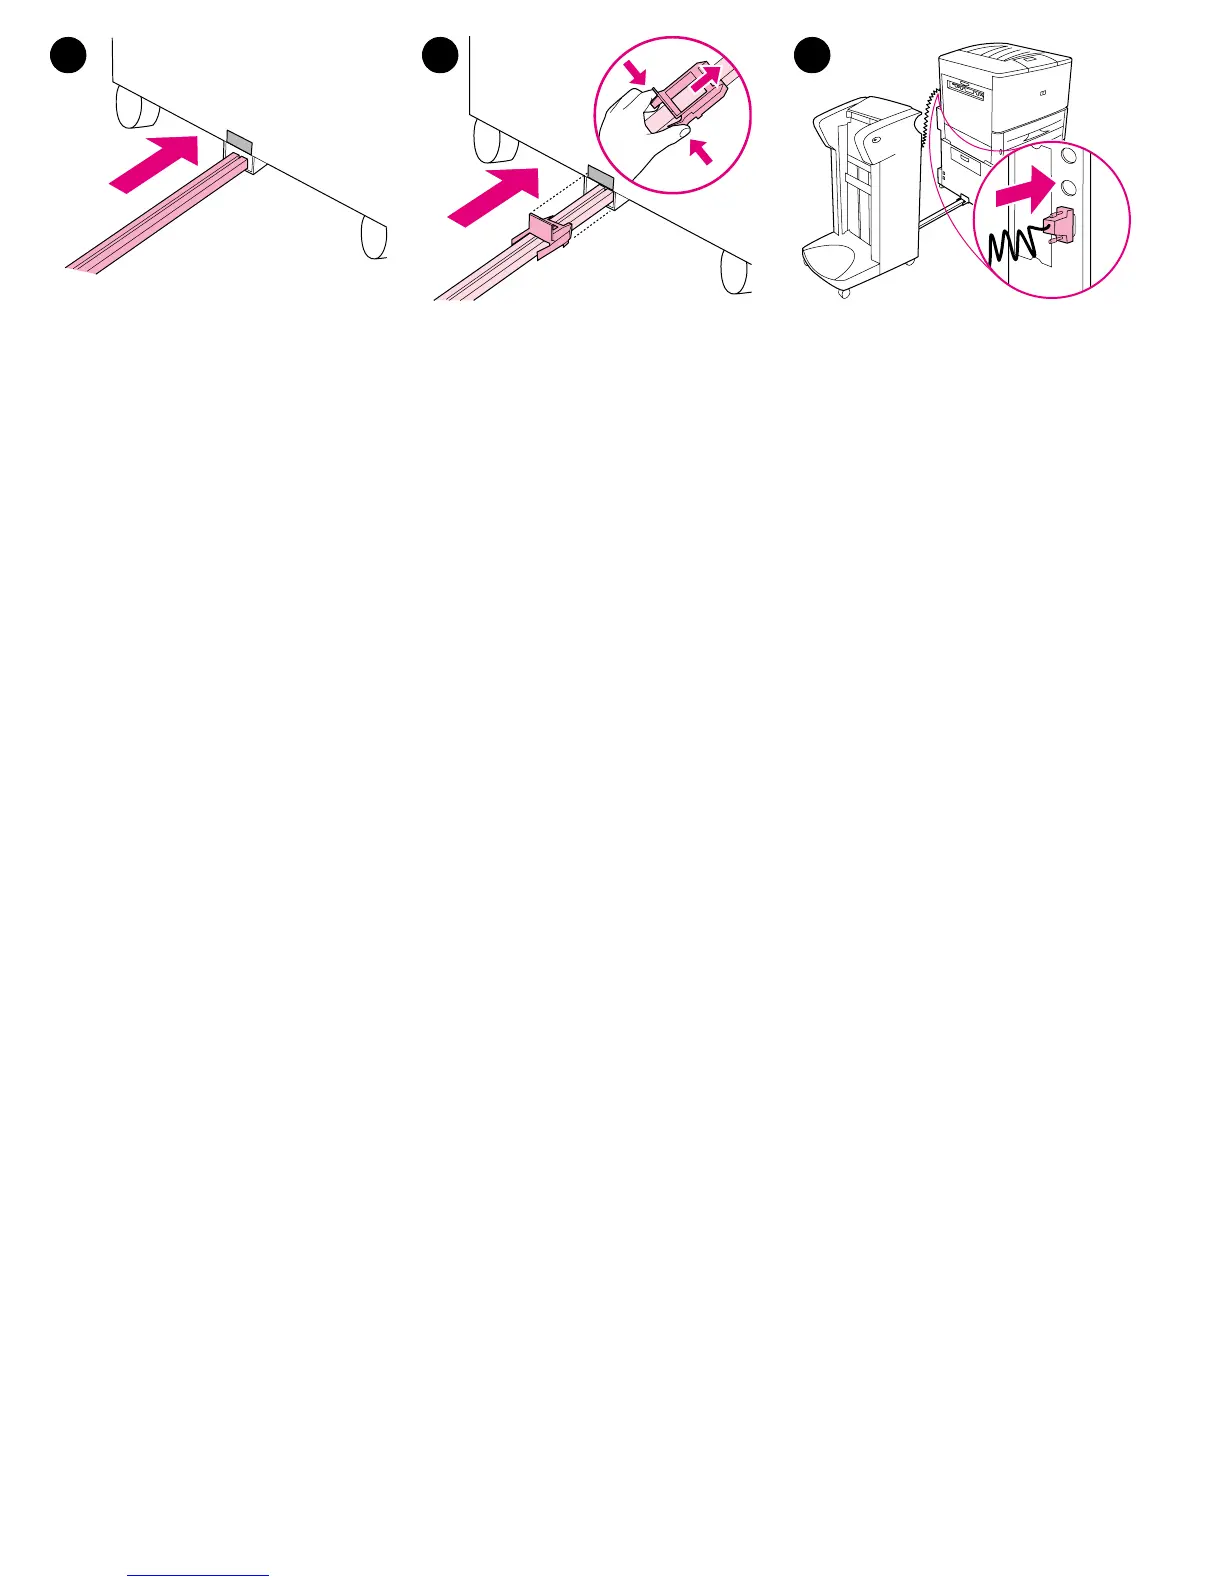
Put the end of the connecting rod into the
U-shaped metal slot on Tray 4 and align the rod
with the gray alignment label.
Slide the blue plastic bracket into the metal slot
until it locks into place. Note: The bracket plate
will cover the gray alignment label on Tray 4.
Securely connect the communication cable to
the printer at the connector labeled
“Accessory”.
Zasuňte konec spojovací tyče do kovového
otvoru ve tvaru U na zásobníku 4 a tyč
vyrovnejte podle šedého vystřeďovacího štítku.
Zasuňte modrou plastovou konzolu do
kovového otvoru, až zaklapne na svém místě.
Poznámka: Destička na konzole zakryje šedý
vystřeďovací štítek na zásobníku 4.
Pevně připojte komunikační kabel k tiskárně do
konektoru, který je označen “Accessory”
(Příslušenství).
Führen Sie das Ende der Verbindungsschiene
in den U-förmigen Metallschlitz an Fach 4 ein,
und richten Sie die Schiene an die graue
Ausrichtungsmarkierung aus.
Schieben Sie die blaue Plastikklammer in den
Metallschlitz, bis sie einrastet. Hinweis: Die
Platte an der Klammer deckt die graue
Ausrichtungsmarkierung an Fach 4 ab.
Stecken Sie das Datenkabel fest in den
Anschluss „Accessory” (Zubehör) am Drucker.
Coloque el extremo de la varilla de conexión
en la ranura metálica en forma de U de la
bandeja 4 y alinee la varilla con la etiqueta gris
de alineación.
Introduzca el soporte azul de plástico en la
ranura metálica hasta que encaje en su sitio.
Nota: La placa del soporte cubrirá la etiqueta
gris de alineación de la bandeja 4.
Conecte correctamente el cable de
comunicaciones a la impresora, en el conector
etiquetado como “Accessory” (Accesorio).
Insérez l'extrémité de la tige de connexion dans
le logement métallique en forme de U du bac 4.
Placez cette tige face à l'étiquette d'alignement
grise.
Introduisez la patte en plastique bleu dans le
logement métallique jusqu'à ce qu'elle soit en
place. Remarque : la plaque de cette patte
recouvre l'étiquette d'alignement grise du
bac 4.
Connectez soigneusement le câble de
communication au connecteur « Accessory »
(Accessoire) de l'imprimante.
Inserire l'estremità della leva di collegamento
nell'alloggiamento di metallo a forma di U sul
Vassoio 4 e allineare la leva all'apposita
etichetta grigia.
Far scorrere la staffa di plastica blu
nell'alloggiamento di metallo fino a quando non
scatta in posizione. Nota: La piastra della staffa
ricoprirà l'etichetta di allineamento grigia sul
Vassoio 4.
Collegare saldamente il cavo di comunicazione
della stampante al connettore con l'etichetta
“Accessory” (Accessorio).
Sæt enden af monteringsstangen ind i den
U-formede holder af metal på Bakke 4, og juster
stangen i forhold til det grå justeringsmærke.
Skub den blå plastikmuffe ind i holderen af metal,
indtil den låses på plads. Bemærk! Muffen
dækker det grå justeringsmærke på Bakke 4.
Tilslut kommunikationskablet forsvarligt i stikket
mærket “Accessory” (Ekstraudstyr) på
printeren.
 Loading...