NOTE: The rear ends of the rails have a bracket that must engage the device chassis to
secure the rear of the chassis to the rails.
4. When cabling the device, use holes provided in the rear rack rails, install tie wraps, and route
external cable as required.
Connecting the Capacity Upgrade Kit to the HP D2D Backup System
HP D2D4100 Series
1. To ensure correct keying, first connect the supplied cable to the P1 connector on the top I/O
module (I/O-A) on the rear of the Capacity Upgrade Kit.
NOTE: Always use the P1 connector; do not use the P2 connector.
2. Connect the other end of the cable to the port labeled "Port 1E" on the RAID PCI-e card on
the rear of the HP D2D Backup System.
3. Use the supplied power cords to connect the Capacity Upgrade Kit to the mains power supply.
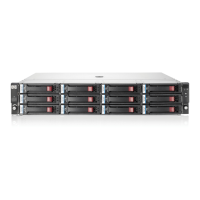
Figure 3 Cabling the Capacity Upgrade Kit to the HP D2D4112 Backup System
2. P1 connector (on I/O-A)1. Power connectors
4. Port 1E connector3. Power on/off button
4. Power on the Capacity Upgrade Kit. You may need to hold down the power on button for a
few seconds.
8 Installing and connecting the Capacity Upgrade Kit