EasyManua.ls Logo

HPM Slimline D810SLIMDP - User Manual

HPM Slimline D810SLIMDP
8 pages
Print Icon
To Next Page IconTo Next Page
Loading...
1
About your Slimline Digital Timer
2
Mechanism Dimensions
Digital Timer
Cat D817SLIM
Instruction Manual
This 7 day digital timer can be set with up to 16
programs. Each of these can be set to repeat
daily, weekly, daily during the working week,
daily on weekends and in a variety of other day
combinations to maximise flexibility.
Additionally this timer has a Random Feature and
Countdown Mode.
This timer has an internal rechargeable battery
to keep your settings in the event of a power
failure. When new, or not used for some time,
the battery may need recharging before you can
setup your timer. Plug the timer in for a few
hours or overnight to recharge the battery.
42mm
25mm
44mm
12mm
118mm
Question and Answer IconNeed help?

Do you have a question about the HPM Slimline D810SLIMDP and is the answer not in the manual?

Summary

About your Slimline Digital Timer

Mechanism Dimensions

Operation Guide

Clock Mode - Setting the Clock

Guidance on setting the current time and day on the digital timer.

Program Mode - Navigating Program Mode

Instructions on how to enter and navigate program settings.

Program Mode - Setting a Program

Detailed steps for setting ON/OFF times and day combinations for programs.

Activate the Timer and Timer Override

Steps to activate automatic operation and understand timer override modes.

Random Feature

Explanation of the Random Feature for unpredictable switching patterns.

Countdown Mode

Guide to setting a delayed ON or OFF switch for a specific duration.

Warranty Information

Customer Support

Overview

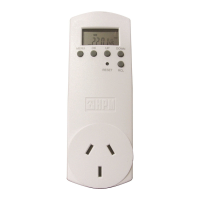
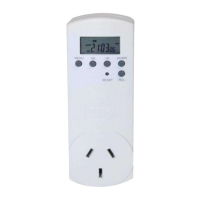
This document describes the HPM Cat D817SLIM Digital Timer, a versatile 7-day programmable timer designed for various electrical devices.

Function Description:

The HPM Digital Timer allows users to automate the switching ON and OFF of electrical devices based on a set schedule. It supports up to 16 distinct programs, offering extensive flexibility in scheduling. The timer is equipped with an internal rechargeable battery, which maintains settings during power outages. For initial use or after prolonged storage, the battery may require recharging by plugging the timer into a power outlet for a few hours or overnight.

Important Technical Specifications:

  • Dimensions: The timer measures 118mm in height, 44mm in width, and 42mm in depth (excluding the plug pins). The display area is approximately 25mm wide.
  • Programs: Up to 16 programmable ON/OFF settings.
  • Scheduling: 7-day programming with various day combinations.
  • Power Source: Internal rechargeable battery for memory retention during power failures.

Usage Features:

The timer operates in three primary modes, accessible by pressing the MENU button:

  1. Clock Mode: Displays the current time and day. This is the default mode and is used for setting the clock and activating special features like Random Mode.
  2. Program Mode: Allows users to view, set, or modify the 16 available program settings.
  3. Countdown Mode: Enables a simple delayed ON or OFF switch, similar to a kitchen timer.

Setting the Clock (Clock Mode):

  • Daylight Savings Time: In Clock Mode, press RCL to toggle between Standard Time and Summer Time (+1h display).
  • Setting Day: Press and hold OK until the days of the week flash. Use UP/DOWN buttons to select the day, then press OK to confirm.
  • Setting Hour: The hour display will flash. Use UP/DOWN buttons to set the current hour, then press OK to confirm.
  • Setting Minutes: The minute display will flash. Use UP/DOWN buttons to set the minutes, then press OK to confirm.
  • Finish: Press MENU to exit clock setting.
  • Hint: You can exit clock setting at any time by pressing MENU if you only need to change the day or hour.
  • Access: Press MENU once from Clock Mode or twice from Countdown Mode.
  • Program Display: The display will show "1 ON" flashing, indicating the first program's ON time.
  • No Time Set: If no days and "--:--:--" are displayed, no time has been set for that program.
  • Deleting/Restoring Programs: Press RCL to delete a programmed time. Press RCL again to restore it.
  • Viewing OFF Times: Press the UP button to switch to "1 OFF" to view the first program's OFF time.
  • Scrolling Programs: Use UP/DOWN buttons to scroll through the 16 program settings.

Setting a Program (Program Mode):

  • Select Program: Use UP/DOWN buttons to scroll to the desired program (e.g., "1 ON").
  • Enter Setting: Press OK to enter the program setting procedure; the day setting will flash.
  • Choose Day Combinations: Use UP/DOWN buttons to select the desired day(s) for the program to operate. Available combinations include:
    • Daily (Monday - Sunday)
    • Monday, Tuesday, Wednesday, Thursday, Friday, Saturday or Sunday
    • Monday - Friday only
    • Monday - Saturday only
    • Saturday & Sunday only
    • Monday - Wednesday only
    • Thursday - Saturday only
    • Monday, Wednesday and Friday only
    • Tuesday, Thursday and Saturday only
    • Scroll through these options to find the best fit.
  • Confirm Day: Press OK to confirm; the hour will flash.
  • Set ON Hour: Use UP/DOWN buttons to set the desired ON hour (e.g., 17:00 for 5:00 PM).
  • Confirm Hour: Press OK to confirm; the minute setting will flash.
  • Set ON Minute: Use UP/DOWN buttons to set the desired ON minute (e.g., 17:15 for 5:15 PM).
  • Confirm Minute: Press OK to confirm; "1 ON" will flash again.
  • Set OFF Time:
    • Press the UP arrow to move to the Program 1 OFF setting.
    • Press OK to enter the setting procedure; the day setting will flash.
    • Use UP/DOWN buttons to choose the OFF days (usually matching ON days, or the following day if remaining ON overnight).
    • Press OK to confirm; the hour will flash.
    • Use UP/DOWN buttons to set the OFF hour (e.g., 19:00 for 7:00 PM).
    • Press OK to confirm; the minute setting will flash.
    • Use UP/DOWN buttons to set the OFF minute (e.g., 19:05 for 7:05 PM).
    • Press OK to confirm.
  • Finish: Press MENU twice to return to Clock Mode, or use UP/DOWN buttons to set other programs.

Activating the Timer and Timer Override:

To enable automatic operation, "AUTO" must be displayed in Clock Mode. Press the UP button in Clock Mode to cycle through four options:

  • ON: Power is continuously supplied to the device, as if directly plugged into the wall.
  • AUTO ON: Power is supplied until the next scheduled OFF time.
  • OFF: Power is not supplied to the device, as if the power point is turned off.
  • AUTO OFF: Power is not supplied until the next scheduled ON time.

Random Feature:

  • Function: Delays preset ON/OFF times by 4 to 32 minutes, creating an unpredictable switching pattern. Ideal for security lighting when on holiday.
  • Activation: In Clock Mode, press the DOWN button once. "RND" will appear on the display.
  • Deactivation: Press the DOWN button again.

Countdown Mode:

  • Function: Sets a delayed ON or OFF switch for a specified duration.
  • Preparation: In Clock Mode, use the UP button to select whether the timer should switch ON or OFF (or AUTO ON/OFF) after the countdown.
  • Access: Press MENU twice to enter Countdown Mode. "CTD" will appear above the seconds.
  • Set Hour: The display shows "0:00:00", and the hour position flashes. Use UP/DOWN buttons to set the hour (0-99). Press OK.
  • Set Minute: The minute position flashes. Use UP/DOWN buttons to set the minute (0-59). Press OK.
  • Set Second: The seconds position flashes. Use UP/DOWN buttons to set the seconds (0-59). Press OK.
  • Start: The timer will immediately begin counting down, and "CTD" will flash. The display returns to Clock Mode after 2 minutes.
  • Override: Countdown Mode overrides all programmed settings and the Random Feature.
  • Cancel: Scroll to the Countdown Mode display and press RCL. Note: Pressing RCL in Clock Mode adjusts Daylight Savings, so ensure you are in Countdown Mode to cancel.

Maintenance Features:

  • Battery Recharging: The internal rechargeable battery requires occasional recharging. If the timer is new or has been unused for some time, plug it in for a few hours or overnight to ensure the battery is charged before setup.
  • Safety Recommendation: For maintenance tasks (e.g., replacing a globe), HPM recommends unplugging the timer from the wall and using the device's OFF switch.

This comprehensive digital timer provides a robust solution for automating various household or office devices, enhancing convenience and energy management.

HPM Slimline D810SLIMDP Specifications

General IconGeneral
BrandHPM
ModelSlimline D810SLIMDP
CategoryTimer
LanguageEnglish

Related product manuals