EasyManua.ls Logo

HPM Slimline Digital Timer D817SLIM - User Manual

HPM Slimline Digital Timer D817SLIM
8 pages
Print Icon
To Next Page IconTo Next Page
Loading...
1
About your Slimline Digital Timer
2
Mechanism Dimensions
Digital Timer
Cat. No. D817SLIM
Instruction Manual
This 7 day digital timer can be set with up to 16
programs. Each of these can be set to repeat daily,
weekly, daily during the working week, daily on
weekends and in a variety of other day combinations
to maximise exibility.
Additionally this timer has a Random Feature and
Countdown Mode.
This timer has an internal rechargeable battery
to keep your settings in the event of a power failure.
When new, or not used for some time,
the battery may need recharging before you can setup
your timer. Plug the timer in for a few
hours or overnight to recharge the battery.
42mm
25mm
44mm
12mm
118mm
3
Operation
HPM recommends you keep these instructions for
future reference.
Setting a digital timer can be confusing at rst.
Essentially there are 3 steps:
1. Set the clock.
2. Setup your switching programs.
3. Put in AUTO mode and plug in your device.
The timer has 3 modes. Press the MENU button to
change from one mode to the next.
To return to clock mode from Program Setting Mode, press MENU twice.
To return to clock mode from Countdown Mode, press MENU once.
1. Clock Mode –
The screen will display the
current time and day.
2. Program Mode –
Enables you to scroll
through to view or set the
16 program settings.
3. Countdown Mode –
Enables you to simply set
the timer to turn ON or
OFF at a later time.
MENU
UP
RCL
OK
DOWN
RESET
15:43
WE
P
1
ON
10:59
25
WE
AUTO
OFF
+1h
0:00
00
AUTO
OFF
OTD
+1h
A
Clock Mode - Setting the Clock
B
Program Mode – Navigating Program Mode
(i) Hold the ok button until the day of the week ashes
– press the up button to cycle through and select
the day that it is then press ok.
(ii) Set the hours for the current time – press ok
– set the minutes then press ok then press menu
(iii) On the clock screen there 4 options for the mode
– press the up button to cycle through the modes
(iv) On – straight override - power on all the time
(v) O – override o – no power
(vi)
Auto On – Is a temporary override where the unit gives
power until the program starts. Its used once off then the
unit continues on with the program – example if connected
to a light and its 6pm, youre setting the timer for 7, this
mode will turn the light on until the program starts then
continues to turn off and on as per the program
(vii) Auto o- is straight timer mode. Turns the unit on and
o per the timer programs
Press menu – 1on will ash – this is to set the on program
time
Press ok then the days of the week will ash. If timer is to be
used for all days of the week press ok or press up to cycle
through the options ie single days or monday wednesday
friday.
Press ok then set the hours for the on time – press ok and set
the minutes for the on time. Press ok once done and the 1on
will ash again. Press up and it will change to 1o
Press ok then the days of the week will ash. If timer is to be
used for all days of the week press ok or press up to cycle through the options ie single days,
monday wednesday friday or just saturday sunday etc.
Press ok then set the hours for the o time – press ok and set the minutes for the on
time. Press ok once done and the 1o will ash again.
If you want to set a second program, press up and 2on will ash. This is the 2nd on
program, follow the above steps to set the 2on time then set the 2o time and so on
upto 16 programs.
Customer Service
For all customer service and
technical support enquiries please
call Monday to Friday during
business hours.
Legrand Australia
1300 369 777
www.hpm.com.au
Legrand - New Zealand
0800 476 009
www.hpm.co.nz
Warranty
Legrand warrants this product for a period of 1 year
from the date of purchase.
These goods come with guarantees that cannot be
excluded under the Australian and New Zealand
Consumer Laws. You are entitled to a replacement
or a refund for a major failure and for compensation
for any other reasonably foreseeable loss or damage.
You are also entitled to have the goods repaired if
the goods fail to be acceptable quality and the failure
does not amount to a major failure.
See the Warranty card enclosed with this product
for further details.
25521B
Question and Answer IconNeed help?

Do you have a question about the HPM Slimline Digital Timer D817SLIM and is the answer not in the manual?

Summary

About your Slimline Digital Timer

Mechanism Dimensions

Operation

Clock Mode - Setting the Clock

Details on how to set the current time and day on the timer display.

Program Mode - Navigating Program Mode

Guidance on navigating to view or set up to 16 switching programs.

Activate the Timer and Timer Override

Covers activating AUTO mode and understanding ON, AUTO ON, OFF, AUTO OFF overrides.

Random Feature

Explains the Random Feature to vary ON/OFF times by 4-32 minutes.

Countdown Mode

Instructions for setting a delayed ON or OFF switching event.

Deleting Programs

Steps to reset all programs or delete individual timer settings.

Troubleshooting

Addresses common issues like incorrect timing, random function interference, and compatibility.

Warranty

Customer Service

Overview

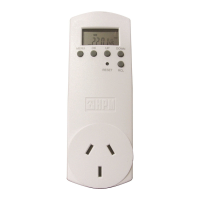
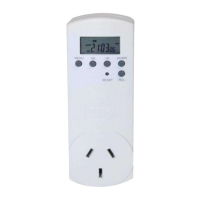
This document describes the HPM Digital Timer, Cat. No. D817SLIM, a 7-day digital timer designed for controlling electrical devices with precision and flexibility.

Function Description

The HPM Digital Timer is a programmable device that allows users to automate the switching ON and OFF of connected electrical appliances. It supports up to 16 distinct programs, each of which can be configured to repeat daily, weekly, daily during the working week, daily on weekends, or in various other day combinations. This extensive programmability provides users with significant control over their devices' operating schedules.

Beyond basic scheduling, the timer includes a "Random Feature" and a "Countdown Mode." The Random Feature introduces a variable delay to the preset ON and OFF times, ranging from 4 to 32 minutes. This functionality is particularly useful for creating an impression of occupancy when users are away, as it makes the switching pattern unpredictable. The Countdown Mode, on the other hand, functions like a kitchen timer, allowing users to set a delayed ON or OFF switch after a specified duration, rather than triggering an alarm.

The timer is equipped with an internal rechargeable battery. This battery serves as a backup, preserving all programmed settings in the event of a power failure. When the timer is new or has been unused for an extended period, the battery may require recharging. Users are advised to plug the timer into a power outlet for a few hours or overnight to ensure the battery is fully charged before setting up the timer.

Usage Features

Operating the HPM Digital Timer involves three primary steps: setting the clock, configuring switching programs, and activating the "AUTO" mode. The timer offers three distinct modes, accessible by pressing the "MENU" button:

  1. Clock Mode: In this mode, the timer displays the current time and day. Setting the clock involves holding the "OK" button until the day of the week flashes, then using the "UP" button to select the correct day, followed by pressing "OK." The hours and minutes are set similarly. Within Clock Mode, there are also options for immediate override:

    • ON (Straight Override): Provides continuous power to the connected device.
    • OFF (Override Off): Cuts power to the connected device.
    • AUTO ON (Temporary Override): Supplies power until the next scheduled program starts, then reverts to the programmed schedule. For example, if a light is connected and it's 6 PM, and the timer is set to turn on at 7 PM, this mode will turn the light on immediately and keep it on until 7 PM, after which it will follow the program.
    • AUTO OFF (Straight Timer Mode): The unit operates according to the programmed timer schedules.
  2. Program Mode: This mode allows users to view and set the 16 available program settings. To set an "ON" program time, users press "MENU" until "1on" flashes. Pressing "OK" makes the days of the week flash, allowing selection of specific days or combinations (e.g., all days, single days, Monday-Wednesday-Friday, or Saturday-Sunday). After selecting the days, users set the hours and minutes for the "ON" time, confirming each step with "OK." The "1on" indicator will flash again. Pressing "UP" changes it to "1off," allowing users to set the corresponding "OFF" time using the same procedure. To set additional programs (up to 16), users press "UP" to cycle to "2on," "3on," and so on, repeating the setting steps for each program.

  3. Countdown Mode: This mode enables users to set a specific duration after which the timer will either turn a device ON or OFF. To access this mode, users press "MENU" twice. The display will show "CTD" above the seconds. Before setting the countdown time, users choose whether the timer should switch ON or OFF after the elapsed time. The display initially shows "0:00:00," with the hour position flashing. Users adjust the hours (0-99) using the "UP" and "DOWN" buttons, then press "OK" to move to minutes (0-59), and again for seconds (0-59). Once confirmed, the timer begins counting down, and "CTD" flashes. After two minutes, the display returns to Clock Mode. Countdown Mode takes precedence over programmed settings and the Random Feature. To cancel a countdown, users navigate back to the Countdown Mode display and press "RCL."

To ensure the timer operates automatically according to the set programs, the word "AUTO" must be displayed in Clock Mode. Users can scroll through various power options (ON, OFF, AUTO ON, AUTO OFF) using the "UP" button in Clock Mode.

Maintenance Features

The HPM Digital Timer includes features for managing and troubleshooting programs:

  • Deleting Programs:

    • To delete all pre-programmed settings: Press the "RESET" button. Note that this will also require resetting the clock.
    • To delete an individual timer setting: Re-program the specific block so that the start and finish times are identical. Alternatively, scroll to the desired block, press the "MODE" button (the display will change to "--:--"), and to retrieve the setting, press "MODE" again.
  • Troubleshooting:

    • Timer not turning off: If only one program is used, verify its settings. Also, check if "program 2on" is inadvertently set (it should show "--:--" if not used; "0:00" indicates it's set for midnight and could interfere).
    • Timer not turning on: Ensure the connected device is switched ON and the powerpoint switch is ON. To check for compatibility issues, cycle through the modes in Clock Mode using the "UP" button. If selecting "ON" does not power the device, it may not be compatible.
    • Unit turning on/off later than programmed: Verify that the "Random Feature" ("RND" will be displayed above the seconds in Clock Mode) is not active. If it is, press the "DOWN" button to toggle it off or on.
    • General operation: For the timer to run, it must be in "AUTO ON" or "AUTO OFF" mode, which can be changed by pressing "UP" in Clock Mode.

The internal rechargeable battery is designed to maintain settings during power outages, reducing the need for frequent re-programming. Initial charging or recharging after extended disuse is a simple process of plugging the unit into a power outlet.

For safety, HPM recommends unplugging the timer from the wall and using the device's OFF switch when performing maintenance tasks, such as replacing a light globe. This emphasizes a safe practice beyond the timer's internal OFF setting.

HPM Slimline Digital Timer D817SLIM Specifications

General IconGeneral
TypeDigital Timer
ModelD817SLIM
BrandHPM
DesignSlimline
Voltage Rating240V
Current Rating10A
DisplayLCD
Battery BackupYes
MountingPlug-in
Operating Voltage230-240V AC

Related product manuals