This document is an instruction manual for the HQUA-FS01, a 1/2 HP Floating Fountain designed for pond aeration.
Function Description
The HQUA-FS01 is a floating fountain system primarily used for aerating ponds. It creates a beautiful crown pattern spray, offering a 3-stage fountain effect. The system is designed to provide aeration for ponds up to 1/4 acre and 6 feet deep. For larger ponds, multiple fountains or HQUA's dedicated aeration systems (SWA20, PAS10, PAS20) are recommended. The fountain operates by pumping water through a special nozzle design, creating a decorative and functional water display that helps improve water quality through aeration.
Important Technical Specifications
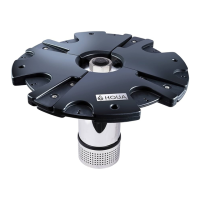
The HQUA-FS01 system comprises three main components: the Floating Fountain Pump (HQUA-FS01P), the Float Plate (HQUA-FS01F), and Electric Parts.
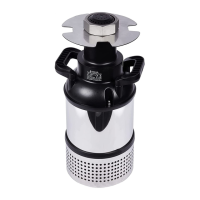
Floating Fountain Pump (HQUA-FS01P):
- Motor Type: Asynchronous Water Cooled Motor with Stainless Steel Shaft Bearing.
- Efficiency: Energy Efficient, Fully Sealed Motor.
- Electrical Specifications: 5.8A, 620W, 100-120V.
- Construction: Stainless Steel Suction Screen & Body.
- Operating Depth: Operates in a minimum of 40 inches of water depth.
- Aeration Capacity: Provides aeration for ponds up to 1/4 acre, 6 feet deep.
Float Plate (HQUA-FS01F):
- Material: Durable HDPE materials, designed for excellent weather resistance.
- Design: Great air tightness, providing sufficient buoyancy to support the pump body.
Electric Parts:
- Power Cord: 100-foot weatherproof, 4-pin power cord, described as durable and reliable.
- Connection Box: Weatherproof connection electric box, containing a capacitor.
- Plug: Standard 3-pin plug.
Overall System Specifications (FS01):
- HP: 1/2 HP
- Max Amps: 5.8 Amps
- Volts: 110V
- Power Cord Length: 100 feet
- Max Pond Size: 1/2 Acre
- Minimum Depth: 40 inches
- Pattern Size: 7 feet (height) × 30 feet (width)
Usage Features
Installation:
The installation process is designed to be straightforward, though it requires careful attention to safety and proper grounding.
- Float Plate Assembly: The two blocks of the float plate are pre-assembled, requiring the user to complete the full assembly of the float plate.
- Rope Attachment: Two carabiners are used to fix the rope onto the float plate.
- Pump and Nozzle Assembly:
- Lay the float plate on the ground with the HQUA logo facing up.
- Place the fountain pump into the center of the float, ensuring the wire is covered by the float.
- Assemble accessories in a specific order: "puzzle plate," gasket, thread fastener, nozzle, and finally, another fastener.
- Lift the float straight up, ensuring the cord is under the float, and place it at the water's edge.
- Mooring: The other side of the rope is fixed to stakes using cable clamps. The stakes are then secured. Cable clamps can be adjusted later to fine-tune the float's position.
- Placement and Adjustment: The entire fountain assembly is placed into the water. Ropes are adjusted using carabiners, or a boat can be used to position the fountain ideally in the pond. The ropes are adjusted by loosening cable clamps, threading them through stake holes, and dragging until the desired length is achieved. This process is repeated to create a triangular mooring pattern with the wires and two cables.
- Power Connection: Connect the power supply to an outlet timer.
Safety Precautions:
- Electric Shock Prevention: Connect only to a properly grounded, grounding-type outlet. Use a ground fault circuit interrupter (GFCI) protected circuit. Disconnect power before anyone enters the water. The fountain is not intended for use in swimming pool areas.
- Operation: NEVER run the unit out of water, as this can damage the motor and create a dangerous situation.
- Handling: NEVER lift or drag the fountain by the power cord; use the provided fixed rope for lifting and carrying.
- Installation Safety: When installing from a boat or raft, ALWAYS wear a Coast Guard-approved life jacket. ALWAYS use a qualified electrician to install a power source near the pond. The product must be grounded to reduce the risk of electric shock.
Maintenance Features
Regular Maintenance:
- Unplugging: Always unplug the system before performing any maintenance or troubleshooting.
- Professional Servicing: Unplug the system and refer servicing to a qualified electrician if the cord is damaged or frayed, or if electrical components (compressor, power control, compressor fan) produce unusual noises or odors.
- Intake Screen Cleaning: Periodically clean the fountain intake screen of debris, algae, and aquatic weeds. This monthly check helps extend the pump's lifetime.
Winter Removal & Storage:
- Removal: Remove the fountain from the pond before ice begins to form.
- Cleaning: Clean or power wash any debris from the unit before storing it for winter.
Spring Installation Inspection:
- Cord Check: Before re-installing the fountain and lights in the spring, check the condition of the power cord for any damage.
Troubleshooting Guide:
The manual provides a comprehensive troubleshooting section for common issues:
Warranty Information:
- Two-Years Limited Warranty for HQUA FS01 Floating Fountain: Covers defects in material and workmanship for 2 years from the purchase date. HQUA will repair or replace defective HQUA UV chambers (note: the manual mentions "UV chamber" here, which might be a typo and should likely refer to the fountain pump or system components, as UV chambers are typically for disinfection systems). Defective parts should be returned to the dealer for claims.
- Five-Years Limited Warranty for HQUA-FS01F Float: Covers defects in the float for 5 years. HQUA will repair or replace defective HQUA UV chambers (again, likely a typo for float or fountain components). Defective parts should be returned to the dealer for claims.